SSOGEN / Add a SAML identity provider in SSOGEN
SSOGEN
Add a SAML identity provider in SSOGEN
Copy the entity ID, ACS URL and metadata address to the provider, import its metadata, map attributes, then validate, test and activate.
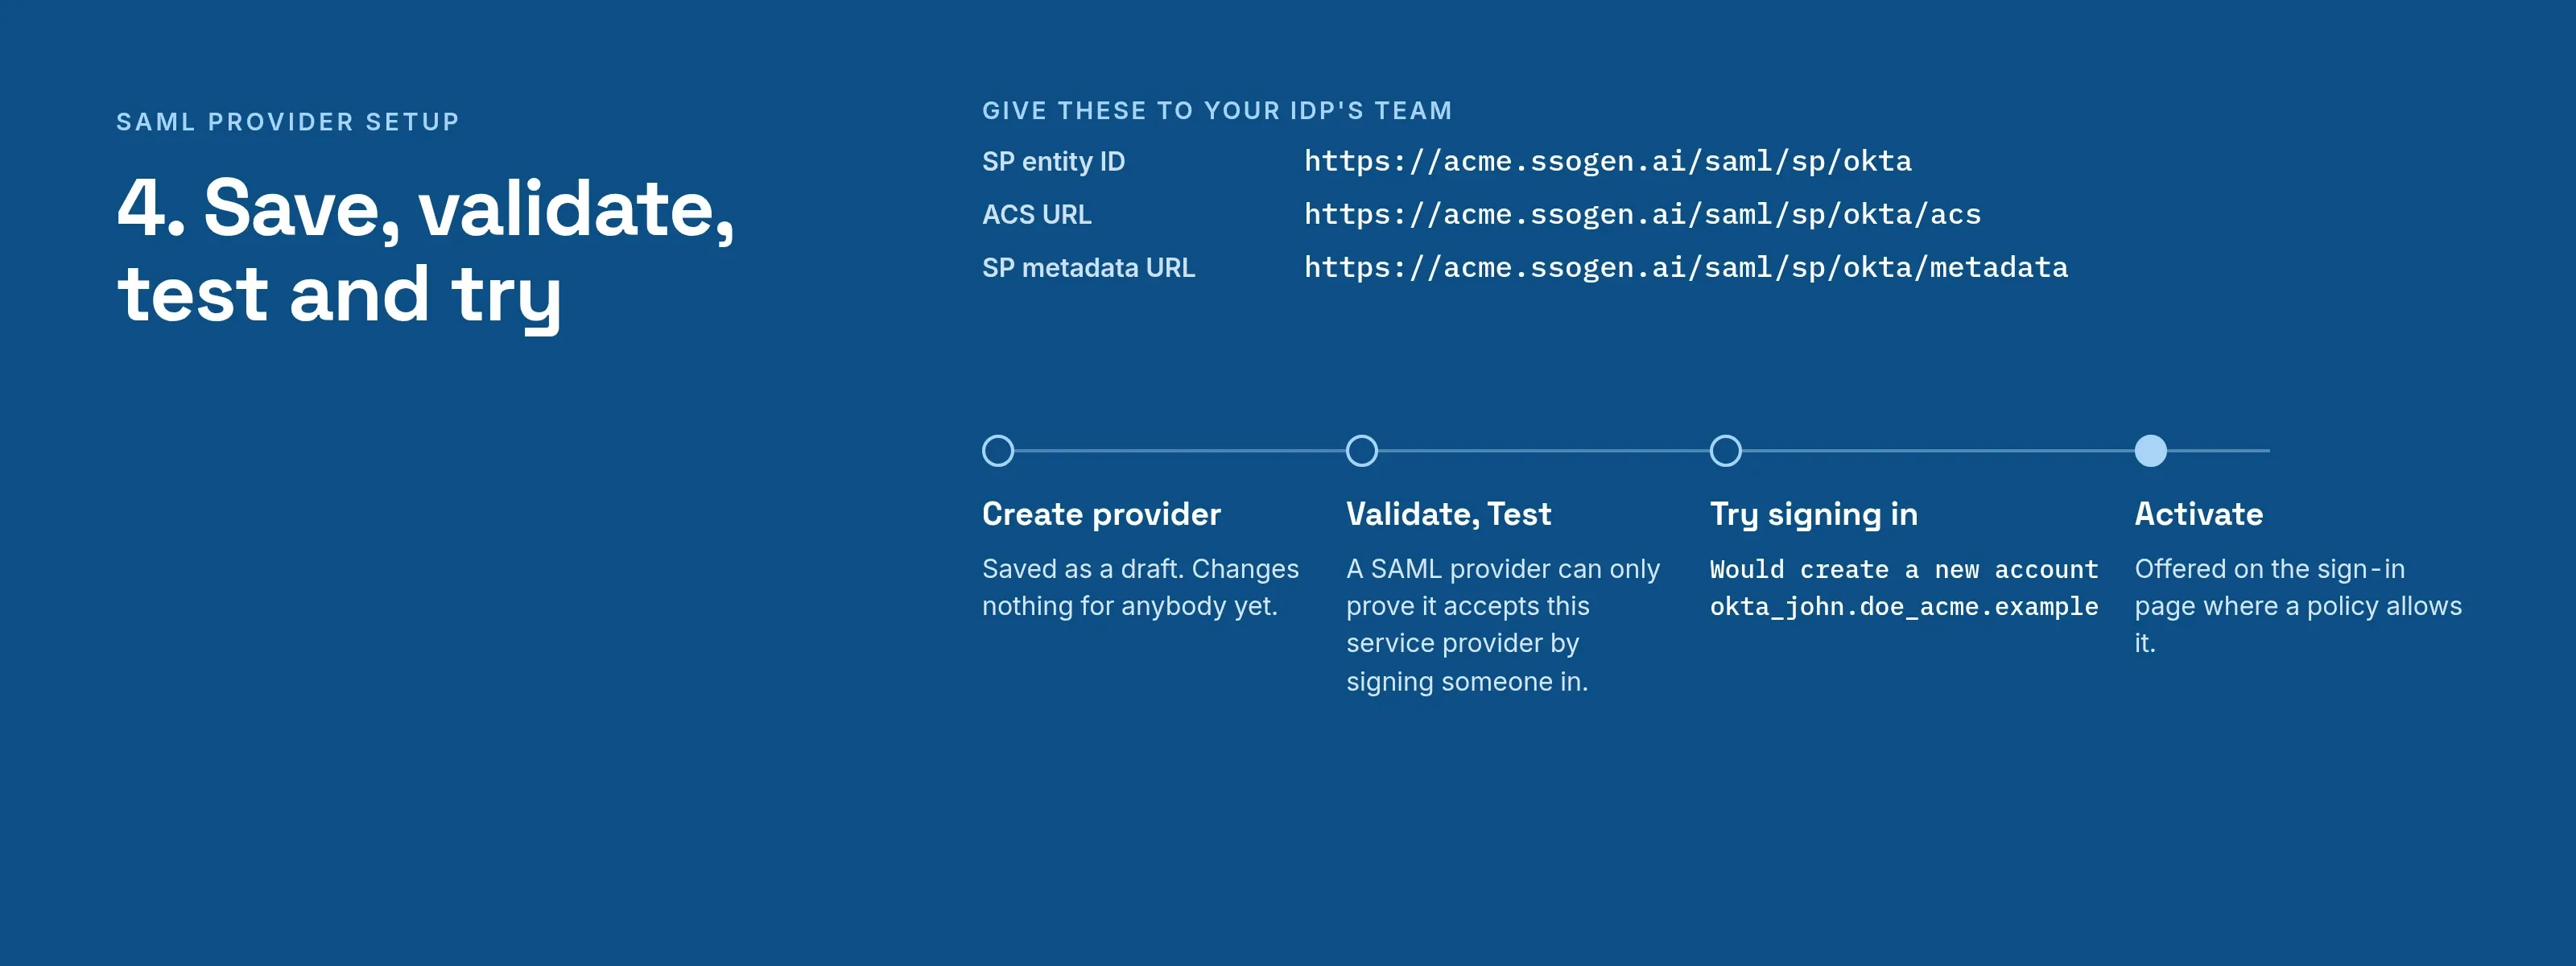
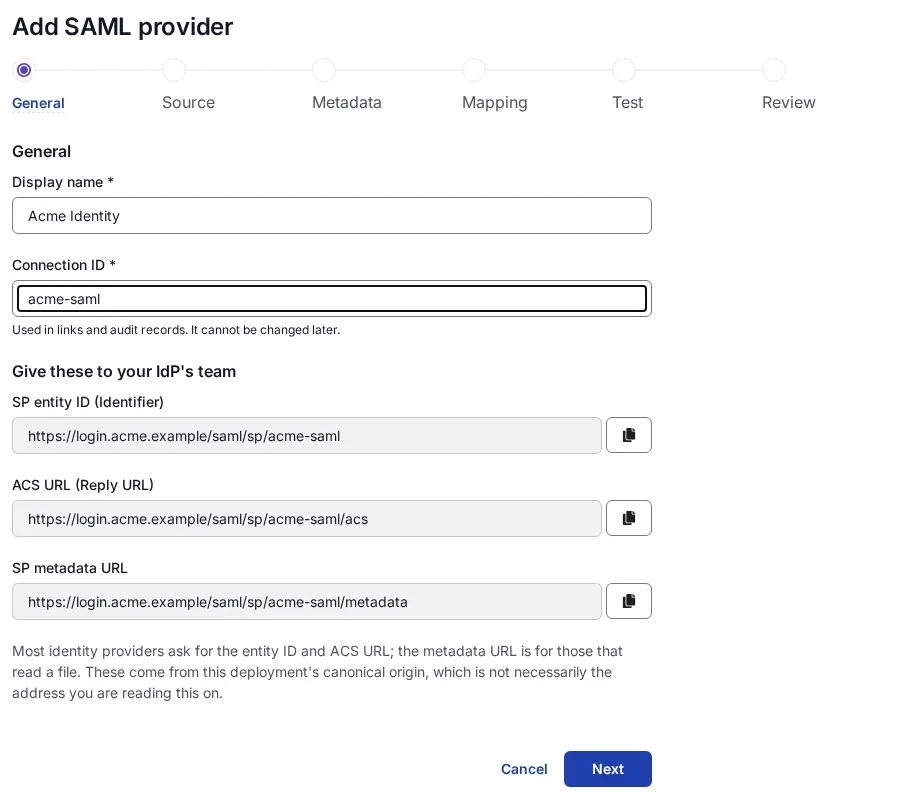
The examples use an SSOGEN at https://acme.ssogen.ai and a connection ID of okta. Your own values appear on screen as soon as you type your connection ID.
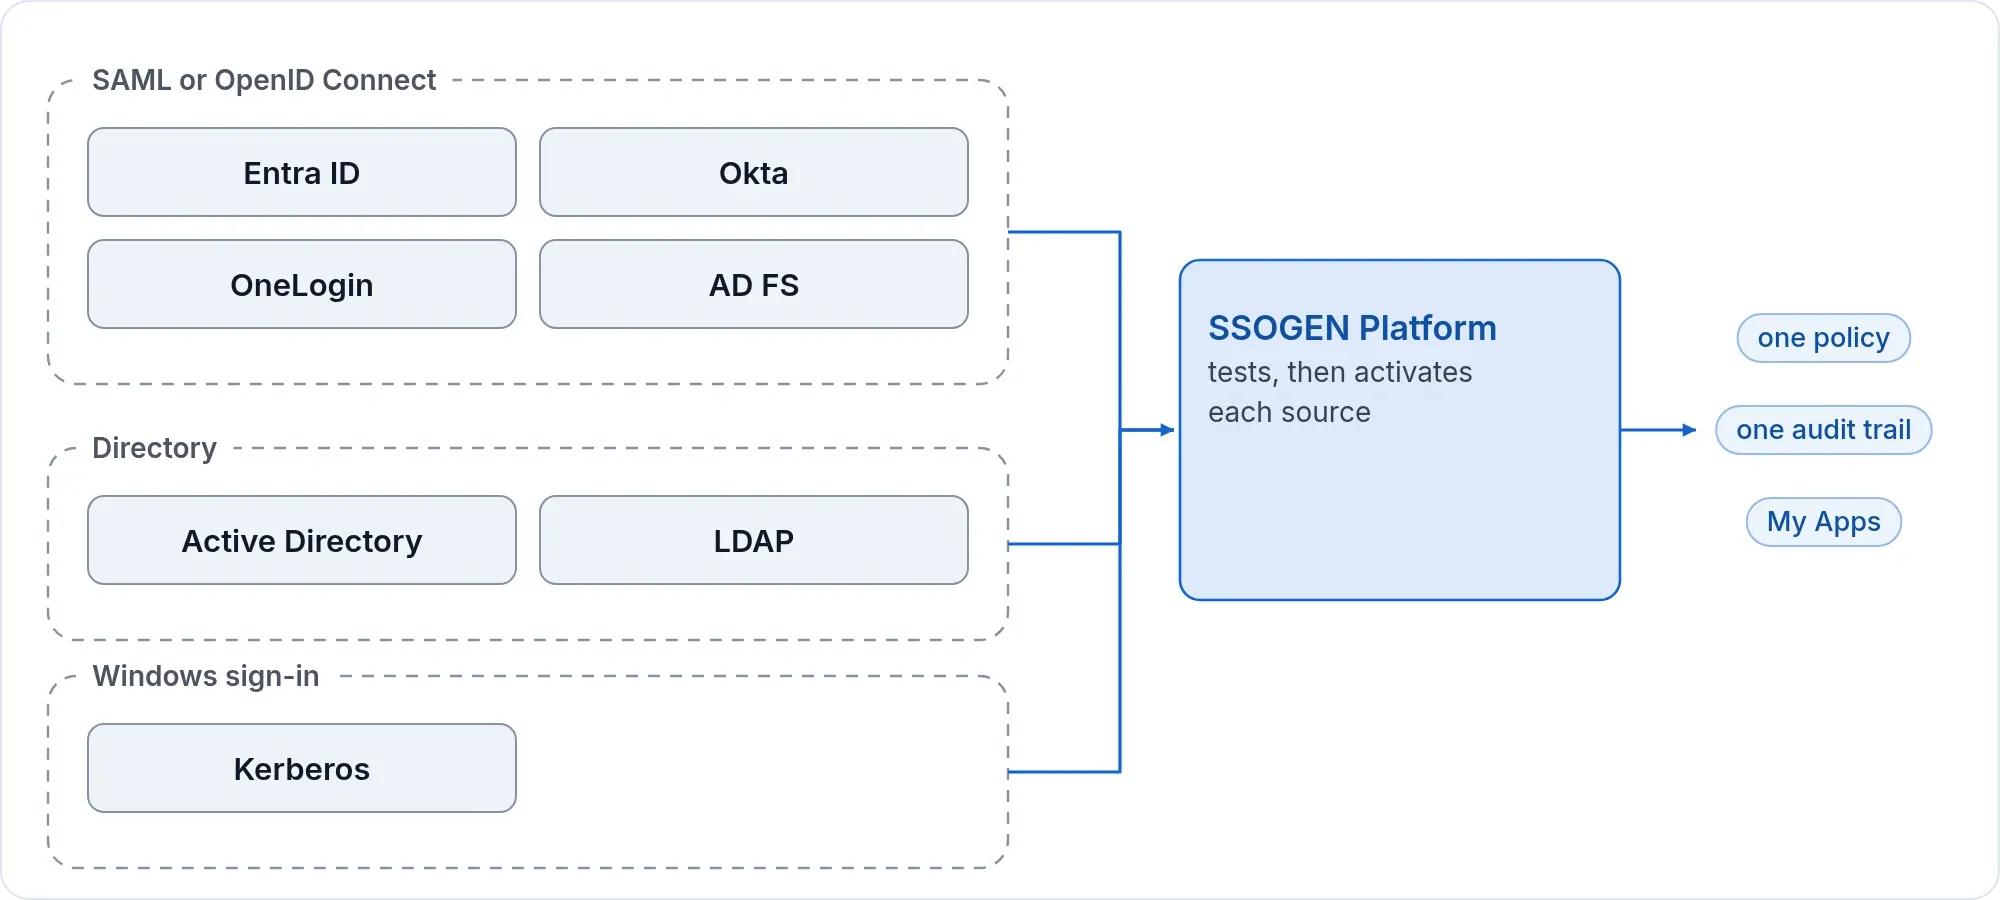
The provider’s side is on its own page, for example AD FS, Okta or any SAML 2.0 provider. All providers are listed under sign-in sources.
What you need
- An SSOGEN administrator with the Super admin or Authentication admin role. Only a Super admin can turn on joining existing accounts by email address, and only a Super admin can activate a provider that administrators sign in through.
- An administrator of the identity provider, for the two hand-overs below.
- Any custom attribute you want to fill from the assertion, already defined under Identity > Attributes.
1. Start the setup and copy the three values
- In the Admin Console open SSO policies > Identity providers and select Add identity provider.
- Choose the provider’s card (for example Okta, OneLogin, Microsoft Entra ID, Ping Identity, Google Cloud Identity, Keycloak). A provider that offers both protocols asks “How should people sign in with name?”: choose SAML and Continue. For any other provider, choose the SAML tile under Generic SAML / OpenID Connect / Directory (LDAP).
- The page Add SAML provider opens with six steps: General, Metadata source, Review metadata, Mapping, Test sign-in, Review and activate.
- On General, type a Display name (what people see on the sign-in page, for example
Acme Okta) and a Connection ID (lowercase letters, numbers and hyphens, at most 64 characters, for exampleokta). The connection ID cannot be changed later, and every value below contains it.
The box Give these to your IdP’s team now shows three values, each with a copy button:
| Label on screen | Example | What the provider calls it |
|---|---|---|
| SP entity ID (Identifier) | https://acme.ssogen.ai/saml/sp/okta |
Audience, Audience URI, Entity ID, Identifier, Relying party identifier |
| ACS URL (Reply URL) | https://acme.ssogen.ai/saml/sp/okta/acs |
Single sign-on URL, Reply URL, Assertion Consumer Service URL, Recipient. HTTP-POST binding. |
| SP metadata URL | https://acme.ssogen.ai/saml/sp/okta/metadata |
For providers that import a metadata address or file |
The values come from the address your SSOGEN was set up with, not from the address in your browser, so copy them from the screen rather than building them by hand. Most providers need only the entity ID and the ACS URL. The SP metadata URL answers only after you press Create provider (step 5 below); give it to the provider’s team after that.
Keep this tab open and set up the provider’s side now, using the steps on the provider’s page. Come back with the provider’s metadata: an address, a downloaded file, or the XML text.
2. Give SSOGEN the provider’s metadata
On Metadata source, answer How will you provide IdP metadata?:
| Choice | What you do | When |
|---|---|---|
| Metadata URL | Paste the address in Metadata URL (https) and select Fetch metadata. | The provider publishes metadata at an https:// address that SSOGEN’s server can reach. The address is kept so you can fetch it again when the provider changes its certificate. |
| Metadata file upload | Choose the XML file under Metadata file. | You downloaded the file from the provider, or the provider sits on a private network SSOGEN cannot reach. |
| Paste metadata XML | Paste the XML into Metadata XML and select Parse metadata. | You copied the XML text. |
| Manual configuration | Type the IdP entity ID on the next step. | Not recommended: SSOGEN then holds no signing certificate and activation fails. |
SSOGEN’s server, not your browser, fetches a metadata URL. It refuses an address that is not https:// or that points into a private network: upload the file instead.
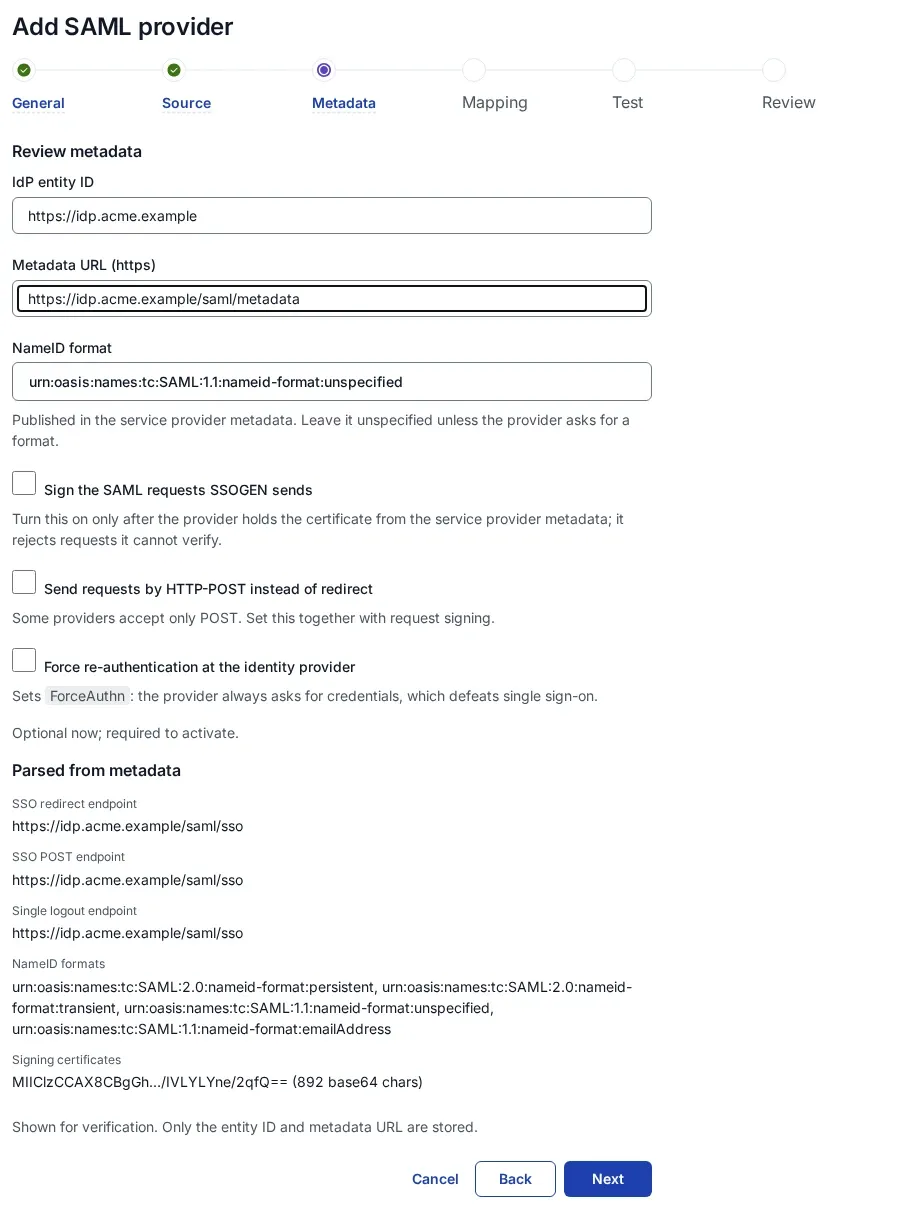
On Review metadata, check what was read:
- IdP entity ID: the provider’s own name, filled in from the metadata. It may be an
https://address, anhttp://address or aurn:name; SSOGEN only compares it with the issuer in each assertion. - Parsed from metadata: check that it lists an SSO redirect endpoint and at least one Signing certificate.
- NameID format: leave it as
urn:oasis:names:tc:SAML:1.1:nameid-format:unspecifiedunless you set a specific format at the provider; then choose the same format here, because SSOGEN asks for this format on every request. - Sign the SAML requests SSOGEN sends (off), Send requests by HTTP-POST instead of redirect (off) and Force re-authentication at the identity provider (off): leave them off for the first sign-in. Turn request signing on only after the provider holds the certificate from SSOGEN’s metadata.
What SSOGEN always does, whatever the settings: it requires the assertion itself to be signed by the provider and checks the signature against the certificates from the metadata; it checks the audience, the destination, the times (five minutes of clock difference allowed) and that an assertion is used only once. It also accepts encrypted assertions: its metadata offers a certificate for encryption, and the provider may use it.
3. Map the attributes
On Mapping:
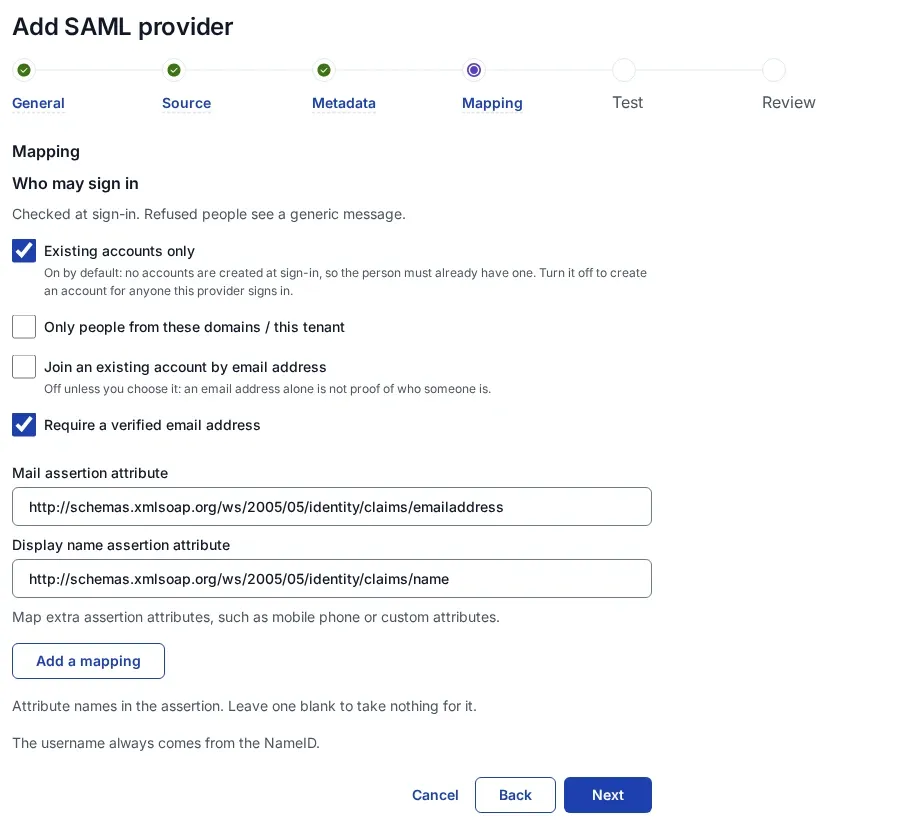
| Field | Default | What to type |
|---|---|---|
| Mail assertion attribute | http://schemas.xmlsoap.org/ws/2005/05/identity/claims/emailaddress |
The exact attribute name your provider sends for the email address |
| Display name assertion attribute | http://schemas.xmlsoap.org/ws/2005/05/identity/claims/name |
The attribute name for the full name |
| Add a mapping | none | Another attribute kept as Mobile phone or as a custom attribute (up to 32 rows) |
The defaults are the names Microsoft Entra ID and AD FS send. If a field is left empty, SSOGEN still recognizes the usual names for it, such as mail and email for the address.
The SSOGEN username of a person created at first sign-in is built from the connection ID and the assertion’s subject (the NameID): lowercased, with every character other than letters, digits, ., _ and - replaced by _. A NameID of john.doe@acme.example on the connection okta gives the username okta_john.doe_acme.example.
The NameID is also what recognizes the same person next time, so choose one at the provider that is stable and unique per person, such as the user principal name or the email address. If a person’s NameID changes, SSOGEN sees a new person.
The same page starts with Who may sign in. Read section 6 before the first real sign-in; you can set it here or later on the provider’s page.
4. Save, validate, test and try
- On Test sign-in, select Create provider. The provider is saved as a draft and changes nothing for anybody yet.
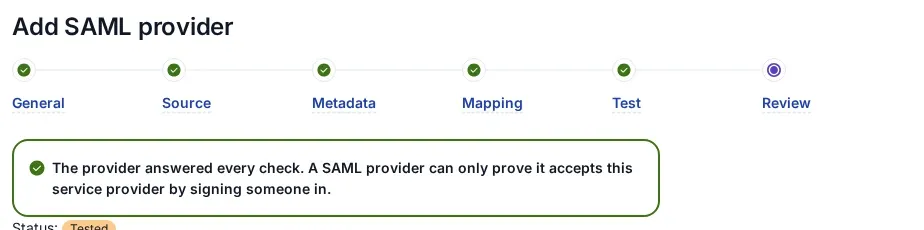
- On Review and activate, select Validate, then Test. Test reads the provider’s metadata and checks the entity ID, the sign-in endpoint and the certificates. It cannot prove the sign-in itself: “A SAML provider can only prove it accepts this service provider by signing someone in.”
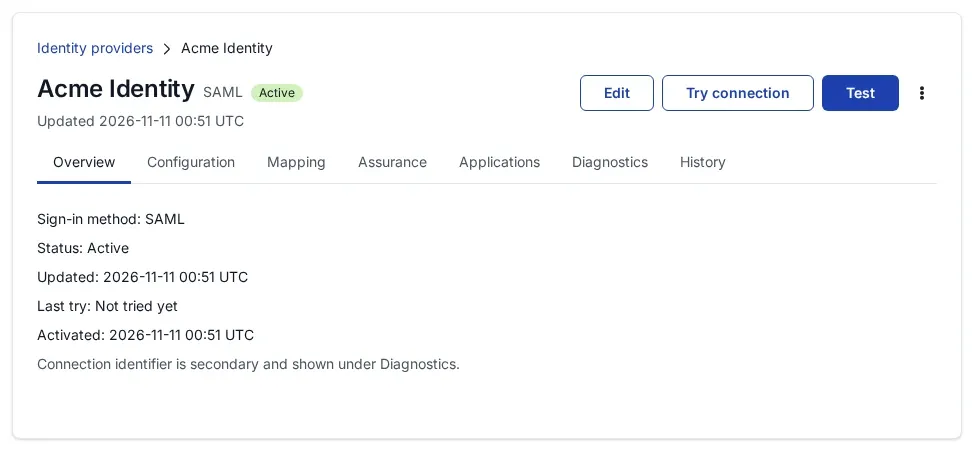
- Select Try signing in (on the provider’s page it is Try connection). A new tab opens at the provider. Sign in as a test person, in a private window or as someone not already signed in at the provider. SSOGEN shows what it received and what it would do, for example “Would create a new account okta_john.doe_acme.example” or “Would be refused”, and creates nothing. A test sign-in lasts five minutes.
- Select Activate. The provider can now be offered on the sign-in page.
5. Offer it on the sign-in page
A provider is offered where a policy allows it. Open SSO policies > Policies, open the policy that applies (the one chosen on the application, or the default policy under SSO policies > Defaults for My Apps), and in the Requirements step, under First factor, tick Single sign-on with an external provider and the provider. With no default policy set, My Apps offers every active provider. See Create an authentication policy and assign it.
On the provider’s Configuration tab you can also set:
- Sign-in order and Sign-in domains: a person who types an address at one of these email domains, for example
acme.example, is sent straight to this provider. - New people from this provider: the user type and group for accounts it creates.
- Second factor after sign-in with this provider: whether a multi-factor sign-in at the provider counts, or SSOGEN asks for its own second factor. A new provider starts at Always ask for SSOGEN’s second factor.
6. Who may sign in, and the first sign-in
Every SAML provider carries a sign-in restriction, checked at every sign-in before anyone gets an account or a session. Change it on the provider’s Configuration tab, section Sign-in restriction, then Save sign-in restriction. On a provider already in use, saving creates a revision, tests it and activates it; if the test fails, nothing changes.
Who may sign in has two choices:
- Only people already linked to this provider (the default). A person is linked by signing in through the provider. A new provider has nobody linked, so with this choice alone nobody can sign in, including people who already have an account in SSOGEN. SSOGEN never matches an existing account by its username.
- Anyone this provider vouches for (a new account is created). Each person gets an account at their first sign-in, named as in section 3, with the email and name from the mapped attributes.
Required claims narrow either choice. Name an attribute the provider sends and the values you allow, for example the Entra tenant ID attribute http://schemas.microsoft.com/identity/claims/tenantid with your tenant ID. The full web-address style attribute names are accepted. The person must have exactly one of the listed values for each claim; an attribute with several values, such as a group list, never matches. Up to 8 claims with up to 32 values each.
People who already have an account (created by hand, imported, or from a directory) can use it through the provider only by email address. A Super admin turns on Account matching on the same tab (When an account with the same email exists: Sign in to the existing account). SSOGEN then joins a first sign-in to an existing account only when all of these hold:
- the restriction has at least one required claim other than the email claims;
- the assertion carries an attribute named
emailwith the address and an attribute namedemail_verifiedwith the valuetrue(set Mail assertion attribute toemailso both speak of the same address); - exactly one active account has that address, and it is not an administrator’s or otherwise protected account.
If no account, several accounts, or only a disabled account has the address, the provider’s own choice applies: a new account, or a refusal. A sign-in with an address not marked true is refused. The account’s owner gets an email whose subject begins “SSOGEN sign-in method linked”. An attribute that always says true trusts every address the provider sends, guest accounts included, so pair it with a required claim that leaves guests out.
Signing out
By default, signing out of SSOGEN does not end the session at the provider. To end it too, turn on Also sign out of this provider under Signing out on the Configuration tab and choose IdP SLO URL (from the provider’s metadata) or a Custom provider SLO URL. The provider then answers at https://acme.ssogen.ai/saml/sp/okta/slo-return; this address is in SSOGEN’s metadata once the setting is on, so give the provider the metadata again.
When the provider changes its certificate
Select Edit on the provider, go to Metadata source, fetch the metadata URL again (or upload the new file), select Save revision, then Validate, Test and Activate the revision. People keep signing in with the active configuration until the revision is activated. Test on an active provider says “The signing certificate in the metadata does not match the one configured.” when this is needed.
Messages you may meet
| Message | What to do |
|---|---|
| “The assertion was addressed to a different service provider. Its audience must be this provider’s entity ID.” | At the provider, set the audience or identifier to the SP entity ID exactly. |
| “The response was addressed to a different address than this provider’s ACS URL.” | At the provider, set the reply or single sign-on URL to the ACS URL exactly. |
| “The assertion’s signature did not verify. Check the signing certificate.” | The provider uses a certificate SSOGEN does not hold. Fetch or upload its metadata again. |
| “The response was not signed. Turn on response signing at the provider, or change what this connection requires.” | Make the provider sign the assertion. |
| “The assertion is outside its validity window. Check that both clocks are correct.” | Fix the clock on the provider’s server or on SSOGEN’s. |
| “That metadata publishes no HTTP-Redirect sign-in endpoint.” | SSOGEN sends its request by redirect; use metadata that lists a redirect sign-in endpoint. |
| “This provider has no metadata yet. Upload or paste the provider’s metadata document, or enter its https:// metadata URL, then Validate again.” | Edit the provider and give it the metadata on Metadata source. |
A person whose sign-in the provider answered in a way SSOGEN cannot accept sees a page titled “Sign-in could not be completed” with a link back to the sign-in page; the reason is in the audit log, and Try connection shows it in words.