SSOGEN / PeopleSoft SSO / PeopleSoft MFA With SSOGEN
Integration
PeopleSoft MFA With SSOGEN
PeopleSoft MFA with SSOGEN adds a second step to PeopleSoft sign-in without any change to PeopleSoft. The SSOGEN Web Agent in front of PeopleSoft sends every sign-in through SSOGEN, and SSOGEN asks for an authenticator code before the person reaches the application.
- Application
- Oracle PeopleSoft
- Where the second step happens
- At SSOGEN, before PeopleSoft sees the request
- Second-step methods
- Authenticator app, recovery codes, text and email codes
- PeopleSoft changes
- None beyond the SSO setup
Where the second step happens
PeopleSoft MFA with SSOGEN protects every PeopleSoft sign-in with a second step, and PeopleSoft itself does not change. The second step happens at SSOGEN, between the browser and the application:
- The SSOGEN Web Agent stops every request without a session and sends the person to SSOGEN.
- SSOGEN checks the password and asks for the second step.
- Only then does SSOGEN return the person to the agent, which passes the user ID to PeopleSoft.
A person who fails the second step never reaches the PeopleSoft sign-in page. PeopleSoft needs no MFA feature of its own for this. Set up the sign-in route first, as the PeopleSoft SSO guide describes, then add the policy below.
One condition: who gets asked
SSOGEN asks for a second step from people who sign in with a password at SSOGEN: a username and password account or a directory (LDAP) account.
- Password at SSOGEN. A username and password account or a directory (LDAP) account gets the second step.
- Entra ID, Okta or another provider. The provider does its own checks, and SSOGEN trusts what it reports about how strongly the person signed in.
- In that case. Configure MFA at the provider, or require more through the SSOGEN policy.
Turn it on with a policy
SSOGEN asks a person for a second step in either of two cases:
- The application’s sign-in policy asks for more than a password.
- The person already has an authenticator app set up.
- In the Admin Console, open SSO Policies, then Policies. Edit the policy that governs PeopleSoft, or create one with Required strength set to Plus a second factor.
- Under Second step, choose the methods that count.
- Assign the policy to the PeopleSoft application on the Sign-in policy step, or on the application’s Authentication tab.
- Have people enroll before you raise the strength.
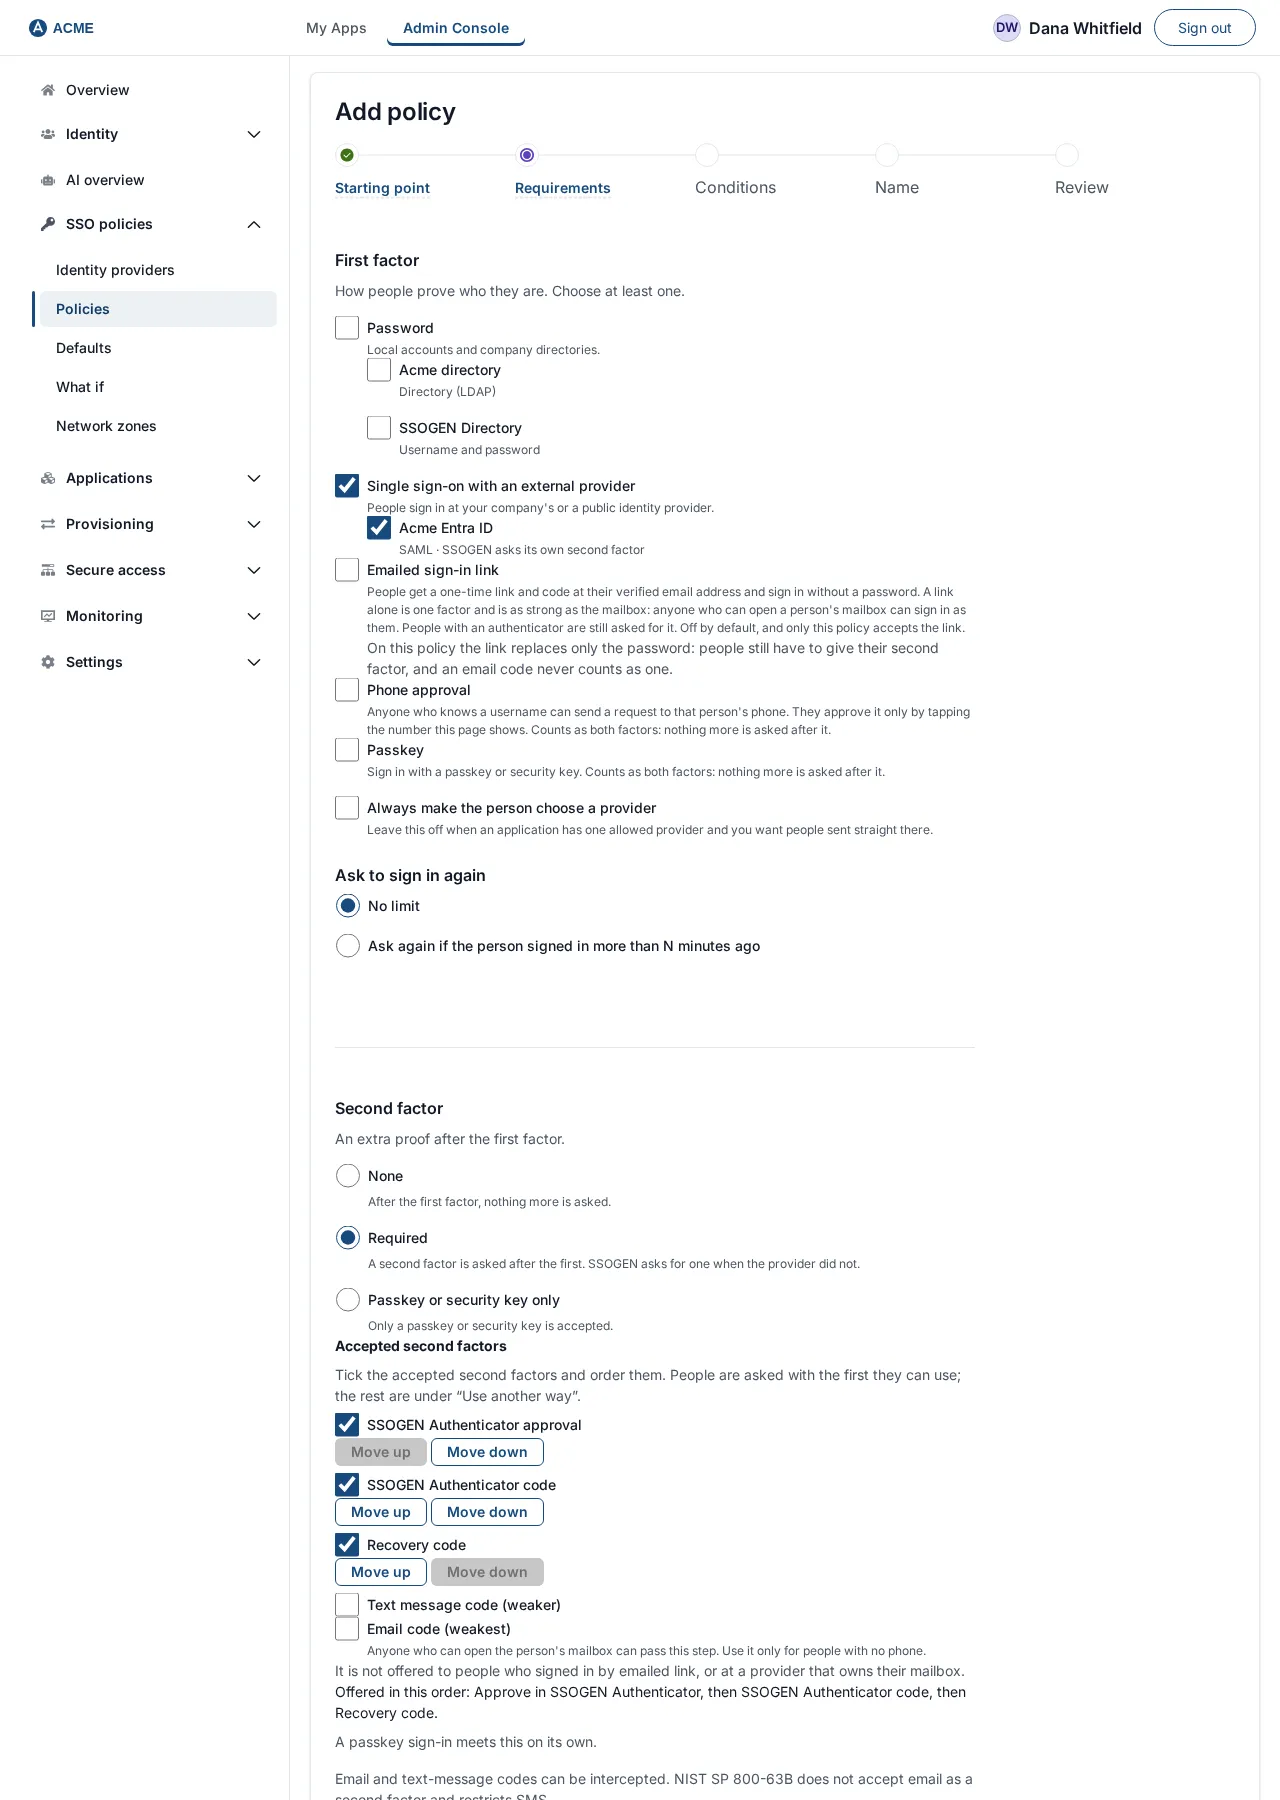
The Second step section lists these options:
| Method | Default | Note |
|---|---|---|
| Authenticator app | On | A six-digit code that changes every 30 seconds. The SSOGEN Authenticator, Microsoft Authenticator, Google Authenticator and 1Password all work. |
| Recovery codes | On | Ten single-use codes for a lost phone. |
| Text message (weaker) | Off | Needs an SMS provider set up in Settings. |
| Email (weakest) | Off | Needs mail (SMTP) set up. Use only as a fallback. |
Email and text codes can be intercepted. NIST SP 800-63B does not accept email as a second factor and restricts SMS, so both ship switched off.
If a policy requires a second step and the person has no usable method, they cannot sign in.
They see “This sign-in needs a second step, and no method is set up for your account. Contact your help desk.” People must enroll first.
What people do
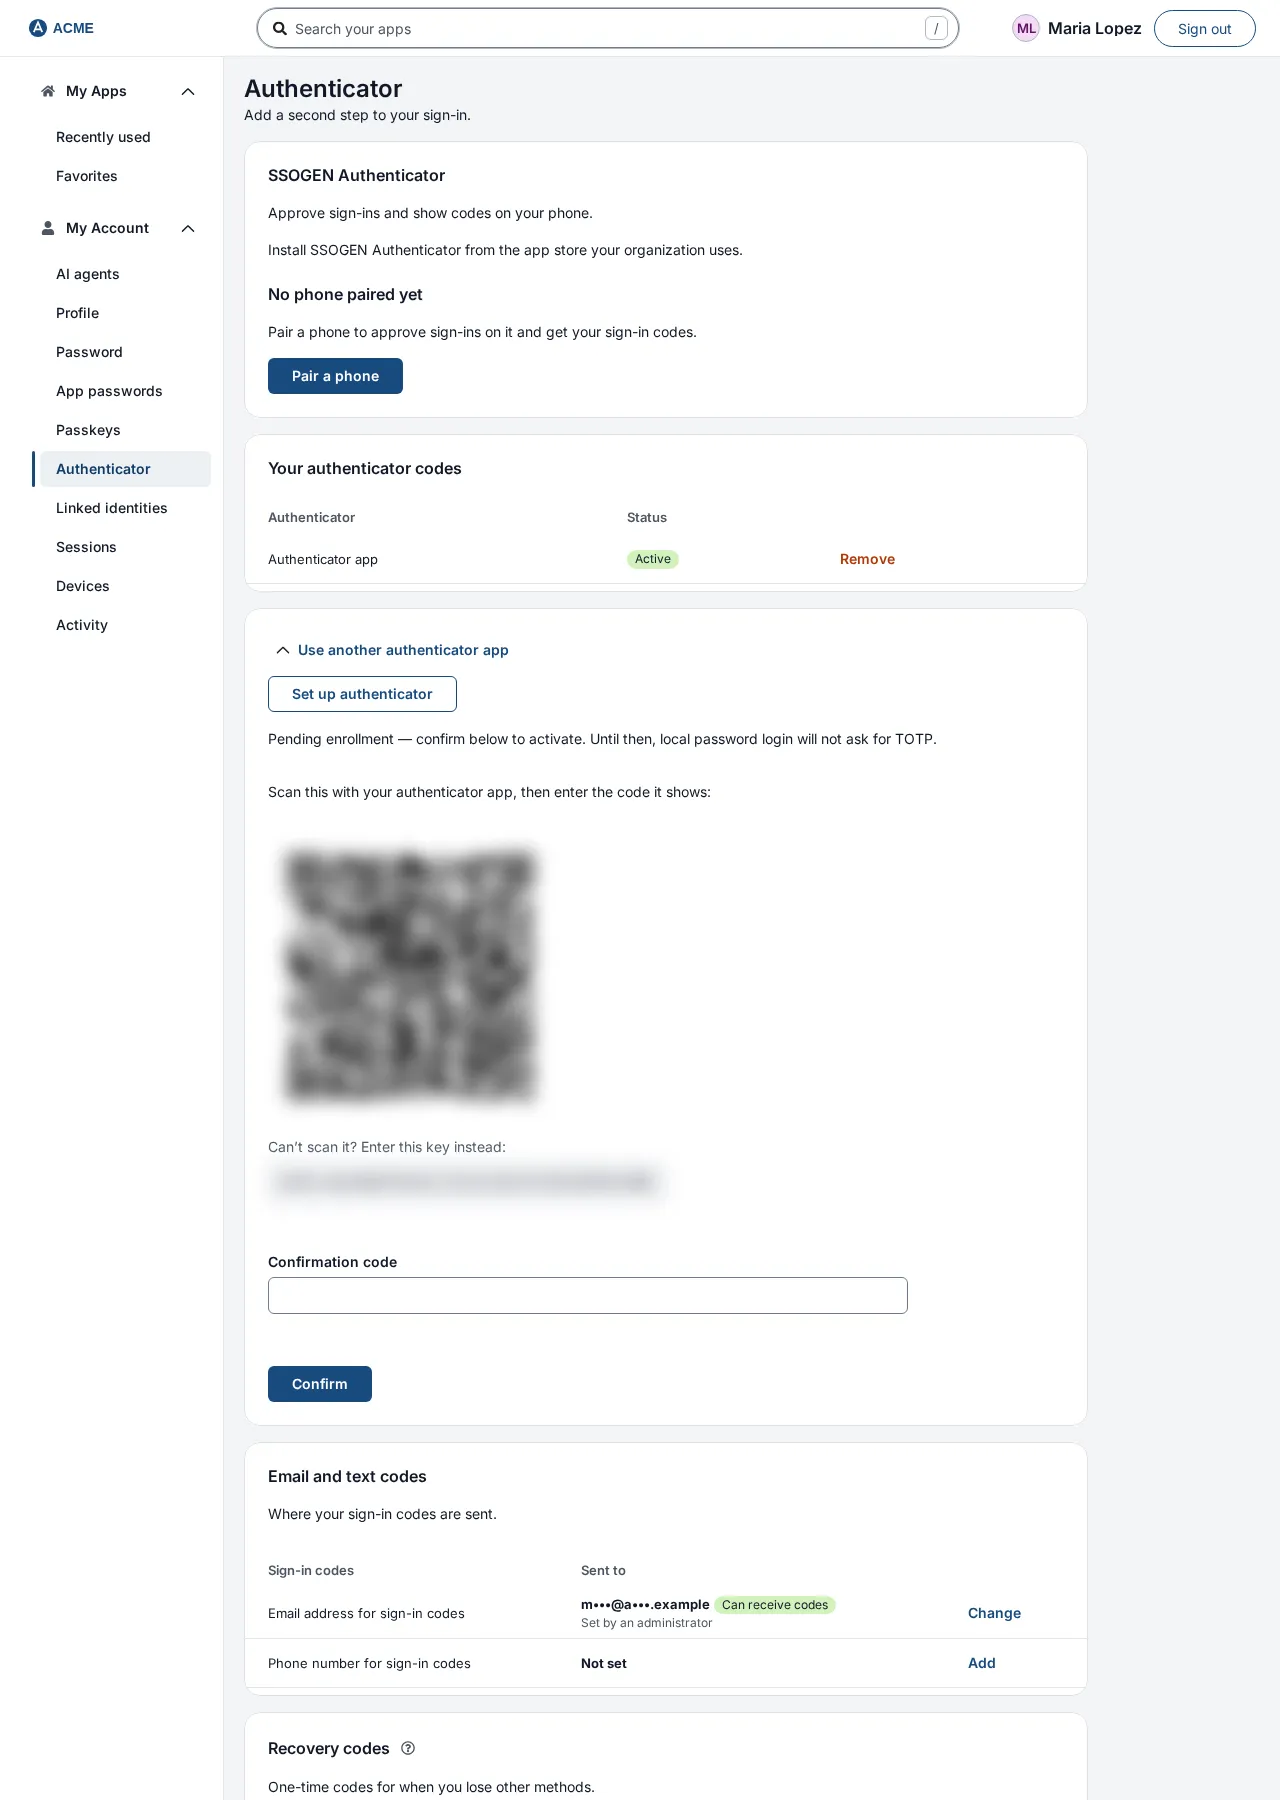
People enroll in My Account under Sign-in and Security.
- Open Authenticator App and select Set Up Authenticator.
- Scan the QR code.
- Enter the six-digit code in Confirmation code and select Confirm.
Until the code is confirmed, the account is not protected.
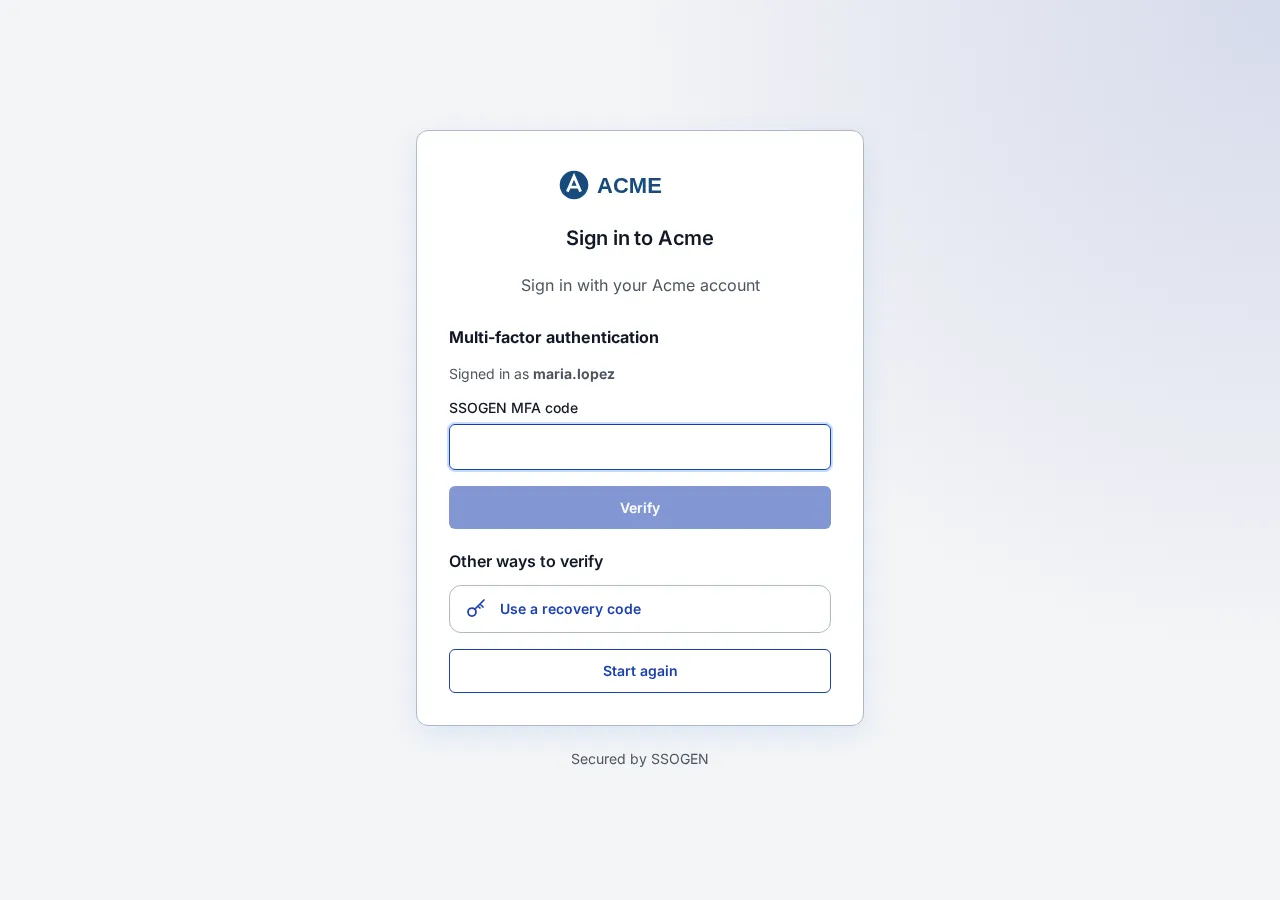
At sign-in, after the correct password, a screen titled Multi-factor authentication asks for the SSOGEN MFA code.
- Verify. The person enters the code and selects Verify.
- Other ways to verify. They can switch to a recovery code or, where the policy allows it, a texted or emailed code.
- Time limit. A sign-in has 5 minutes to finish this screen.
Step-up for sensitive pages
- Same screen. When a signed-in person opens an application whose policy requires a stronger sign-in than the session has, SSOGEN shows the same Multi-factor authentication screen without asking for the password again.
- Straight on. When the person passes, they go straight on to the application.
- Where they are sent. The policy sets where the person is sent when more is needed, under When more is needed.
Limits and lockouts
By default, 10 wrong codes in a row lock second-step sign-in for 15 minutes, and codes are limited to 5 a minute. A texted or emailed code expires after 5 minutes. The messages users see:
| Message | What to do |
|---|---|
| That code didn’t work. Check it and try again. | Wrong or old code. Check that the phone’s clock is set automatically. |
| Your sign-in took too long. Start again. | The 5 minutes passed. Select Start again. |
| Too many attempts. Try again in n minutes. | Wait. The lock ends on its own. |
When someone loses their phone
- Recovery code. The person can use a recovery code from Other ways to verify.
- None left. An administrator opens Identity, then Users, opens the person and chooses Reset MFA from the Actions menu.
- Confirm identity first. Until the person enrolls again, they sign in with a password alone.
- After a reset. A person with no method cannot sign in under a policy that requires one. Enroll them first or allow a temporary exception.
Questions people ask
Do I have to change PeopleSoft to add MFA?
No. The second step happens at SSOGEN before the request reaches PeopleSoft. You still need the SSO setup from the overview guide.
Which MFA methods are available?
Authenticator app codes and recovery codes by default, and text and email codes if you switch them on. Admin mode in the console always asks for an authenticator code.
Where to go next
- SMTP and SMS settings. Read the full multi-factor authentication guide.
- Policies. Learn how to create a policy and assign it.
- Other applications. See MFA for legacy applications.