MFA setup: authenticator apps, passkeys and codes
A password alone can be guessed, phished or reused. Multi-factor authentication (MFA) adds a second proof that the person is who they say, such as approving the sign-in on their phone. This guide covers multi-factor authentication setup end to end: the methods SSOGEN offers, how you switch them on in a sign-in policy, how people set them up and use them, and what they see on screen. It also covers the mail (SMTP) and text-message (SMS) settings that emailed and texted codes need.
Authentication methods you can turn on
Section titled “Authentication methods you can turn on”| Method | What the person does | Counts as | Notes |
|---|---|---|---|
| Phone approval (SSOGEN Authenticator approval) | Opens the request on their paired phone and taps the number that matches the one on the sign-in page. | A second step; or, where the policy turns on Phone approval as a first factor, the whole sign-in | The default second step for people with a paired phone. See Phone approval with number matching. |
| SSOGEN Authenticator code | Types the six-digit code the SSOGEN Authenticator shows. The code changes every 30 seconds. | A second step | Pairing a phone sets up its codes too. Another authenticator app can be allowed (see below). |
| Passkey | Approves sign-in with the device they already unlock (fingerprint, face, PIN, or a security key). Nothing is typed. | A sign-in on its own that cannot be phished: both factors | Offered on the sign-in page under a policy that allows it. |
| Recovery code | Types one of ten single-use codes kept somewhere safe. | A second step | For a lost phone. Can be switched off under Settings > Security (Allow recovery codes). |
| Text a code | Asks for a six-digit code by text message and types it in. | A second step, weaker | Off unless a policy lists it. Needs an SMS provider set up. |
| Email a code | Asks for a six-digit code to their email address and types it in. | A second step, the weakest | Off unless a policy lists it. Needs SMTP set up. |
Email and text-message codes can be intercepted. Standards bodies such as NIST do not accept email as a second factor and restrict text messages, so SSOGEN leaves both off unless a policy lists them, and labels them “weaker” and “weakest” in the policy screen.
When is a second step asked for?
Section titled “When is a second step asked for?”The second step applies to people who sign in with a password at SSOGEN (a Username and password account or a Directory (LDAP) account) and, as set on each provider, to people who sign in through another identity provider (see Second factor after sign-in with a provider).
A person is asked for a second step when either of these is true:
- The authentication policy that governs the sign-in has Second factor set to Required (or Passkey or security key only). See Policies.
- The person has set up an authenticator or paired a phone. Even when the policy’s Second factor is None, SSOGEN still asks them for it after the password.
If the policy requires a second step and the person holds no second factor at all, the policy decides what happens, under If the person has no second factor: Offer to set one up during sign-in (the default: after the password, and a code to their email address, or a text message when they have no email address), After a reset only (only after an administrator’s Reset MFA), or Send them to the help desk. The same block chooses what the person proves first (a code to email or text, email only, text only, or nothing more than their sign-in) and whether a person with no email address or phone number on file may still set one up. Only a Super admin can make a policy ask less there. A person who is not offered set-up sees: “This sign-in needs a second step, and no method is set up for your account. Contact your help desk.” Plan enrollment before you raise a policy (see below).
Which methods count is chosen per policy. In the policy wizard, under Requirements, the Second factor block offers None, Required and Passkey or security key only. Under Required, Accepted second factors lists:
| Policy option | Default |
|---|---|
| SSOGEN Authenticator approval | on |
| SSOGEN Authenticator code | on |
| Recovery code | on |
| Text message code (weaker) | off |
| Email code (weakest) | off |
Tick the methods you accept and use Move up and Move down to order them. People are asked with the first method they can use; the rest are under Use another way. Email code is a separate opt-in with the note “Anyone who can open the person’s mailbox can pass this step. Use it only for people with no phone.” It is not available while the emailed sign-in link is the only first factor, because the same mailbox would prove both steps. The note beside the text and email options reads “Email and text-message codes can be intercepted. NIST SP 800-63B does not accept email as a second factor and restricts SMS.”
A passkey sign-in meets Required on its own: the policy’s First factor block has a Passkey box that says it counts as both factors. The policy’s First factor block also has Phone approval (sign in with the phone alone, no password) and Emailed sign-in link; both are off by default and are described in The sign-in page.
A second-step method has to be both allowed by the policy and usable by the person, and for email or text, SSOGEN must be able to send (SMTP or SMS set up).
The Admin Console accepts fewer methods
Section titled “The Admin Console accepts fewer methods”The policy that governs the Admin Console accepts, of what it lists, an approval in the SSOGEN Authenticator (always with number matching), the SSOGEN Authenticator code, a recovery code or a passkey. It never accepts an email code or a text-message code, and it never takes a second step another provider reports. Its policy never sets anyone up with no code or with no email address or phone number on file, and anyone who can open the console is set up only by its rule, wherever they sign in. For the strongest protection choose Passkey or security key only. See Admin Console sign-in and lockout protection.
Remembered browsers
Section titled “Remembered browsers”A policy whose Second factor is Required can let a person skip the second step on a browser they chose to remember. The policy’s Remembered browsers block has three choices: Always ask for the second step (the default), Don’t ask on a remembered browser from a known network inside a network zone, and Don’t ask on a remembered browser from a known network. The person chooses it with Don’t ask again on this browser for 30 days on the second-step screen.
The second step is still asked when the browser’s cookie does not come back (another browser profile, a private window or cleared cookies), when the person signs in from a new network, after a wrong password or code in the last 15 minutes, and when the sign-in starts from an application whose policy always asks. It is never skipped for the Admin Console, password reset, phone approval or sign-in-method changes. A password reset or Reset MFA clears every remembered browser, and a person can forget one browser under Devices in My Account (Forget browser).
Admin mode
Section titled “Admin mode”Administrator powers come with admin mode, which the Admin Console enters by itself when the administrator’s sign-in meets the console’s policy: there is no separate code to type. The console’s policy is the only rule. A sign-in with a password alone is asked for the second factor first, and a sign-in older than the policy’s maximum authentication age (an hour on Administrator sign-in) signs in again. Admin mode ends after 15 minutes without use or 60 minutes in total, by default, and comes back without a prompt while the sign-in still meets the policy.
Phone approval with number matching
Section titled “Phone approval with number matching”Phone approval is a feature of SSOGEN and the SSOGEN Authenticator. When a policy accepts SSOGEN Authenticator approval and the person has paired a phone, the sign-in page shows a request screen titled Approve sign-in on your SSOGEN Authenticator. It shows one number in large type and the line “Tap this number in the app”. The phone shows six numbers, and the person taps the one that matches the screen. Nothing is typed on the computer.
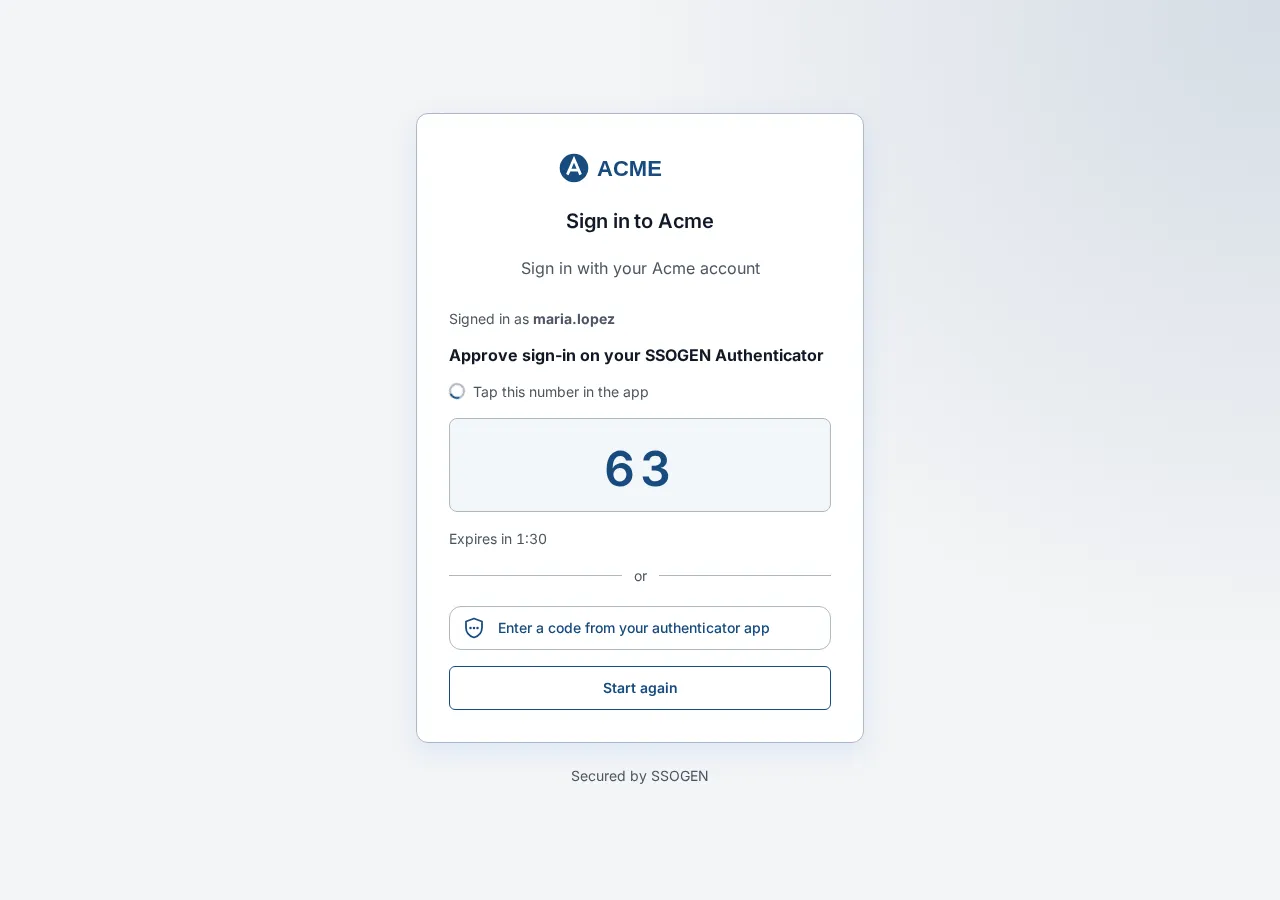
This is number matching, and it is the only way an approval works: it is not a setting. A person who taps Approve on a request they did not start cannot pass, because they must pick the number the sign-in page shows. Number matching does not stop a phishing site that relays a sign-in, because that site shows the same number; passkeys do. Passkeys are the phishing-resistant choice, so offer them where you can.
What the person and the screen do:
- The screen counts down (“Expires in 1:30”). Push lifetime (seconds) under Settings > Authenticator sets how long a phone has to answer; it must be between 30 and 180.
- If the request is denied or runs out, the screen says so and offers Try again or Resend. Use another way lists the other methods the policy accepts, such as an authenticator code or a recovery code.
- The phone also has This wasn’t me. It ends the sign-in and pauses phone approval for that person. For the next 24 hours the Setup health list under Monitoring > System health warns that someone else may know the person’s password, and points to the audit log.
- The phone shows whether the sign-in comes from a known network. Known network window (days) decides how many days of sign-in history make a network known.
- Requests are limited. Under Settings > Authenticator > Sign-in approval you can change Devices per person, Denials before push is paused, Pause after denials (minutes), Pause after “This wasn’t me” (minutes) and Requests per 10 minutes. An administrator can lift a pause with Clear push suspension on the person’s Devices tab.
- The Admin Console takes an approval in the app like any other sign-in, always with number matching; it also takes a code, a recovery code or a passkey.
Turn on phone approval
Section titled “Turn on phone approval”- Open SSO policies > Policies and edit the policy (or the default policy). Under Second factor, choose Required and tick SSOGEN Authenticator approval. Put it first with Move up if you want it offered first.
- Open Settings > Authenticator. Under Push notifications, Push notifications: provided by SSOGEN is a switch. With it off, people open the app to approve instead of getting a notification. Advanced: use my own app credentials is for organizations that deliver notifications through their own Apple and Google credentials.
- Ask people to open My Account > Authenticator and select Pair a phone. Pairing also sets up the phone’s sign-in codes. See The SSOGEN Authenticator app.
Sign in with your phone
Section titled “Sign in with your phone”A policy can also accept phone approval as the whole sign-in. In the policy’s First factor block, tick Phone approval. The sign-in page then shows Sign in with your phone once the person has typed a username: no password is typed, and the same number screen follows. The screen offers Cancel and Use password instead. Anyone who knows a username can send a request to that person’s phone, but it passes only if the person taps the number the page shows. Phone approval as a first factor is not offered on the Admin Console.
Part 1: Plan the rollout
Section titled “Part 1: Plan the rollout”- Decide the policy. Open SSO policies > Policies and either edit the policy that governs the sign-in or create one with Second factor set to Required, and choose the methods under Accepted second factors. Assign it as the Default policy (My Apps, My Account) or to individual applications. See Policies.
- Set up SMTP if you will allow email codes (and for reset links; see below).
- Set up SMS if you will allow text codes.
- Check Security settings for limits and the code lifetime (see Security settings).
- Ask people to enroll before you require a second factor. Send them to My Account (see Part 4). People who have no usable method cannot sign in once the policy requires it.
Part 2: Email (SMTP) settings
Section titled “Part 2: Email (SMTP) settings”SSOGEN sends password reset links, invitations and emailed sign-in codes through your mail server. Open Settings > SMTP. The card is titled Email (SMTP): “Mail server for password resets, invitations and sign-in codes.”
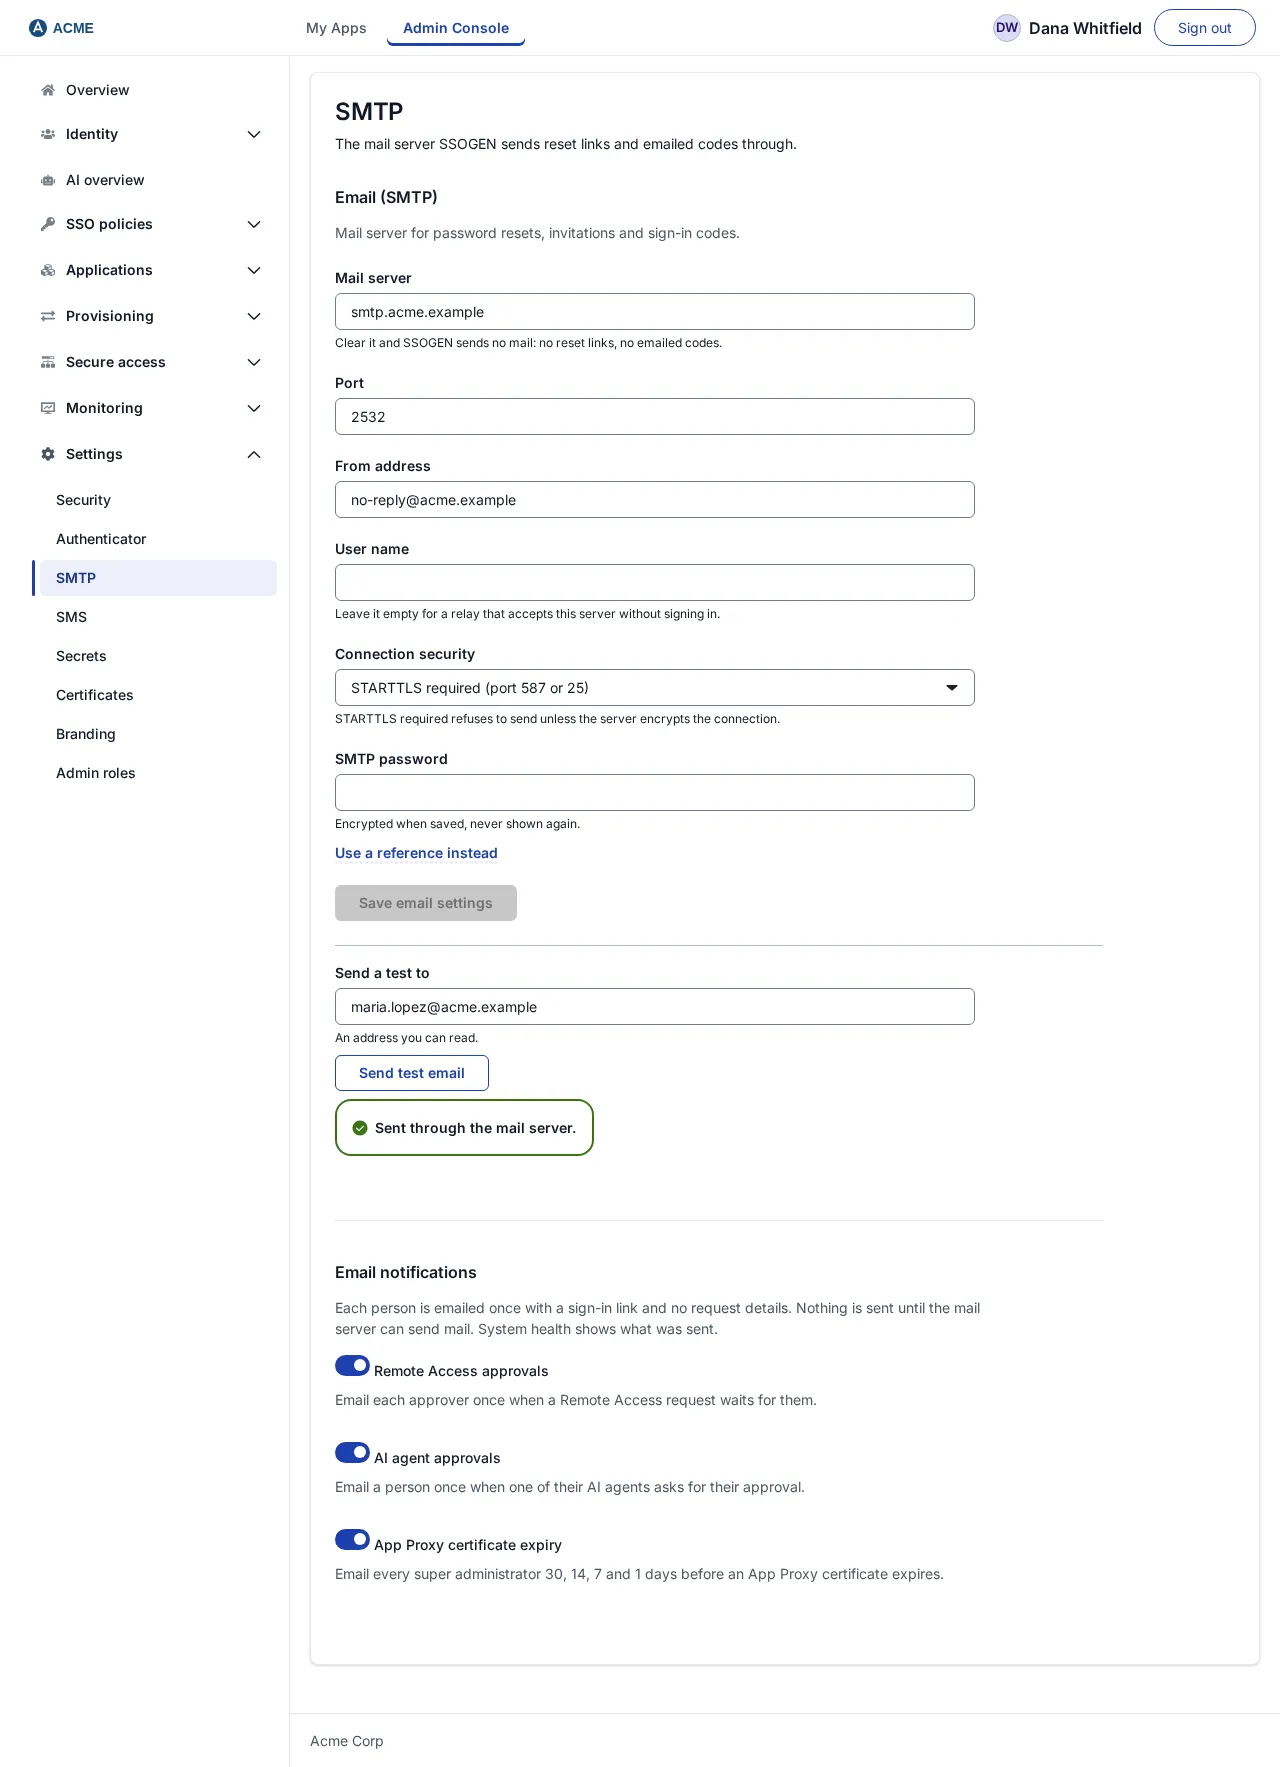
| Field | What to enter | Default | Example |
|---|---|---|---|
| Mail server | The host name of your mail relay. “Clear it and SSOGEN sends no mail: no reset links, no emailed codes.” | not set | smtp.acme.example |
| Port | The port the server listens on: 587 for submission with STARTTLS, 465 where encryption starts at once, 25 for an internal relay. 1 to 65535. | 25 | 587 |
| From address | The address messages come from. Most relays refuse a sender they do not recognize, so this must be one your relay accepts. | not set | no-reply@acme.example |
| User name | The account used to sign in to the mail server. “Leave it empty for a relay that accepts this server without signing in.” | not set | sso-mailer@acme.example |
| SMTP password | The account’s password, typed here or given as a reference (the same Type a password instead / Use a reference instead choice as other secrets). Encrypted when saved and never shown again. | not set | |
| Connection security | STARTTLS required (port 587 or 25): “refuses to send unless the server encrypts the connection.” TLS from the start (port 465). None (only a mail server on this machine): sends in the clear and is accepted only when the mail server is on the SSOGEN machine itself. | STARTTLS required |
Select Save email settings. A toast says “Email settings saved.” If you change the server address or port, SSOGEN sends the stored password only to the address it was typed for, so it asks you to type it again: “Type the SMTP password again to send mail to the new server”.
Check it: under Send a test to enter “An address you can read.” and select Send test email. You see “Sent through the mail server.” or a reason:
| Message | Meaning |
|---|---|
| Not sent: this channel is not fully configured yet. | Mail server or From address is empty. |
| Not sent: the provider did not answer within 10 seconds. | Wrong host or port, or a firewall. |
| Not sent: SSOGEN could not connect to the provider. | The same. |
| Not sent: the provider’s certificate could not be verified. | The mail server’s certificate is not trusted or does not match its name. |
| The provider refused the message (HTTP n). | The relay rejected the sender, recipient or login. |
| Not sent: the provider’s address points inside this network. | SSOGEN will not send to that address. |
| Five tests a minute at most. Wait a minute and try again. |
Changing these settings needs the Super admin role. An Authentication admin and a Read-only admin can see them but not change them.
Part 3: Text-message (SMS) settings
Section titled “Part 3: Text-message (SMS) settings”Open Settings > SMS. The card Text messages (SMS) says “The provider SSOGEN texts sign-in codes through.” and shows Ready to send or Not sending.
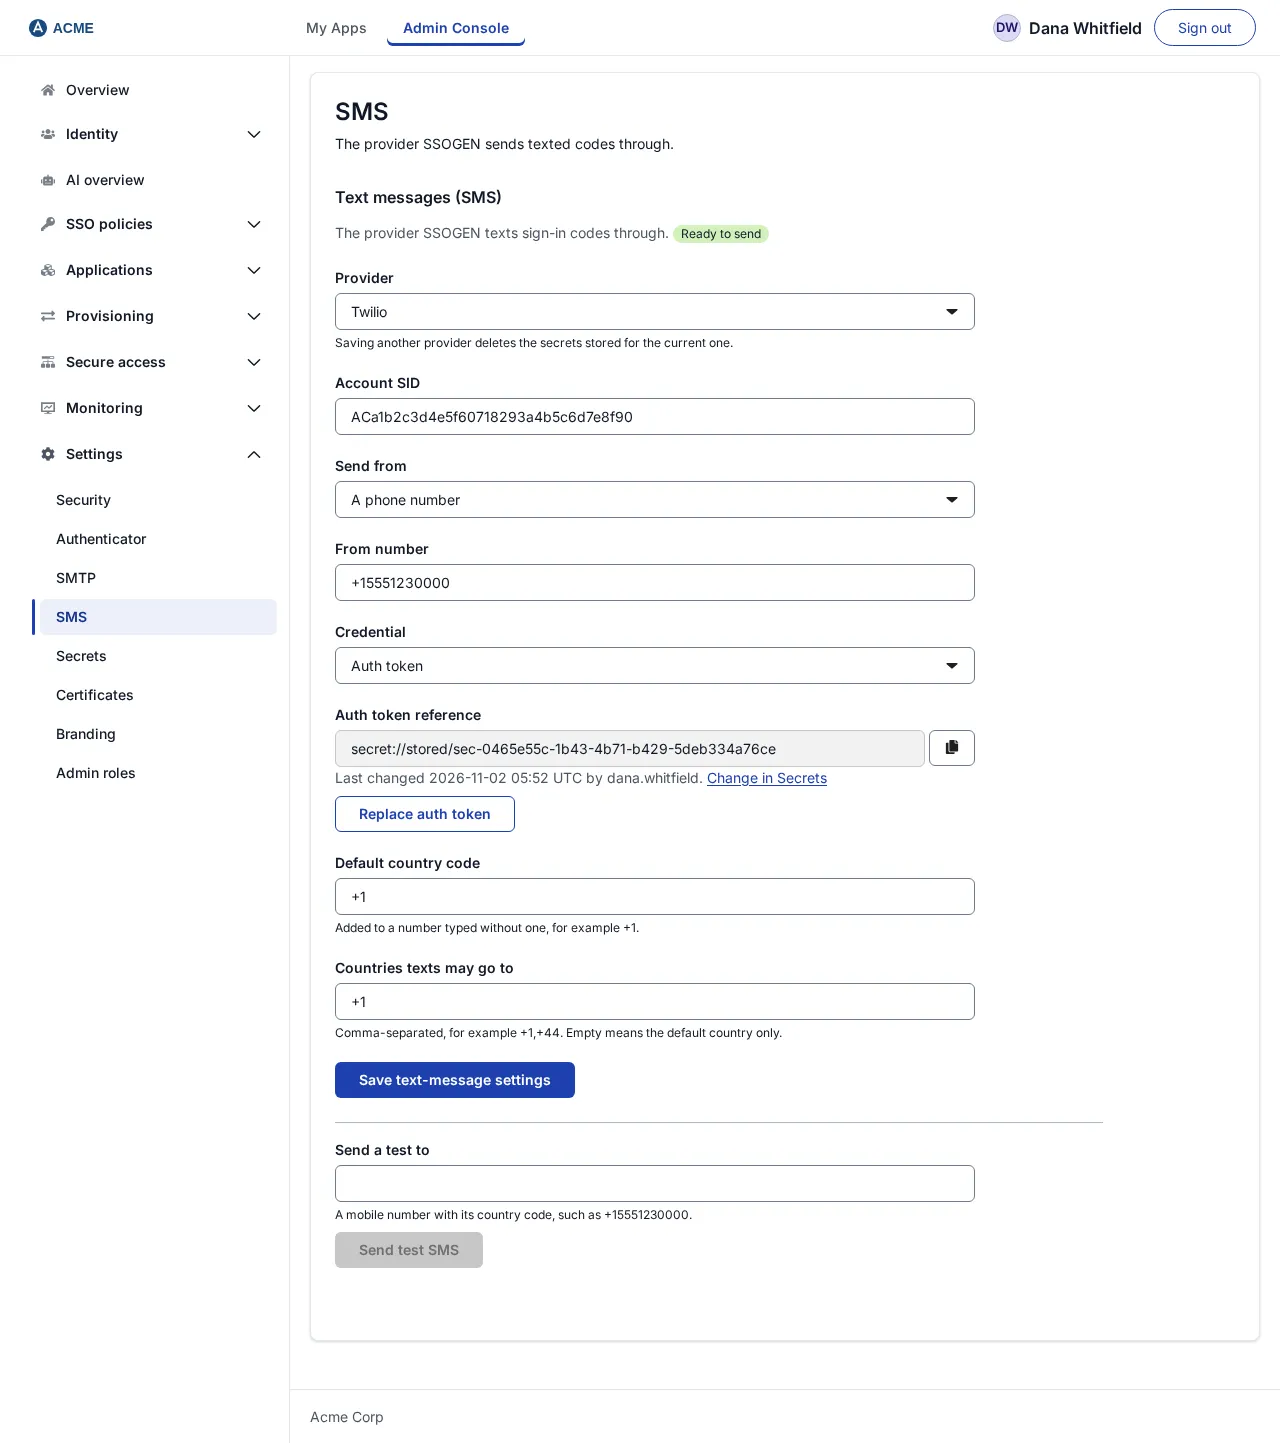
The Provider drop-down has None, Twilio, Amazon SNS and Custom HTTP gateway. A note says “Saving another provider deletes the secrets stored for the current one.” Every provider also uses two country settings at the bottom of the card:
| Field | Meaning | Example |
|---|---|---|
| Default country code | Added to a number typed without one. Must look like +1. Leave empty and a number without a country code cannot be used. |
+1 |
| Countries texts may go to | Comma-separated country codes. “Empty means the default country only.” This limits where SSOGEN can be made to send, which guards against someone running up your bill with texts to expensive destinations. | +1,+44 |
Messages sent look like: “Your SSOGEN sign-in code is 123456. It expires in 5 minutes. Don’t share it with anyone.” followed by a line that lets a phone fill the code in automatically only on your SSOGEN address.
Twilio
Section titled “Twilio”| Field | What to enter | Example |
|---|---|---|
| Account SID | From the Twilio console dashboard. | AC… |
| Send from | A phone number or A messaging service. | |
| From number (if a number) | A Twilio number in international format. | +15551230000 |
| Messaging service SID (if a service) | From Twilio Messaging > Services. | MG… |
| Credential | Auth token or API key. | |
| API key SID (if API key) | SK… |
|
| Auth token or API key secret | The secret, typed or given by reference. |
Amazon SNS
Section titled “Amazon SNS”| Field | What to enter | Example |
|---|---|---|
| Region | The AWS region to send from. | eu-west-1 |
| Credentials | IAM role of this server (the server’s own identity, such as an instance profile; nothing to type) or Access key. If the role is not allowed on this deployment you see “cannot use the server’s IAM role on this deployment; use an access key”. | |
| Access key ID (if access key) | AKIA… |
|
| Secret access key (if access key) | Typed or by reference. | |
| Sender ID (optional) | Up to 11 letters and digits, where the destination country allows one. | ACME |
| Origination number (optional) | +15551230000 |
Messages are sent as transactional SMS.
Custom HTTP gateway
Section titled “Custom HTTP gateway”Use this for any SMS gateway with an HTTPS API.
| Field | What to enter |
|---|---|
| Preset | Choose a preset… then Anveo. Fills the form for a known gateway; review every field before saving. |
| Gateway URL | The gateway’s HTTPS address. “HTTPS only. Redirects are not followed.” Do not put a key or password in the address. |
| Method | POST or PUT. |
| Content type | JSON (application/json) or Form (application/x-www-form-urlencoded). |
| Body template | The message body, with placeholders: {to} the phone number (a + and digits), {to_digits} the same without the + (for gateways such as Anveo), {message} the text, {secret} the API key given below. Values are escaped for the content type. For a form, one name=value pair per line. Only these four placeholders are allowed, and {secret} once and never in the message text. |
| Authentication | None, or a client certificate, Token in a header (then Header name, for example X-Api-Key, and Header token), or User name and password (HTTP Basic) (then User name and Password). |
| Client certificate (PEM, optional) | For a gateway that wants mutual TLS; the key goes in Client private key (PEM). |
| API key in the body | Appears when the template contains {secret}. |
| Success statuses (optional) | Comma-separated HTTP codes that mean success, for example 200, 201. Empty means every 2xx. |
| Success also requires | Nothing more, A JSON value in the answer (then JSON pointer, for example /status, and Expected value, for example queued) or The answer starting with some text (then Answer starts with, for example result=success, for gateways that say an error with status 200). |
The Anveo preset. Selecting Anveo fills: Gateway URL https://www.anveo.com/api/v1.asp, method POST, content type Form, the body
apikey={secret}action=smsfrom=<your Anveo number>destination={to_digits}message={message}and Answer starts with result=success. 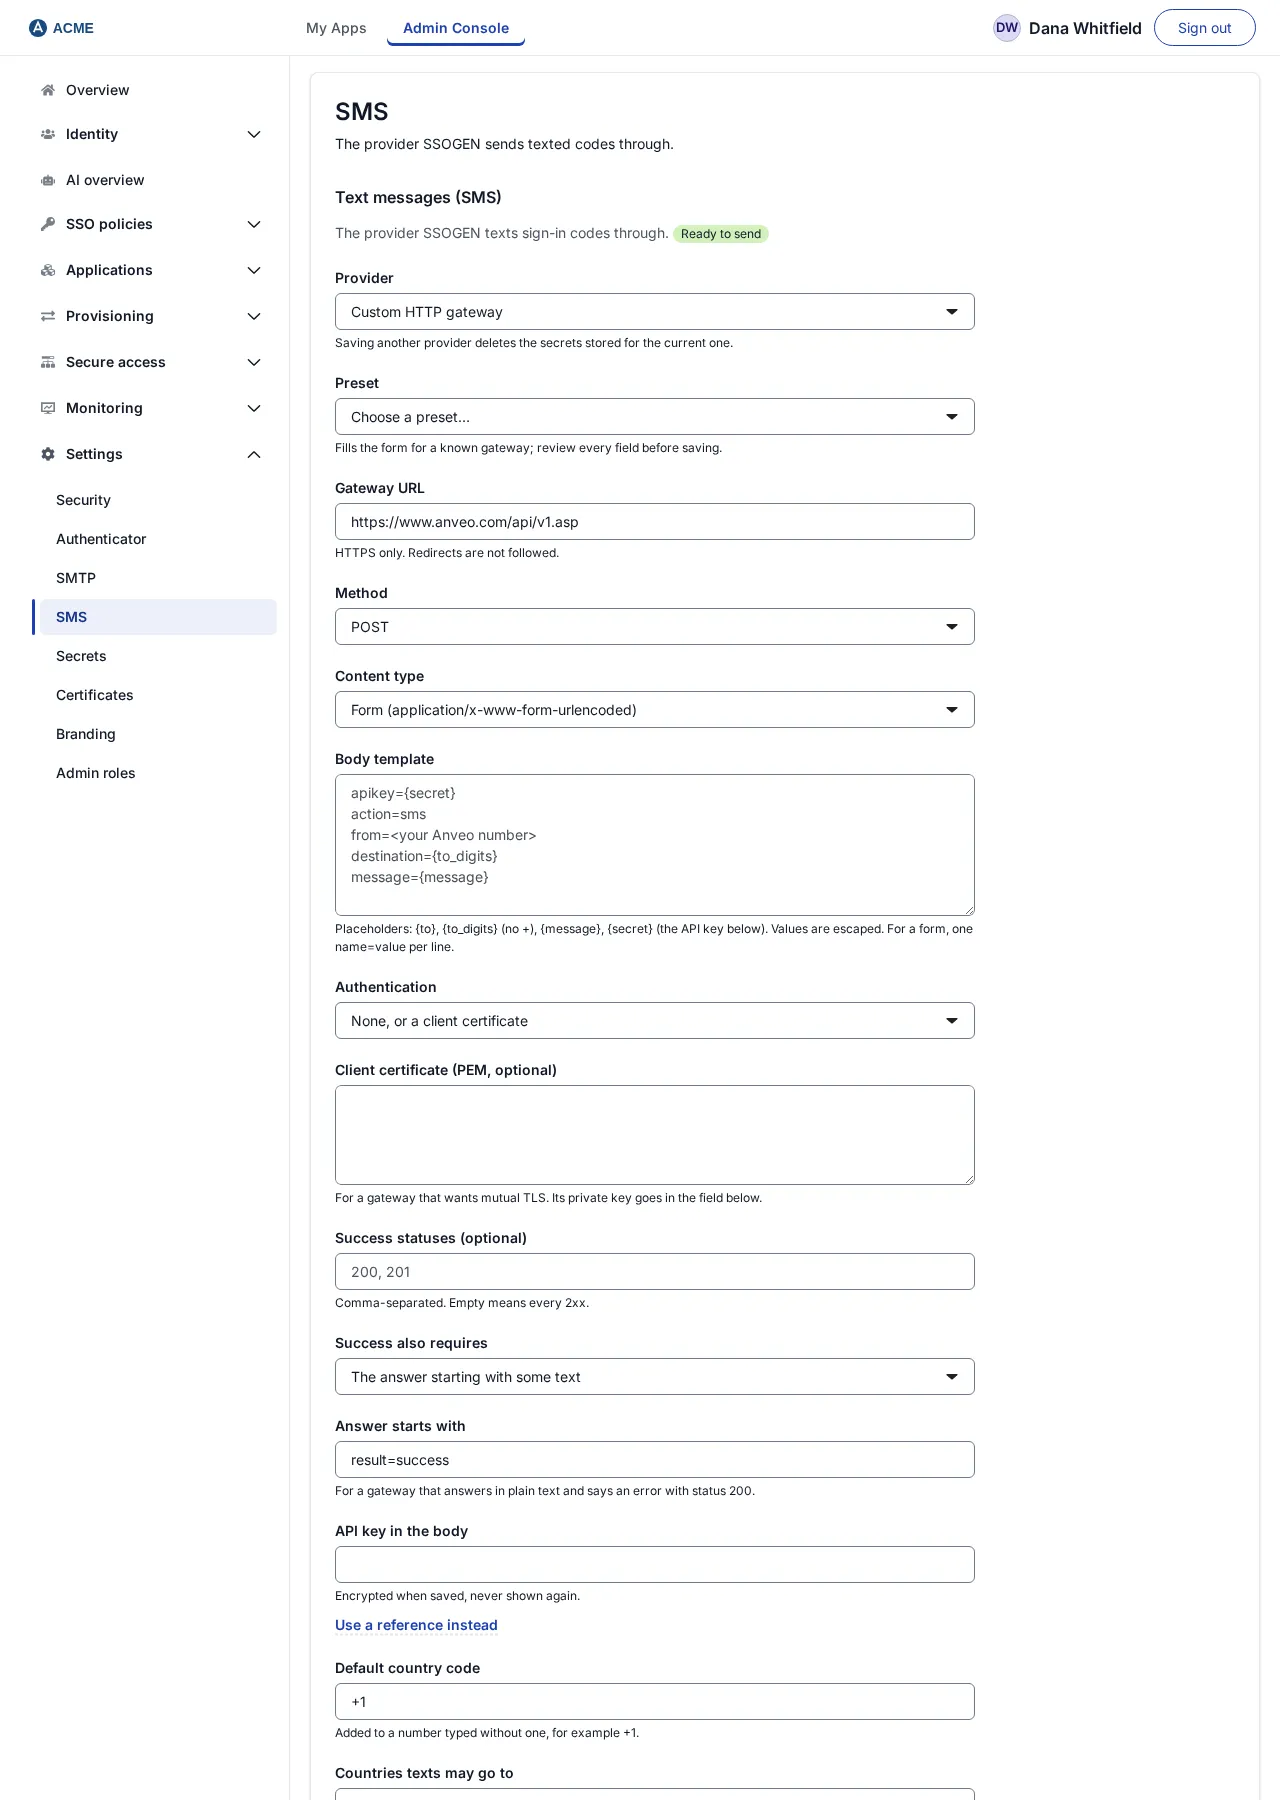
Before you can save, replace <your Anveo number> with your Anveo number, country code first (for example 15551230000); until then the page warns “Replace
Select Save text-message settings; the toast says “Text-message settings saved.” If you change the gateway address, you are asked to type its secrets again. Common save messages: “field must start with https://”, “field points inside this network, which SSOGEN does not send to”, “field could not be resolved in time”, “Somebody saved these settings first. Reload the page to see their change, then make yours again.” A role that cannot change the settings is told so and the fields stay read-only.
Check it: under Send a test to enter “A mobile number with its country code, such as +15551230000.” and select Send test SMS. You see “Sent through provider.” or one of the failure messages in the table above (for example “The provider answered, but not with the success these settings expect. Check the success rule.”).
Part 4: What the person does
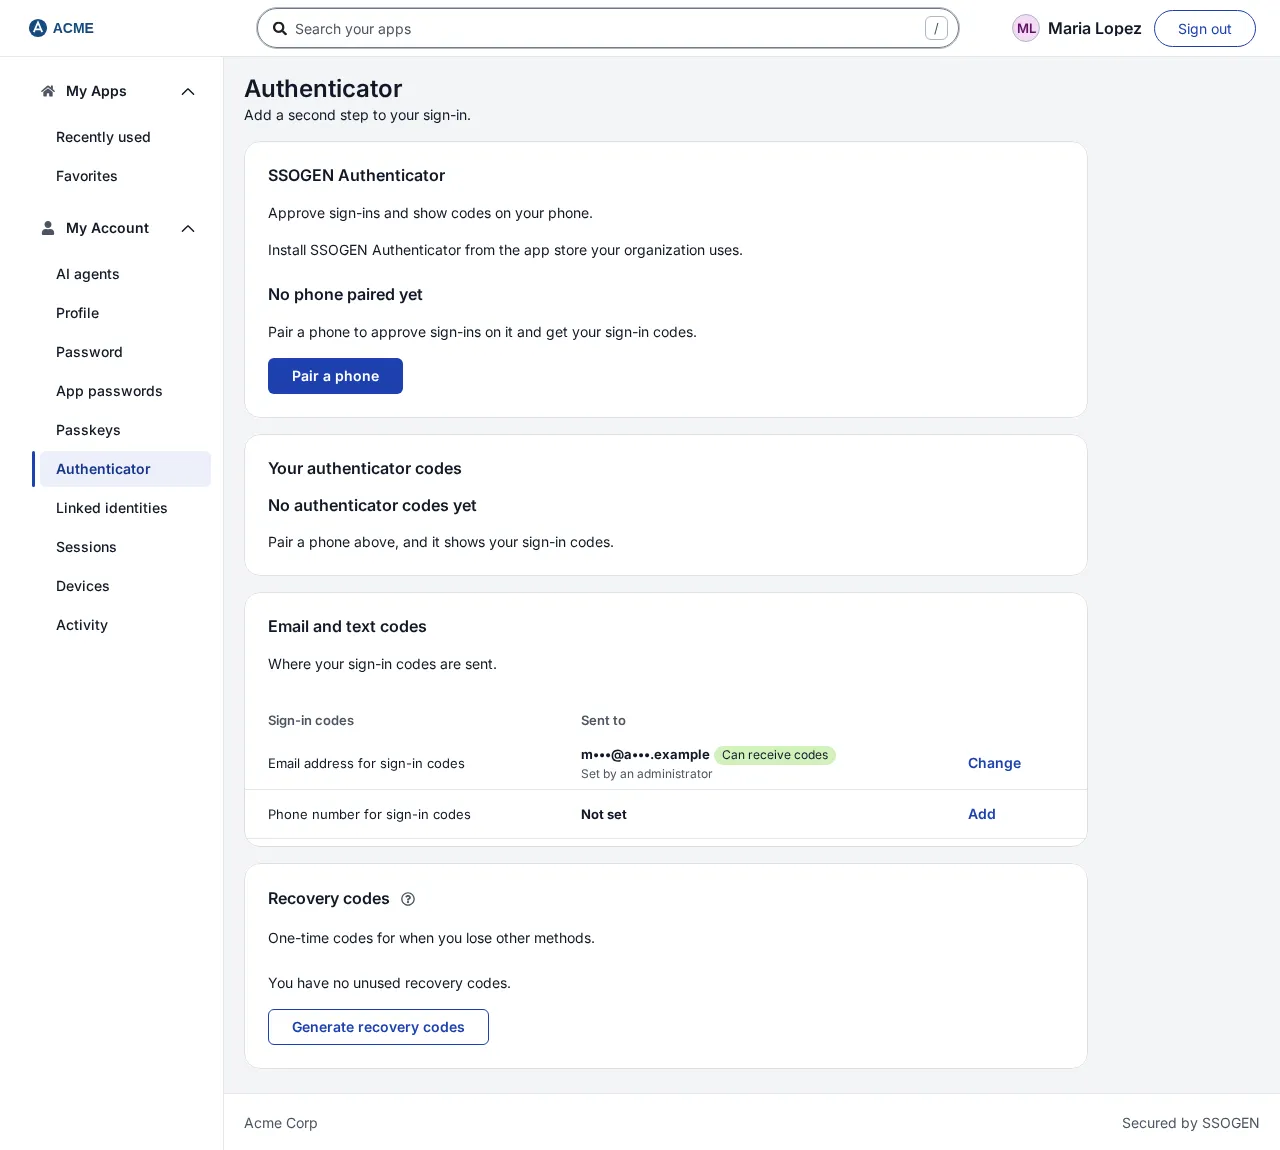
Section titled “Part 4: What the person does”Everything in this part happens in My Account, in the left menu of the home page, https://sso.acme.example/. The menu has Password, Authenticator, Passkeys, Devices and Activity, among others.
Confirm it is you first
Section titled “Confirm it is you first”Changing how you sign in needs recent proof, and what counts depends on whether the person already has a second factor.
No second factor yet. (A person who holds an administrator role and has no second factor sets up the first one at the Admin Console’s sign-in, under the console’s sign-in policy, and not here: this page tells them to sign in to the Admin Console, which sets one up when your organization allows it, after a code sent to the email address or phone number on file, or to ask another administrator for help.) Adding the first authenticator, recovery codes or passkey needs a recent sign-in. Any one of these is enough:
- The person signed in to SSOGEN within the last 5 minutes (a shorter time if your administrators set one).
- They re-enter their password in the Confirm identity card on the Authenticator page (field Current password, button Confirm): their SSOGEN password, or for a person from your directory, their directory password.
- For a person whose account comes from an OpenID Connect or SAML provider there is no password to re-enter, so Confirm identity shows Sign in again (“Sign in again with your organization, then add your first second factor within five minutes.”). It sends them to the provider, which is asked to authenticate them afresh, and brings them back to My Account. SSOGEN counts it only when the provider states a recent authentication time.
Already has a second factor. Later changes need a second step, never the password: an authenticator code, a recovery code, or signing in with a passkey, completed within the last 5 minutes. An email or text code does not count. The page shows A second step is needed: “Verify with a second step to continue. A password alone is not enough.” with a Verify with a second step link. (Where no link can be given, for example an account whose only second step is a passkey, the link reads Sign in again.) This protects the account if someone else knows the password.
A factor added in a session never confirms that session. If a sign-in method was added during a session, that session cannot be used as proof for the next change, so a person who left a session open cannot be used to swap in a new method. The page shows Sign in again: “A sign-in method was added to your account after you signed in here, so this sign-in cannot confirm it is you. Sign out and sign in again, then retry within a few minutes.” with the button Sign out and sign in again. The one exception: right after a person adds their first factor, they can generate their first recovery codes in the same session.
Approvals follow the same rule. Someone who tries to approve a Remote Access or AI agent request in a session in which a sign-in method was added is asked to sign out and sign in again.
People are told. When an authenticator, a set of recovery codes, a passkey, or an email address or phone number for sign-in codes is added or removed, SSOGEN emails the account’s owner at the address on the account (subject “SSOGEN sign-in method added” or “SSOGEN sign-in method removed”). The email names the kind of method only. It is sent only when outgoing email is set up (see Part 2) and the account has an email address.
Pair a phone
Section titled “Pair a phone”On the Authenticator page, an empty list says “No phone paired yet” with the button Pair a phone. Pairing links the SSOGEN Authenticator on the person’s phone to the account, so the phone can approve sign-ins and also shows the person’s sign-in codes. The list Paired phones shows each phone; a person can rename or remove one. Removing a phone also removes the codes it shows, and SSOGEN emails the person. How many phones one person can pair is Devices per person under Settings > Authenticator. Whether people can remove their own phone is the setting Allow people to remove their phone from the app.
Set up an authenticator app
Section titled “Set up an authenticator app”Most people pair the SSOGEN Authenticator app instead (see The SSOGEN Authenticator app); these steps are for another authenticator app, where your organization allows it. By default it does not: under Settings > Authenticator, Code setup, Where people get sign-in codes starts at SSOGEN Authenticator only, and Use another authenticator app is not shown. An administrator who chooses Any authenticator app turns it on for everyone; codes people already set up in other apps keep working either way.
-
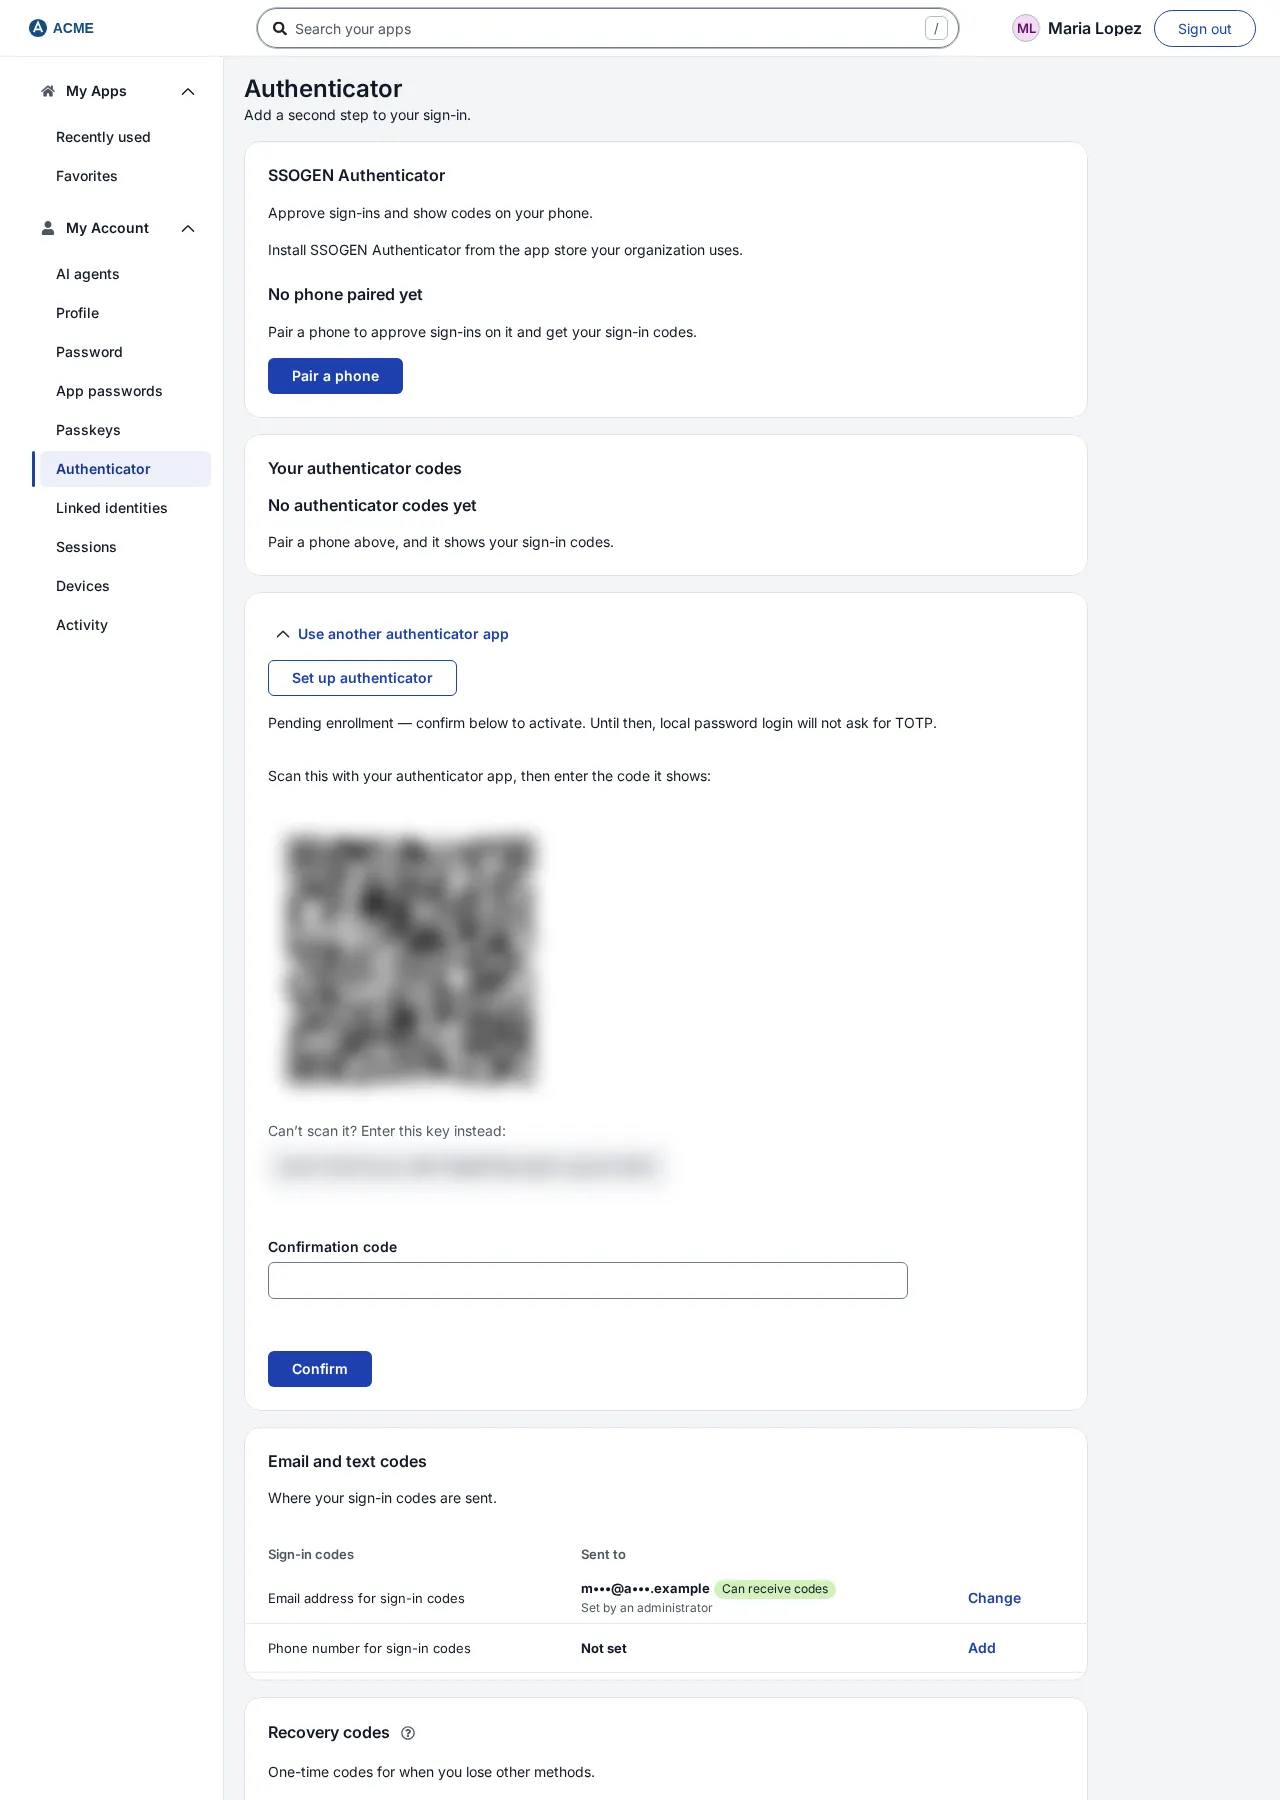
Open Authenticator, then expand Use another authenticator app in the SSOGEN Authenticator section. Select Set up authenticator.
-
A message says “Pending enrollment — confirm below to activate. Until then, local password login will not ask for TOTP.” and a QR code appears with “Scan this with your authenticator app, then enter the code it shows:”. Under it is the key to type by hand (shown unless an administrator turned off Show the enrollment key beside the QR code).
-
In the authenticator app, add an account by scanning the code (or typing the key). The account is named “SSOGEN”.
-
Type the six-digit code the app shows into Confirmation code and select Confirm.
-
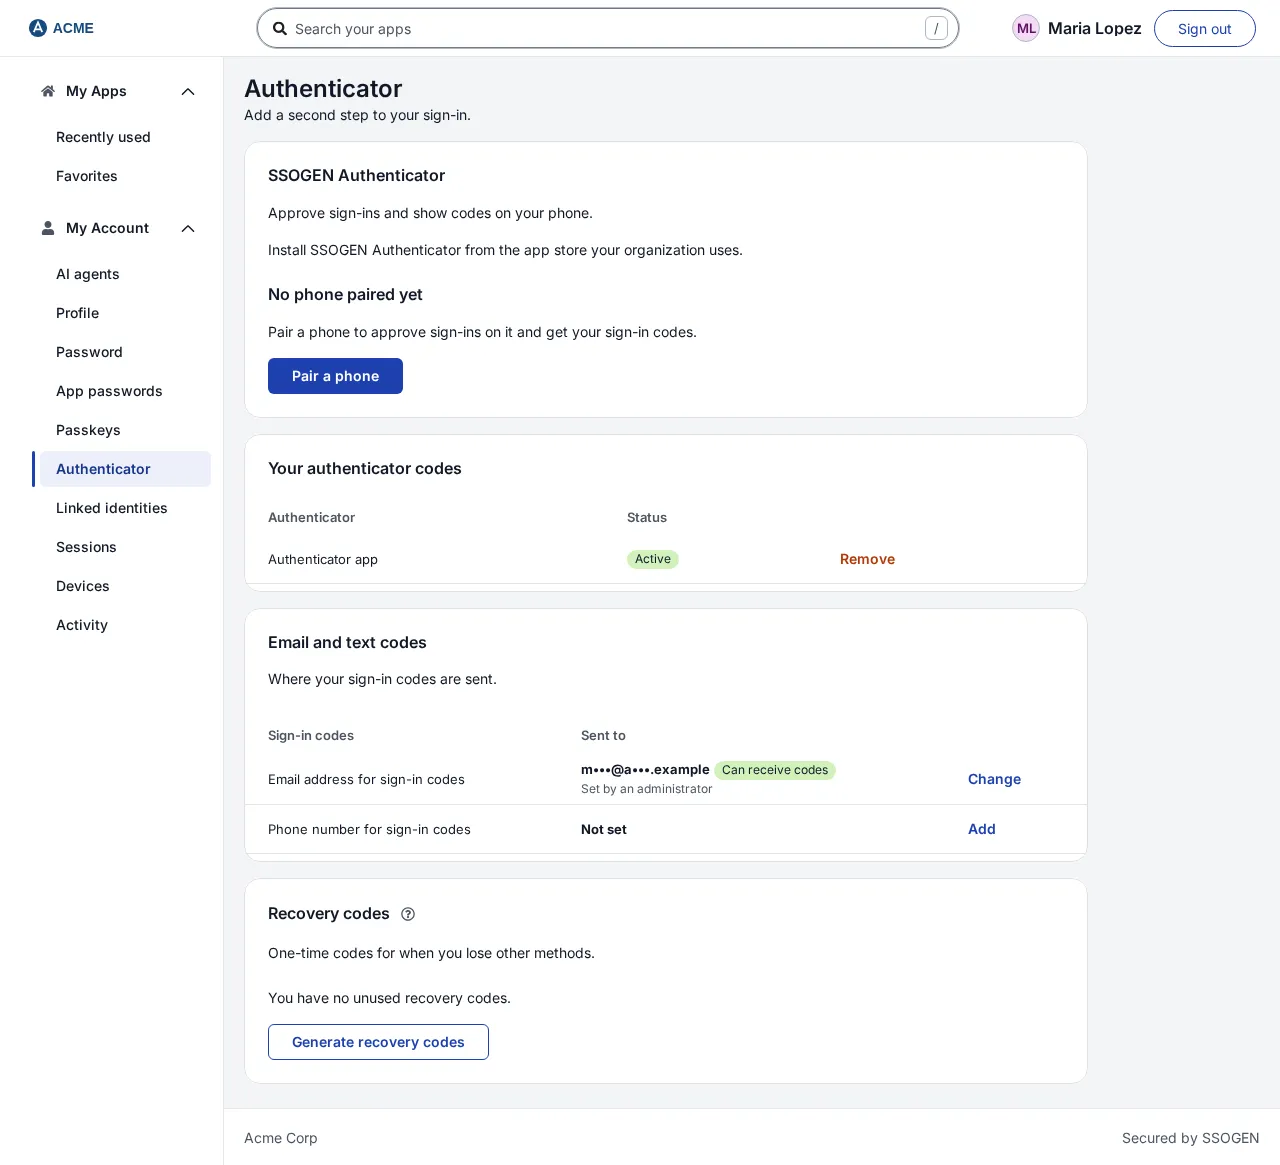
The list shows “Authenticator app” with the status active, and the page says “TOTP is active. Future local sign-ins will require your authenticator code.”
The enrollment only protects the account after step 4. If the code is wrong: “Enter a valid authenticator code.” (not six to eight digits) or “Code not accepted. Check your app and try again.”
To remove it, select Remove. The dialog “Remove this authenticator?” says “Codes from this app stop working. If it is your only second factor, your password alone protects the account.” Confirm with Remove authenticator. The codes that belong to a paired phone cannot be removed this way; remove the phone instead.
Set up a passkey
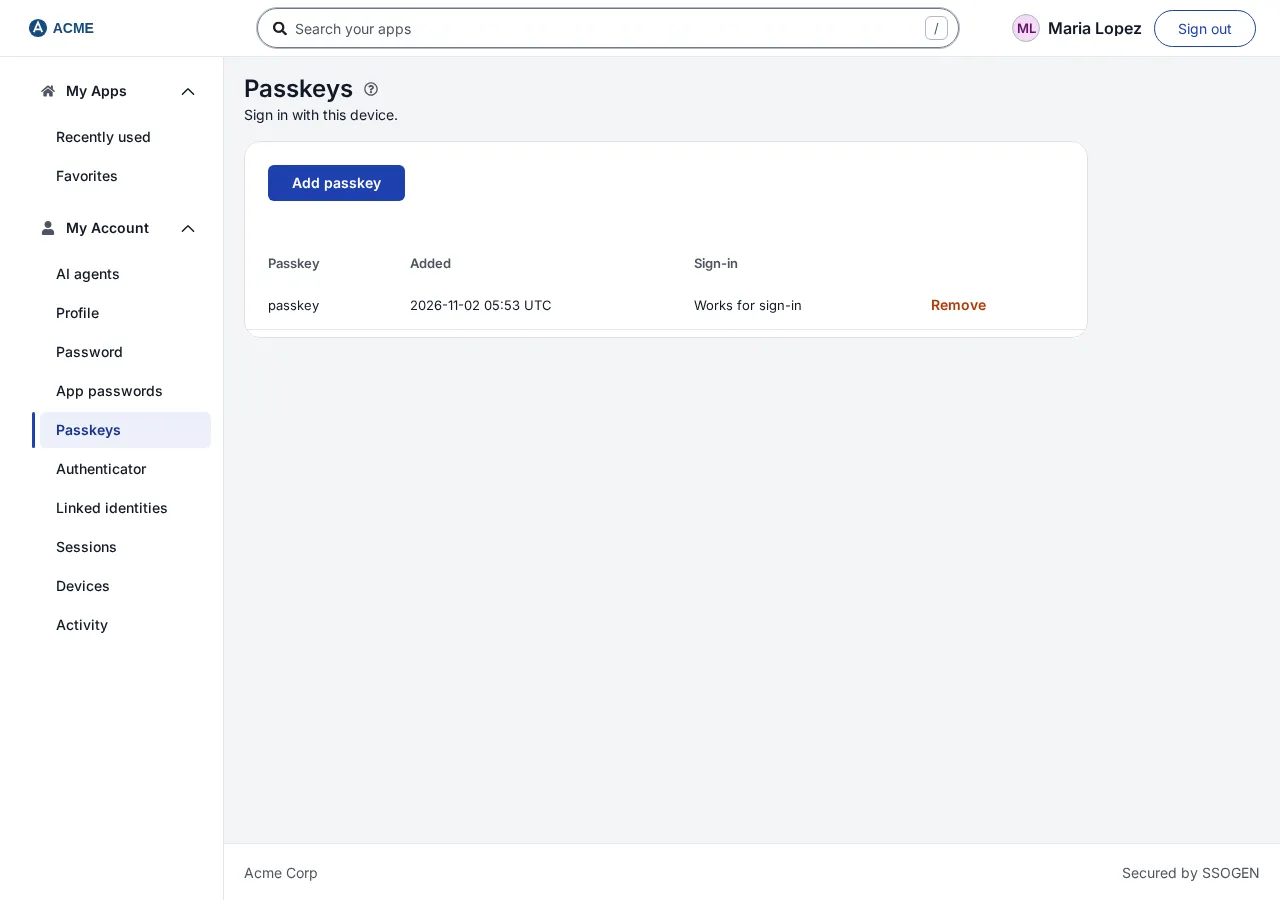
Section titled “Set up a passkey”- Open Passkeys. Select Add passkey. If the person already has a second factor they verify it first. A device that already holds a passkey for the account is not offered to register a second one.
- The browser asks them to use their fingerprint, face, PIN or security key. Approve.
- The passkey appears in the list as “passkey”.
If it does not work, the page says “Passkeys are not supported in this browser.”, “Passkey enrollment canceled.”, “The passkey was not added. Try again, or use another device.”, or, when the device already holds a passkey for the account, “This device already has a passkey for your account, so no new one was added.”
To remove one, select Remove; the dialog “Remove this passkey?” explains “This passkey can no longer sign you in.” and, for the last passkey, that an application that accepts only passkeys cannot be opened until another is added. Confirm with Remove passkey.
To sign in with a passkey, the person opens the sign-in page, types their username, and selects Sign in with passkey (shown under the password form when the governing policy offers passkeys). Without a username the page says “Enter your username first, then choose Sign in with passkey.” Other messages: “Passkey sign-in canceled.”, “Passkey sign-in did not complete. Check the username, or add a passkey first.” and “Passkey sign-in is not turned on here. Choose another option, or contact your administrator.” If a policy requires Passkey or security key, only a passkey is accepted.
Email and text codes: where they go
Section titled “Email and text codes: where they go”Open Authenticator and find the Email and text codes section. Two entries appear, Email address for sign-in codes and Phone number for sign-in codes, each with a status: Can receive codes, Not verified yet, Cannot receive codes or Not set, and where the value came from: “From your organization’s directory”, “From your organization’s identity provider”, “Imported by your organization”, “Set by an administrator” or “Entered by you”.
- If the value came from your directory or identity provider, the page says “Your organization’s directory manages this for your account. Ask your help desk to change it.” The person cannot change it.
- Otherwise Add or Change opens New email address or New phone number (phone numbers need the country code, for example
+1 555 123 4567). Select Save and send a code. A code is sent to it; enter the six digits under Code and select Verify. Send a new code sends another. A new contact is used for sign-in codes only after it is confirmed (the form says “We send a code to it, and it is used for sign-in codes only after you enter that code.”). - Changing a contact needs a second step first, as described under “Confirm it is you first”. A contact that is on file but cannot receive codes yet offers Send a code to verify.
By default, an address or number that came from your directory, identity provider, an import or an administrator is trusted as it is, without the person confirming it. People whose account comes from a directory cannot add their own unless an administrator allows it. See Security settings.
Which profile fields hold the email and phone is set in Security settings (Sign-in codes).
Recovery codes
Section titled “Recovery codes”- Open Authenticator, find Recovery codes and select Generate recovery codes. (If your organization turned recovery codes off, the page says “This deployment does not use recovery codes. If you lose your second factor, an administrator can reset it for you.”)
- If the person already has codes, a dialog “Generate new recovery codes?” warns “Every current recovery code stops working. The new set is shown once.” Confirm with Generate new codes.
- Ten codes appear, each 16 characters of letters and digits (the digits 0 and 1 and the letters I and O are left out, because they are easily misread). “Copy and store these codes now. They will not be shown again.” Keep them somewhere safe and separate from the phone, such as a password manager.
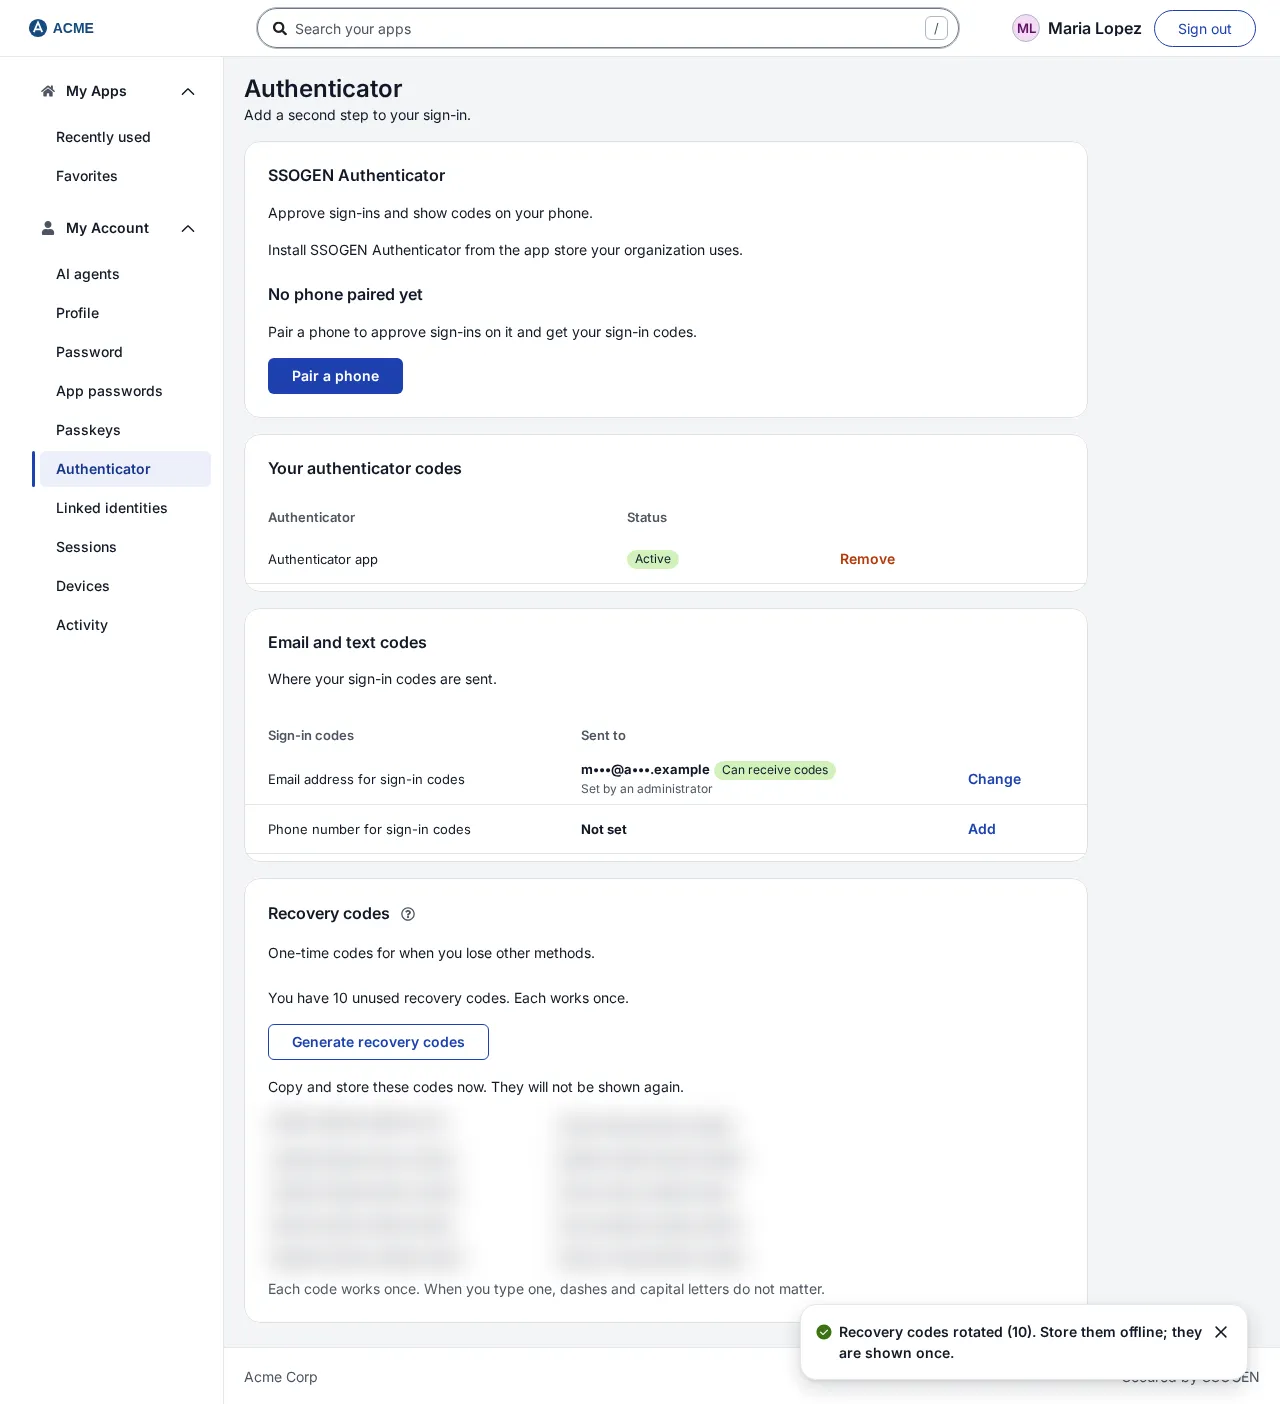
Each code works once. Dashes and spaces are ignored, and case does not matter, when typing one. The page also tells the person how many unused codes are left (“You have n unused recovery codes. Each works once.”).
Part 5: What the person sees when signing in
Section titled “Part 5: What the person sees when signing in”After the correct password, a separate screen appears titled Multi-factor authentication, with “Signed in as maria.lopez@acme.example” (the account’s name; it is not a full sign-in yet). When the policy’s first accepted method is phone approval and the person has a paired phone, the screen is the number screen described under Phone approval with number matching, and the other methods follow below it after “or”: Enter a code from your authenticator app, Email me a code, Text me a code and Use a recovery code, each opening its field in place. Otherwise the first method the person can use is shown at the top and the rest are listed under Other ways to verify.
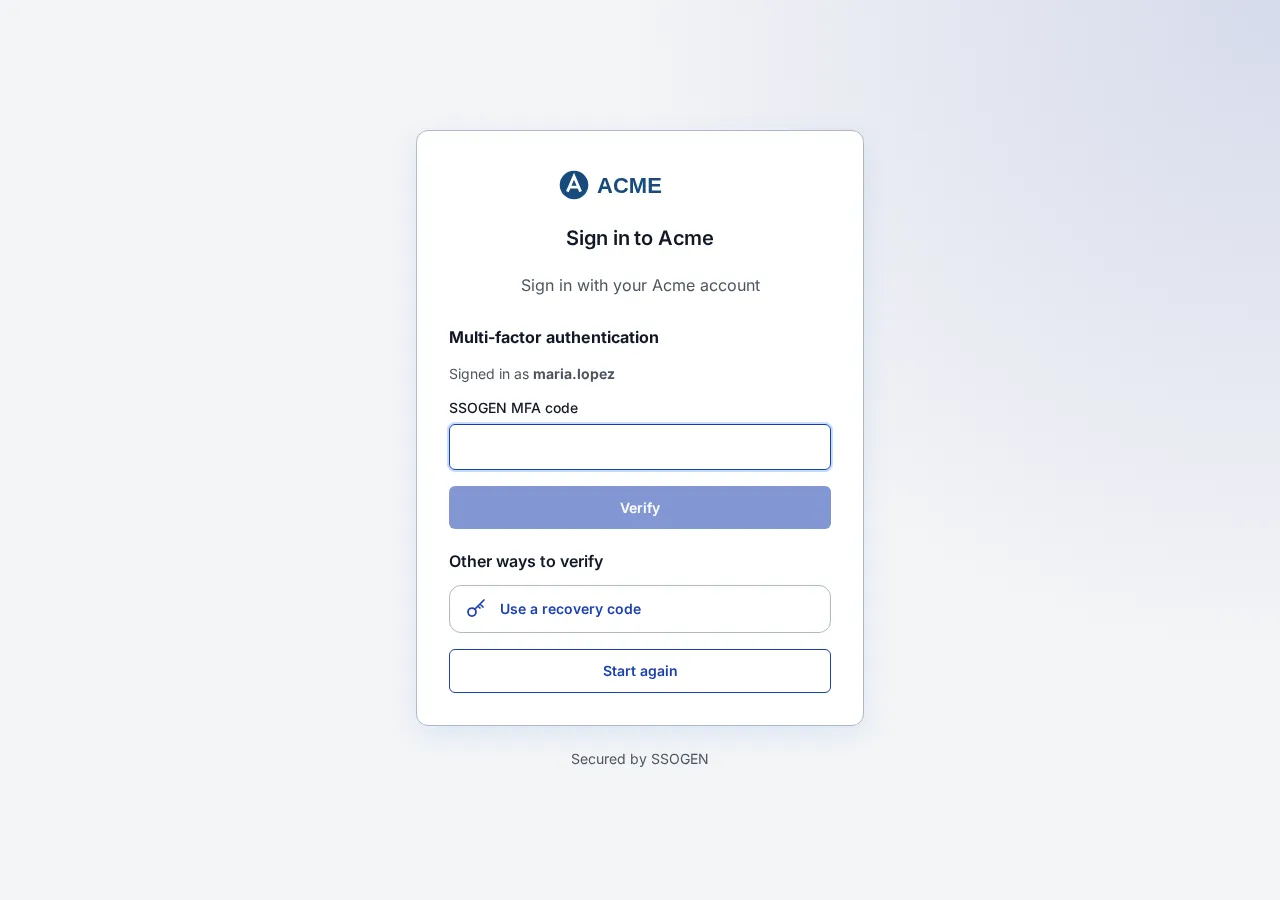
- Authenticator code: a field labelled SSOGEN MFA code. The person types the six-digit code and selects Verify. The wording is “Enter a code from your authenticator app” beside the number screen.
- Email a code: “Send a code to m•••@a•••.example” and a Send a code button. After sending: “We sent a code to address. It expires in 5 minutes.” and a field Verification code. A Resend in n s button counts down (30 seconds by default) before it becomes Resend code.
- Text a code: “Text a code to •••• •• 34”, Send a code, then “We texted a code to number.” and Verification code.
- Recovery code: a field labelled Recovery code.
- Under Other ways to verify, the other methods the person can use appear as buttons: Approve on SSOGEN Authenticator, Use a code from SSOGEN Authenticator, Use a recovery code, Email a code to and Text a code to (each with the masked destination). One sign-in can send at most three emailed or texted codes.
- Don’t ask again on this browser for 30 days appears when the policy allows remembered browsers.
- Start again returns to the first sign-in screen.
- Under Lost your phone?, where your organization allows it, the person selects Use an email code and a text code to verify with a code sent to their email address and a code sent to their phone number (see Part 6).
Only methods that the governing policy allows and the person can actually use are shown. Passkeys are not a choice on this screen; they are a sign-in on their own (see above). My Account > Activity lists each time a second step was asked, as Second step asked, with the reason.
A sign-in has 5 minutes to complete this screen. Messages:
| Message | Meaning and fix |
|---|---|
| That code didn’t work. Check it and try again. | Wrong or old code. Authenticator codes change every 30 seconds; check the phone’s clock is automatic. |
| Your sign-in took too long. Start again. | The 5 minutes passed. Select Start again. |
| Too many attempts. Try again in n minutes. | After 10 wrong codes in a row (by default), second-step sign-in is locked for 15 minutes. It ends on its own. |
| Too many attempts. Wait a moment and try again. | Rate limit (5 codes a minute by default). |
| You’ve asked for several codes. Wait a few minutes and try again. | Limits on how many codes can be sent (5 per account and 20 per address in 15 minutes by default). |
| We can’t send codes right now. Use another method or contact your help desk. | SMTP or SMS is not set up, or the method is not allowed. |
| Request denied. Try again or use another method. | The person denied the phone approval. |
| The number you chose did not match. Start again. | The person tapped a number other than the one on the sign-in page. |
| Sign-in stopped. Your administrator has been notified. | The person chose This wasn’t me on the phone. |
| The request expired. | The phone did not answer in time; select Resend. |
| Too many requests. Use another method. | The limit on phone approval requests was reached (see Requests per 10 minutes above). |
| Your identity was not verified. Try again. | An unexpected failure. |
| (no message) The Email a code option is not listed | For 24 hours by default after the person reset their own password, email codes are not offered as a second step. Other methods still are. See Forgot password and account recovery. |
Codes expire after 5 minutes by default and each code survives five wrong guesses at most.
Step-up
Section titled “Step-up”A person who is already signed in may open an application whose policy needs a stronger sign-in than their session has (for example, they signed in with a password and the application’s policy has Second factor set to Required). SSOGEN then shows the same Multi-factor authentication screen without asking for the password again. After they verify, they go straight to the application. What counts as enough, and where the person is sent when it is not (SSOGEN’s own second step, their identity provider, or either) is set in the policy under When more is needed. See Policies.
Some actions ask for a fresh second step even without a policy: approving a Remote Access request or an AI agent action, and changing second factors or sign-in contacts.
Part 6: When someone loses their phone
Section titled “Part 6: When someone loses their phone”- The person can use a recovery code (Use another way > Use a recovery code).
- If your organization has chosen the relaxed setting under Settings > Authenticator > Lost phone (Lost phone recovery: email code and text code both), the person can instead confirm with a code sent to their email address and a code sent to their phone number, then remove the old phone and pair a new one. The default is Strict (an enrolled second factor is required): a person who lost their only phone asks an administrator. The relaxed setting is only offered when SSOGEN can send both an email code and a text code, and its description warns that anyone who controls both the mailbox and the phone number and knows the password can replace the authenticator, and that a phone number can be taken over by a SIM swap. It also needs an email address and a mobile number that can receive codes and have not changed in the last three days, and a sign-in with the password rather than an emailed link. It is never offered to administrators.
- If they have neither, an administrator opens Identity > Users, opens the person, and chooses Reset MFA from the Actions menu. The dialog “Reset multi-factor authentication for name?” warns “Their paired phones, authenticator apps, passkeys and all remaining recovery codes stop working immediately. At their next sign-in the sign-in policy that applies to them decides: if it asks for a second factor and offers set-up, they are offered to set one up after their first factor, for 72 hours after this reset; otherwise they are told to contact the help desk.” (The hours are Set-up window after a reset (hours) under Settings > Authenticator: 1 to 720, 72 by default.) Confirm with Reset MFA. Check who you are talking to before you do this.
- The person signs in, and is offered a new authenticator within the set-up window if the policy offers set-up.
If the person signs in through an identity provider and their only email address and phone number came from that provider, no set-up code can be sent to them at sign-in, with or without a reset. The dialog says what to do instead: add an email address or phone number the provider does not supply, or let them set up the SSOGEN Authenticator under My Account while a policy that does not ask for a second factor applies to them.
If a policy requires a second step and the person has no method after a reset, the policy’s If the person has no second factor decides: with Offer to set one up during sign-in or After a reset only they set one up at their next sign-in, after the code the policy asks; with Send them to the help desk they cannot sign in until you set one up for them, or let them enroll their email and phone first.
The only administrator who can still enter the Admin Console cannot have their second factor reset. The answer says to give another account the Super Admin role first. See Admin Console sign-in and lockout protection.
Troubleshooting
Section titled “Troubleshooting”| What you see | Cause and fix |
|---|---|
| The second-step screen does not appear | The governing policy’s Second factor is None and the person has not paired a phone or set up an authenticator. Check the policy’s Second factor. |
| “This sign-in needs a second step, and no method is set up for your account. Contact your help desk.” | The policy requires a second step and the person has no usable method. Enroll one, or reset. |
| The Email a code or Text a code buttons are missing | The policy’s Second step does not include them; or SMTP/SMS is not set up (check Ready to send); or the person has no confirmed email or phone. |
| Admin cannot enter admin mode | The sign-in does not meet the console’s policy: the console asks for the second factor, or for a new sign-in. An administrator needs the SSOGEN Authenticator or a passkey. If they lost theirs, another Super admin can use Reset MFA on their account. |
| Codes arrive late or not at all | Test SMTP or SMS from Settings. Check spam folders. |