OIDC SSO: register an OpenID Connect application
This guide sets up OIDC SSO: it connects an application to SSOGEN with OpenID Connect (OIDC), using a client ID, exact redirect URIs and PKCE. It also covers service applications: programs that call an API as themselves, with no person present.
What OpenID Connect is, in plain words
Section titled “What OpenID Connect is, in plain words”OpenID Connect is a standard way for an application to ask an identity system “who is this person?”. The application is called the client (or relying party). SSOGEN is the OpenID provider.
- The person opens the application. The application sends their browser to SSOGEN’s authorization endpoint, saying who it is (its client ID), where to send the person back (its redirect URI) and what it wants to know (its scopes).
- SSOGEN signs the person in, checks they may use the application, and sends the browser back to the redirect URI with a short-lived authorization code.
- The application’s server swaps the code for an ID token (a signed statement of who the person is) and an access token, at SSOGEN’s token endpoint.
SSOGEN applies two protections to every OpenID Connect sign-in, and your application’s library must support both:
- PKCE with S256. The application proves it is the one that started the sign-in. SSOGEN accepts only the
S256method, and the authorization code flow only. There is no implicit or hybrid flow. - Exact redirect URIs. The address the application sends the person back to must match a registered address character for character: no wildcards, and a trailing slash makes it a different address. All registered addresses must start with
https://.
The example used in this guide
Section titled “The example used in this guide”Acme Wiki is a fictional web application that Acme Corp runs at https://wiki.acme.example. It uses a standard OpenID Connect library, which wants a client ID, an issuer (or discovery) address and a redirect address. SSOGEN is at https://sso.acme.example. Replace these with your own addresses.
Before you start
Section titled “Before you start”- You can sign in to the Admin Console with a role that may write applications.
- A sign-in policy exists (see Choose how to connect an application).
- You know the application’s redirect URI: the address on the application that receives the sign-in result. For Acme Wiki it is
https://wiki.acme.example/auth/callback. Your application’s documentation names it (“redirect URI”, “callback URL”, “reply URL”). - You know whether the application can keep a secret (a server-side web app can; a single-page app or mobile app cannot). That decides Part C.
Part A: register the application in SSOGEN
Section titled “Part A: register the application in SSOGEN”-
In the Admin Console open Applications, then OpenID Connect. The list shows Name, Access mode, Status, Sign-in policy and Launch URL columns, and these buttons: App Packs, Register service and Register OpenID Connect app. Select Register OpenID Connect app.
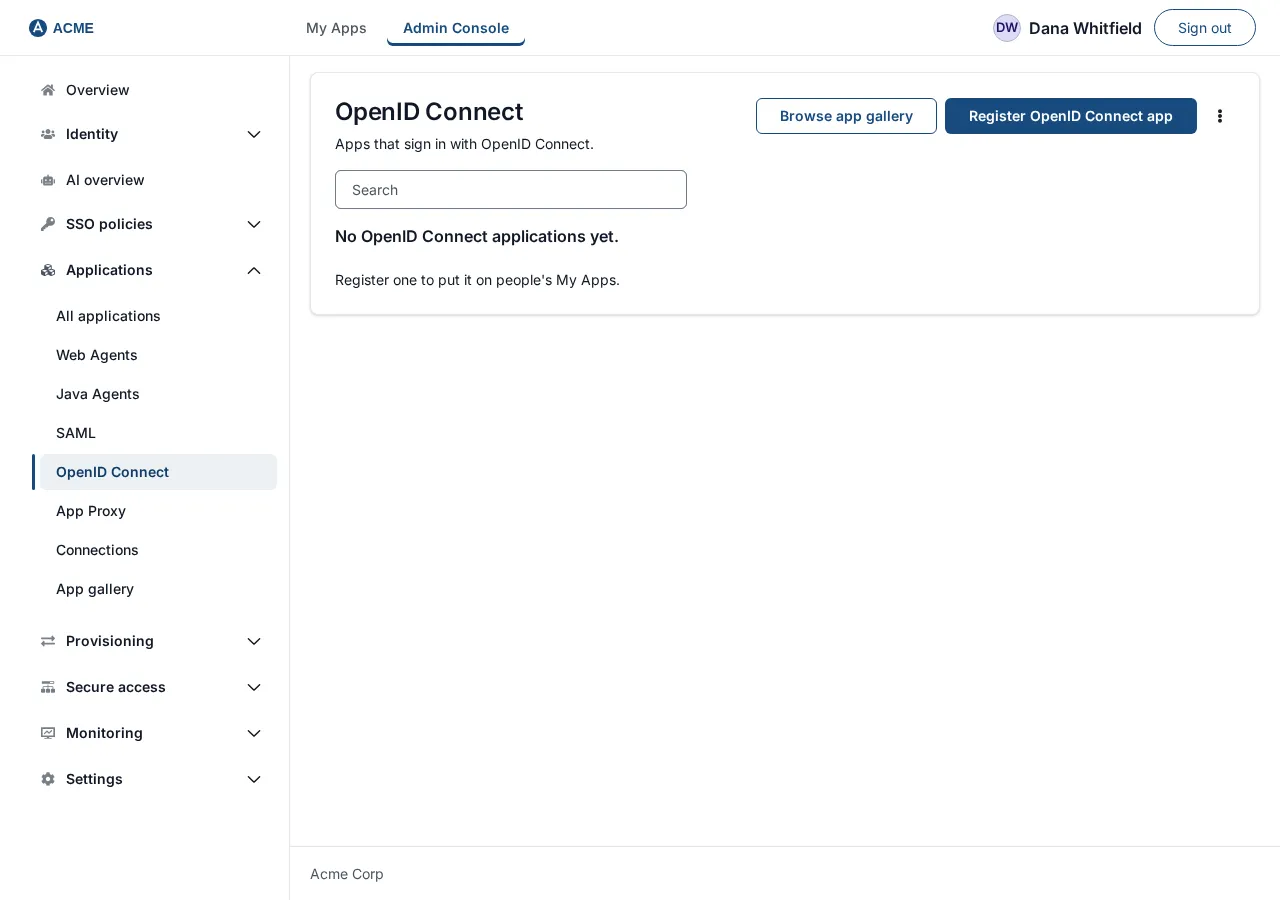
With nothing registered yet, the list says “No OpenID Connect applications yet.” and “Register one to put it on people’s My Apps.”
-
General. Fill in:
Field Example Name Acme WikiSlug acme-wiki(filled in from the name)Application ID app_acme_wiki(filled in from the name; it cannot be changed later)Category CollaborationMy Apps icon (required) choose one from the library, or select Upload an image (PNG, JPEG, GIF or SVG up to 2 MB, resized automatically) Select Next.
-
Access mode. Choose OpenID Connect: “App uses OpenID Connect.” Select Next.
-
Connection. The step says: “Where the app is sent back after sign-in.” The Integration tab later gives you SSOGEN’s endpoints to put into the application. Fill in:
Field Example Notes Redirect URI https://wiki.acme.example/auth/callback“One per line, https only. Exact match, no wildcards.” A trailing slash is a different URI. Up to 16, every one starting with https://. Add several lines if the application has several (for example a test and a live address).Client ID acme-wiki“Lowercase letters, digits, hyphens. A public client (PKCE, no secret) is created; add a client secret later under Sign-in tokens.” At most 64 characters, not a web address. 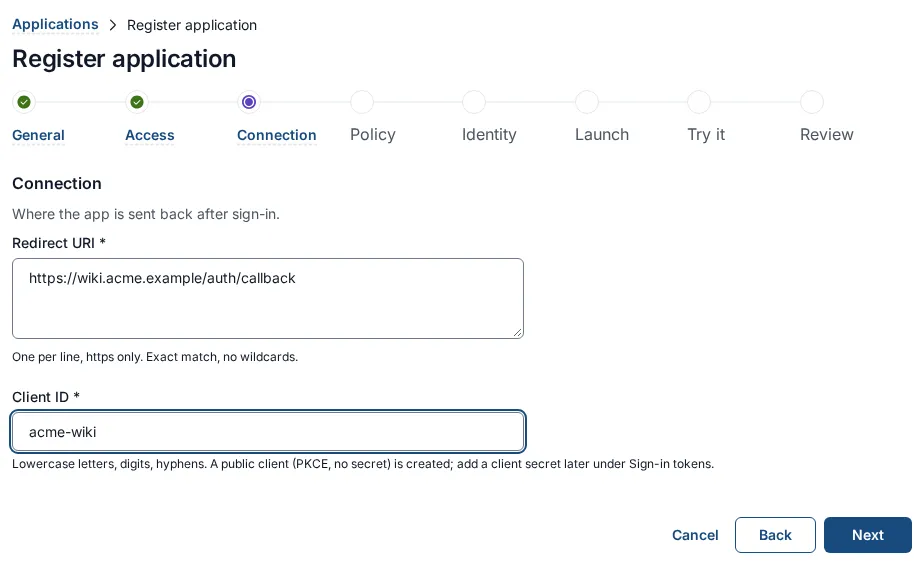
If the Client ID is empty you stay on the step and see “Enter a client ID, for example my-app-client.”; if there is no redirect address, “Enter at least one redirect URI, the address the application receives the sign-in at.”; an address that does not start with
https://or has a#part is refused with a message naming it.A Client ID can belong to one application only. If another application already uses it, saving fails (see the table at the end of this part).
-
Sign-in policy. Choose the policy that decides how people sign in (see the SAML guide for the screen, which is the same).
-
Identity sent to app. This step decides what the application learns about the person.
- Identify the person by controls the
subclaim, the person’s identifier in the ID token. With the default (shown asusername — the SSOGEN account name (default)) thesubis SSOGEN’s stable internal identifier for the person, not a readable name. If you choose another attribute, such asemail — mail address, thesubis that value instead. Choose the one the application matches its own accounts on. A person who has no value for the chosen attribute is refused rather than sent under a different kind of name. - Add an attribute adds an extra claim: type a name (for example
department), choose where the value comes from (for examplegroups), and leave Required unticked unless the application cannot work without it (a person missing a required value is refused). Each extra attribute appears in the ID token as a claim of that name; a single value is a string, several values are a list. - The names
iss,sub,aud,exp,iat,jti,auth_time,nonce,acr,amr,azp,at_hash,c_hash,s_hash,email,email_verified,nameandpreferred_usernameare reserved: SSOGEN will not send an extra attribute under one of them.
The standard claims are released by scope:
emailwith theemailscope, andnameandpreferred_usernamewith theprofilescope. SSOGEN never sendsemail_verified, because it does not verify addresses itself. - Identify the person by controls the
-
Launch. Type the address My Apps opens, which should start the application’s own sign-in:
https://wiki.acme.example/login. Select Next. This saves the application (not yet active). -
Try it (optional). Pick Maria Lopez and select Run test. For an OpenID Connect application the result shows cards titled ID token claims and UserInfo claims, listing the claims the application would receive. Under Advanced, OpenID Connect scope lets you try a different scope list than
openid profile email. -
Review and activate. Check the summary, which lists OAuth client ID and Redirect URIs, and select Activate application.
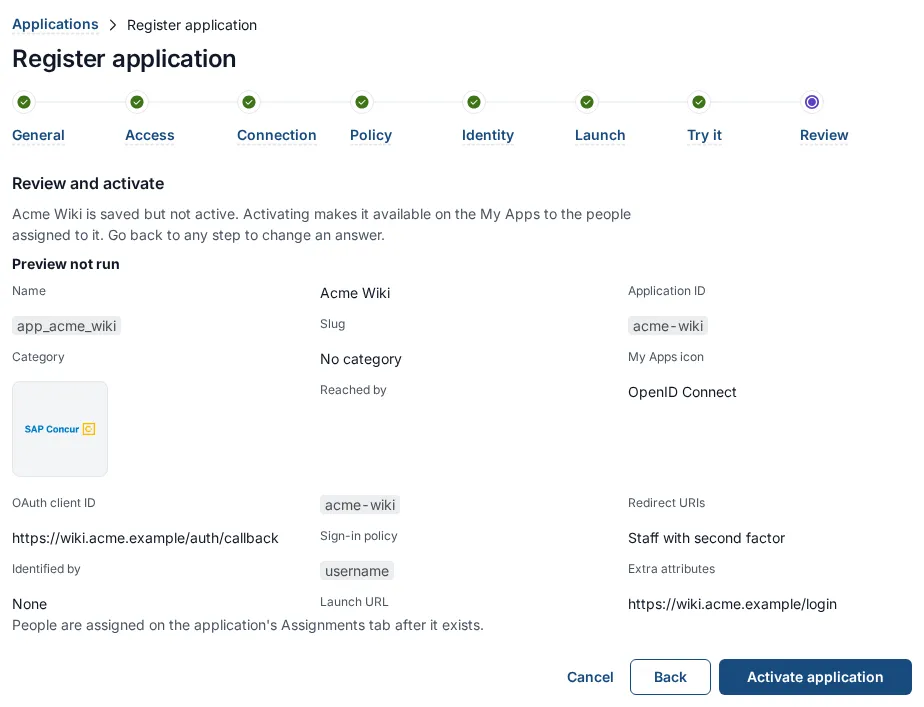
If saving fails, the wizard stays on the step and says why:
| Message | What to do |
|---|---|
| That application ID is already in use. Choose a different one. | Change Application ID. |
| The application ID may use only lowercase letters, numbers, underscores and hyphens. | Fix Application ID. |
| Enter a name of 1 to 256 characters. | Fix Name. |
| The slug may use only lowercase letters, numbers and hyphens. | Fix Slug. |
| Application registration failed. Check the values on each step and try again. | A general refusal. The usual causes for OpenID Connect: the Client ID is already used by another application, or it is not a valid client ID (use lowercase letters, numbers and single hyphens, up to 64 characters), or a redirect URI does not start with https://. |
Part B: give SSOGEN’s values to the application
Section titled “Part B: give SSOGEN’s values to the application”-
Open Applications, OpenID Connect, then Acme Wiki, then the Integration tab. The section OpenID Connect (“For an application that speaks OpenID Connect to SSOGEN directly. Configure it with the discovery document if its library supports one.”) shows:
Setting Value in this example Why Discovery document https://sso.acme.example/.well-known/openid-configurationPoint the application’s library at this and the endpoints below are configured for it. Issuer https://sso.acme.exampleMust match the issclaim exactly.Client ID acme-wikiAlso the audof every token issued for this application.Redirect URI https://wiki.acme.example/auth/callbackMatched exactly. No wildcards. Authorization endpoint https://sso.acme.example/oauth2/authorizeWhere the browser is sent. Token endpoint https://sso.acme.example/oauth2/tokenWhere the code is redeemed. JWKS https://sso.acme.example/oauth2/jwksThe keys that verify what SSOGEN signs. UserInfo endpoint https://sso.acme.example/oauth2/userinfoClaims for an authenticated person. End session endpoint https://sso.acme.example/oauth2/logoutSigns the person out of SSOGEN, not only out of the application. PKCE Required, S256 The only method accepted. Response type codeAuthorization code only. Scopes openid profile emailWhat SSOGEN will honour. 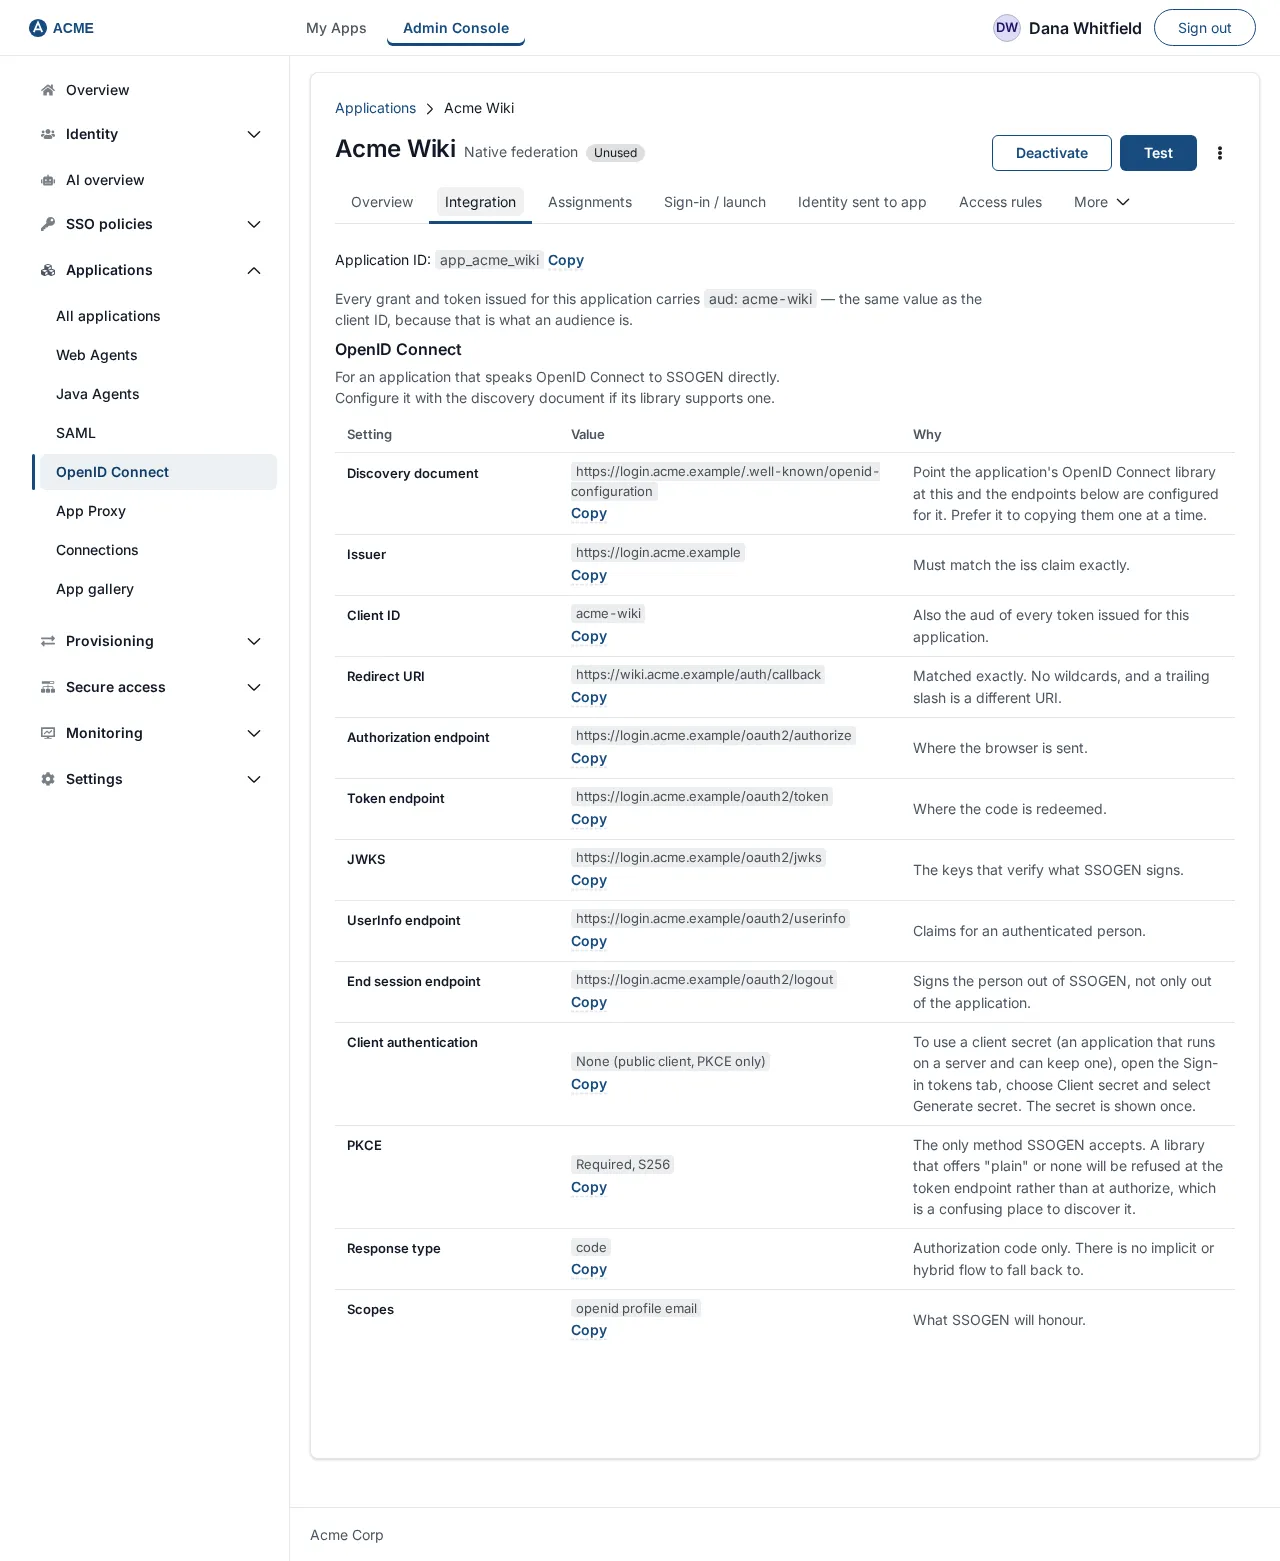
A line above the tables says: “Every grant and token issued for this application carries
aud: acme-wiki— the same value as the client ID, because that is what an audience is.”Your values use your own SSOGEN address.
-
Configure Acme Wiki. This happens in the application, not in SSOGEN. Most libraries need only the issuer (or discovery address), the client ID, the redirect address and the scopes. For example, a configuration file for the application:
OIDC_DISCOVERY_URL=https://sso.acme.example/.well-known/openid-configurationOIDC_CLIENT_ID=acme-wikiOIDC_REDIRECT_URI=https://wiki.acme.example/auth/callbackOIDC_SCOPES=openid profile emailOIDC_USE_PKCE=trueOIDC_PKCE_METHOD=S256The names on the left are invented for this example; use your application’s own setting names. If the application is built on the Python library Authlib, the equivalent is:
oauth.register(name="ssogen",client_id="acme-wiki",server_metadata_url="https://sso.acme.example/.well-known/openid-configuration",client_kwargs={"scope": "openid profile email","code_challenge_method": "S256","token_endpoint_auth_method": "none",},)token_endpoint_auth_method: nonemeans “public client, PKCE only”, which is how a new OpenID Connect application is registered. For a client with a secret see Part C. -
Check that the application can reach SSOGEN, from the application’s server:
curl -s https://sso.acme.example/.well-known/openid-configurationYou should see a JSON document that includes
"issuer","authorization_endpoint","token_endpoint","jwks_uri","code_challenge_methods_supported":["S256"]and"scopes_supported":["openid","profile","email"]. If the command fails, the application’s server cannot reach SSOGEN over HTTPS: check DNS, the firewall and that the server trusts SSOGEN’s certificate.
Part C: keep a secret, or use a key (Sign-in tokens tab)
Section titled “Part C: keep a secret, or use a key (Sign-in tokens tab)”A new OpenID Connect application is registered as a public client: it proves itself with PKCE only and has no secret. That is right for single-page and mobile apps. A web application with a server can do better, by also proving who it is when it redeems the code.
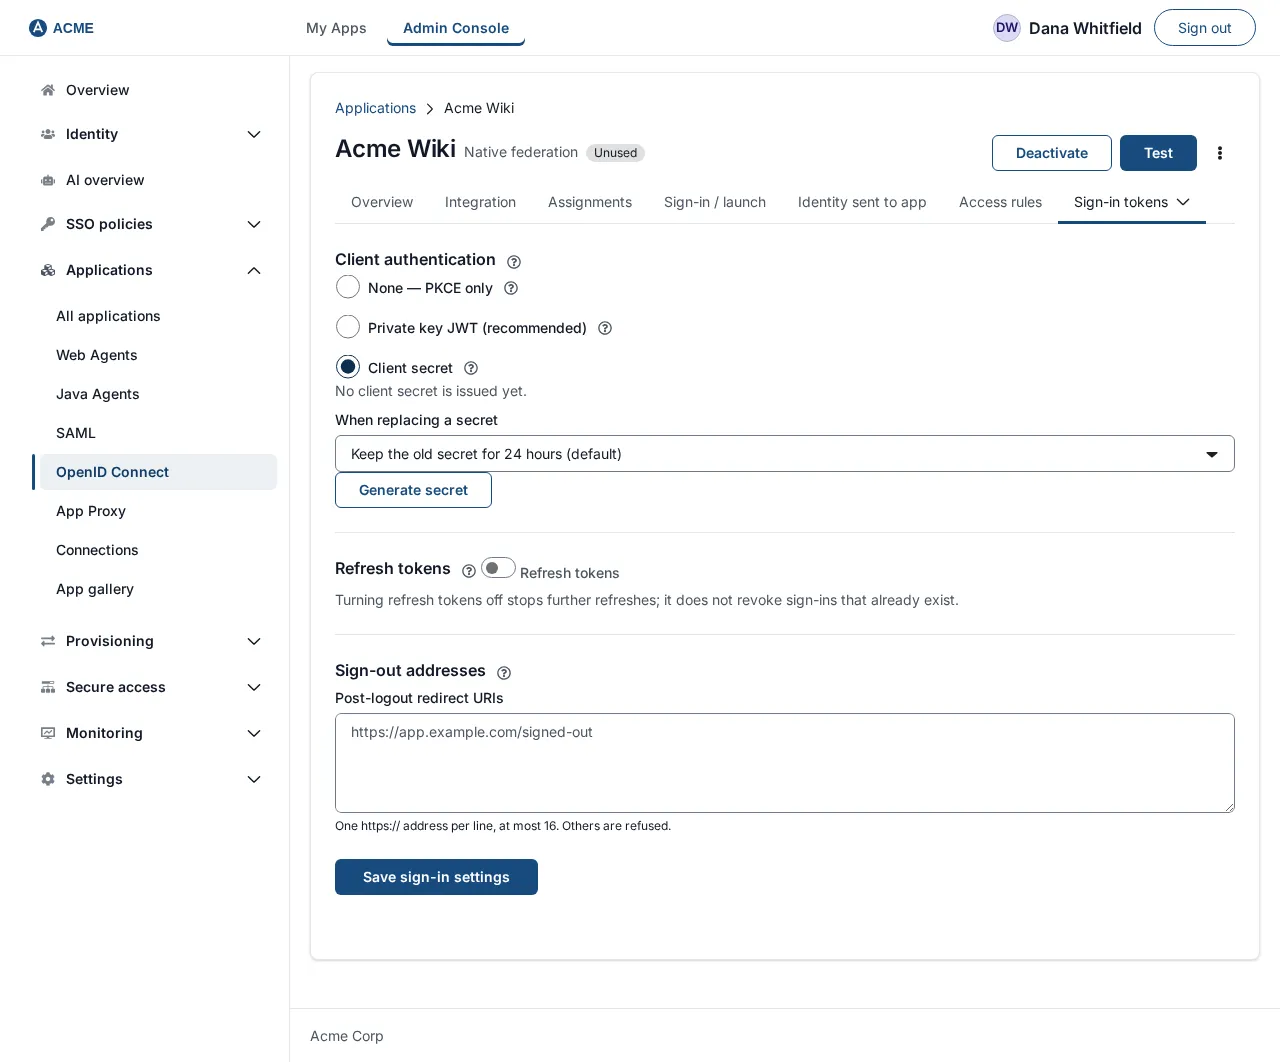
Open the application, then the Sign-in tokens tab. (This tab appears for applications that have an OpenID Connect registration.) It has two sections.
Client authentication
Section titled “Client authentication”“How the application proves its identity when requesting tokens.” Choose one:
| Choice | Meaning | Use it for |
|---|---|---|
| None — PKCE only | “For public clients (SPA, mobile). Not for service applications.” | Single-page and mobile apps. |
| Private key JWT (recommended) | “Register public keys only (RS256 2048+ or ES256).” The application signs a short assertion with its private key; SSOGEN keeps no shared secret. | Server applications that can keep a private key. |
| Client secret | “Generated secret, shown once. SSOGEN stores only a hash.” | Server applications that cannot use keys. |
To use a client secret:
-
Select Client secret. The page says “No client secret is issued yet.”
-
Under When replacing a secret leave the default for the first secret (it only matters later).
-
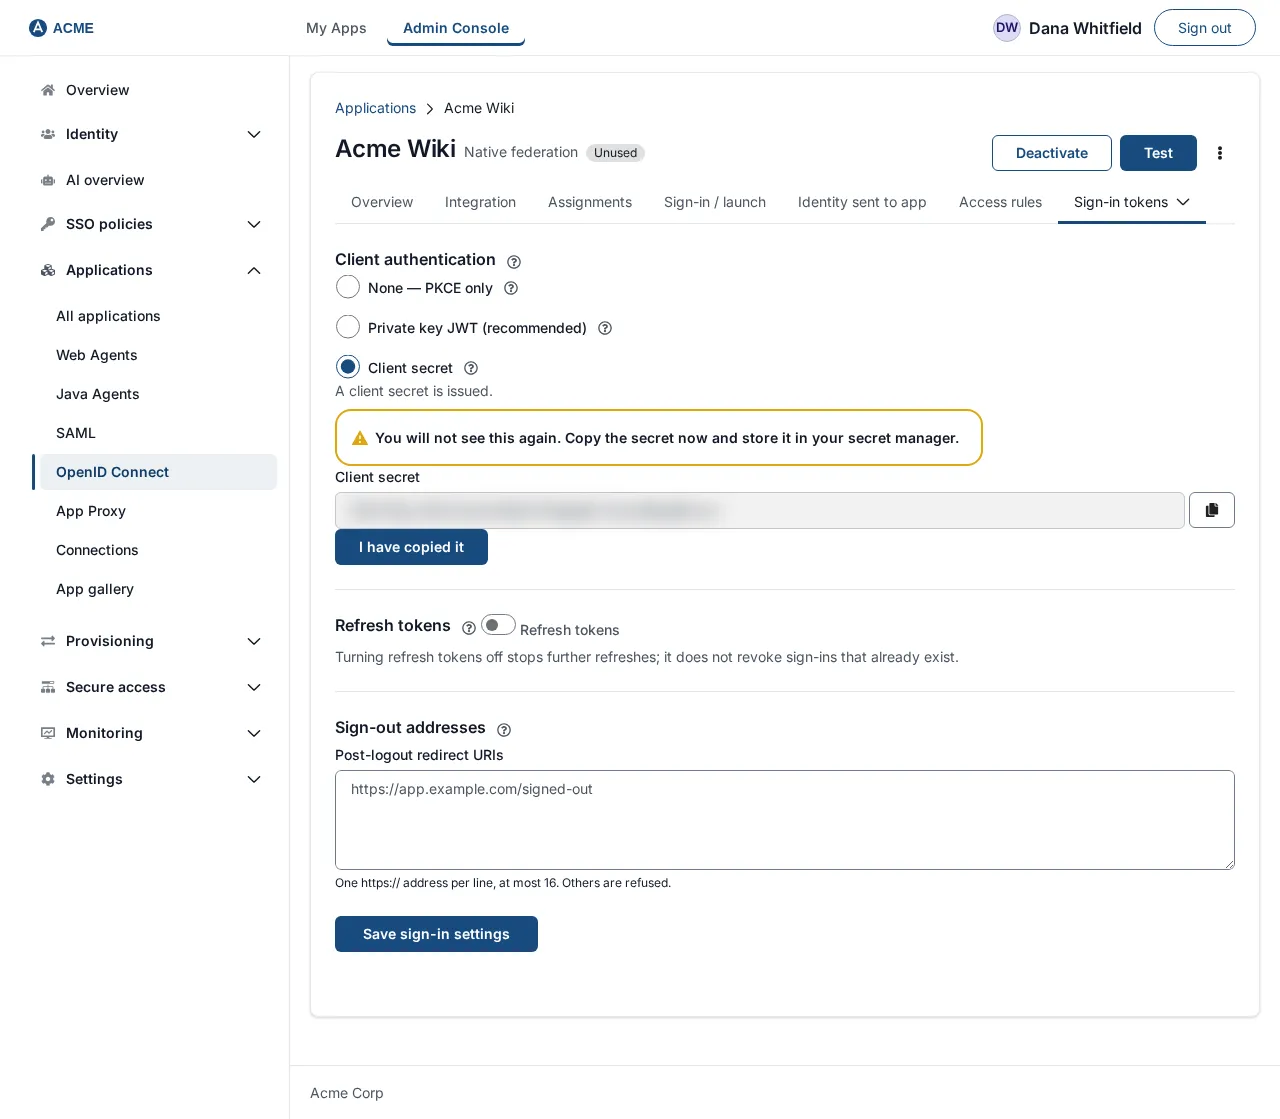
Select Generate secret. A warning appears: “You will not see this again. Copy the secret now and store it in your secret manager.” The secret is shown in the field Client secret with a copy control. Copy it into your secret store and select I have copied it.
-
Select Save sign-in settings. The page says “Saved. As it is now: client authentication client secret; refresh tokens off.” (The secret must be issued first; if you save the method before generating one the console shows the refusal code
client_secret_required.) -
In the application, set its client secret and use client secret basic (HTTP Basic authentication at the token endpoint) as the token endpoint authentication method.
client_kwargs={"scope": "openid profile email","code_challenge_method": "S256","token_endpoint_auth_method": "client_secret_basic"}and supply
client_secretfrom your secret store, never from source code.
To replace a secret later: return to the tab, choose the old-secret behavior under When replacing a secret (Retire the old secret at once, Keep the old secret for 1 hour, Keep the old secret for 24 hours (default) or Keep the old secret for 7 days), and select Generate secret again. While the old one is kept, the tab says “The previous secret keeps working until” and the time. Use Retire the old secret at once if the secret leaked.
To use a private key: select Private key JWT (recommended), paste the Public keys (JWKS) (public keys only, at most 5, each with a unique kid; see “Make a key pair” below), and select Save sign-in settings. Refusals name the key at fault, for example “Key 1 (acme-wiki-1) contains private key material. Paste public keys only.”
Refresh tokens
Section titled “Refresh tokens”“Lets the app renew access without a new sign-in. Authorization code flow only.” Turn on the switch Refresh tokens and choose:
| Setting | Choices | Default |
|---|---|---|
| Ends after no use for | 5 minutes, 15 minutes, 30 minutes, 1 hour, 8 hours, 24 hours | 30 minutes |
| Ends at the latest after (never longer than the person’s sign-in session) | 1 hour, 8 hours, 24 hours, 7 days, 30 days | 8 hours |
Select Save sign-in settings. Access tokens for a person’s sign-in are short-lived (five minutes by default); a refresh token lets the application get new ones until the limits above. Turning refresh tokens off stops further refreshes; the page notes that it does not revoke sign-ins that already exist.
Part D: assign people and try it
Section titled “Part D: assign people and try it”- Open the Assignments tab and assign Maria Lopez or a group (see Assign people, set the sign-in policy, test and activate).
- As Maria Lopez, open My Apps and select the tile Acme Wiki. She goes to
https://wiki.acme.example/login, which sends her to SSOGEN, and then back to the redirect address signed in. - In the application, you should see her as
maria.lopezor her email, according to Identify the person by.
If it does not work
Section titled “If it does not work”| What you see | Cause and fix |
|---|---|
| An SSOGEN page “Sign-in refused”: “The application sent a sign-in request this service cannot accept. Go back to the application and try again.” | The request was malformed or does not match the registration. Check: the Client ID is exactly the registered one; the redirect URI matches exactly (scheme, host, port, path, trailing slash); the library sends code_challenge with code_challenge_method=S256; the application asks for the code response type. |
The browser comes back to the redirect URI with error=access_denied |
SSOGEN refused the person: not assigned, the application is not active, or the sign-in policy denies them. Run Test on the application as that person; it names the failed check. |
The application’s server cannot redeem the code, with an invalid_client or similar answer |
The token endpoint authentication method in the application does not match Client authentication in the Sign-in tokens tab (for example it sends a secret to a public client). |
| The application says the token’s issuer or audience is wrong | Use the Issuer from the Integration tab, and expect aud to equal the client ID. |
| The person arrives with no email or name | The email or profile scope was not requested, or the person has no value in SSOGEN. |
The sub is a long identifier, not a name |
Identify the person by is at its default. Choose another attribute in Identity sent to app and Save. |
Signing out
Section titled “Signing out”The Integration tab lists an End session endpoint, https://sso.acme.example/oauth2/logout, which signs the person out of SSOGEN, not only out of the application.
To let the browser come back to your application afterward, open the Sign-in tokens tab (it shows Sign-out addresses for browser-based OpenID Connect applications) and enter the addresses in Post-logout redirect URIs, one https:// address per line, at most 16: “Where the browser may go after sign-out. Exact-match https URLs.”
- A request to the end session endpoint with a
post_logout_redirect_urithat is registered there ends the person’s SSOGEN session and sends the browser to that address. If the person had signed in through another identity provider that also ends its session, the browser goes there first and then on to your address. - A request with a
post_logout_redirect_urithat is not registered is refused with an HTTP 400 error. - A request without it ends the session and answers with an empty successful response (HTTP 204), so the browser shows nothing new.
Have your application end its own session first, then call the end session endpoint. Turning off Refresh tokens does not revoke sign-ins that already exist; use a shorter lifetime if that matters to you.
Service applications (client credentials)
Section titled “Service applications (client credentials)”A service application is a program that calls an API as itself: a nightly report job, a build system, an integration. There is no person, no redirect and no My Apps tile. It gets an access token about itself, and the API it calls checks the token.
Register one
Section titled “Register one”-
Open Applications, OpenID Connect, then Register service. The wizard is titled Register service application, with a breadcrumb Applications and four steps: Details, Access, Authentication, Review.
-
Details.
Field Example Notes Name Acme Nightly ReportSlug acme-nightly-reportApplication ID app_acme_nightly_reportClient ID acme-nightly-report“Becomes the subject of the tokens it is issued. It is retired for good if the application is deleted.” Lowercase letters, numbers and single hyphens; it cannot look like a UUID. -
Access.
Field Example Notes Audiences (required) https://reports.acme.example/api“APIs it may request tokens for: https URIs or urn: names, one per line.” The API you will call. If you leave it empty: “Name at least one audience: the API this application will call.” Scopes reports.readOptional, one per line. The permissions you define for your API. “Optional, one per line. openid, profile and email are for people and are refused.” Access token lifetime 15 minutes (default) Choices: 5 minutes, 15 minutes (default), 30 minutes, 1 hour. 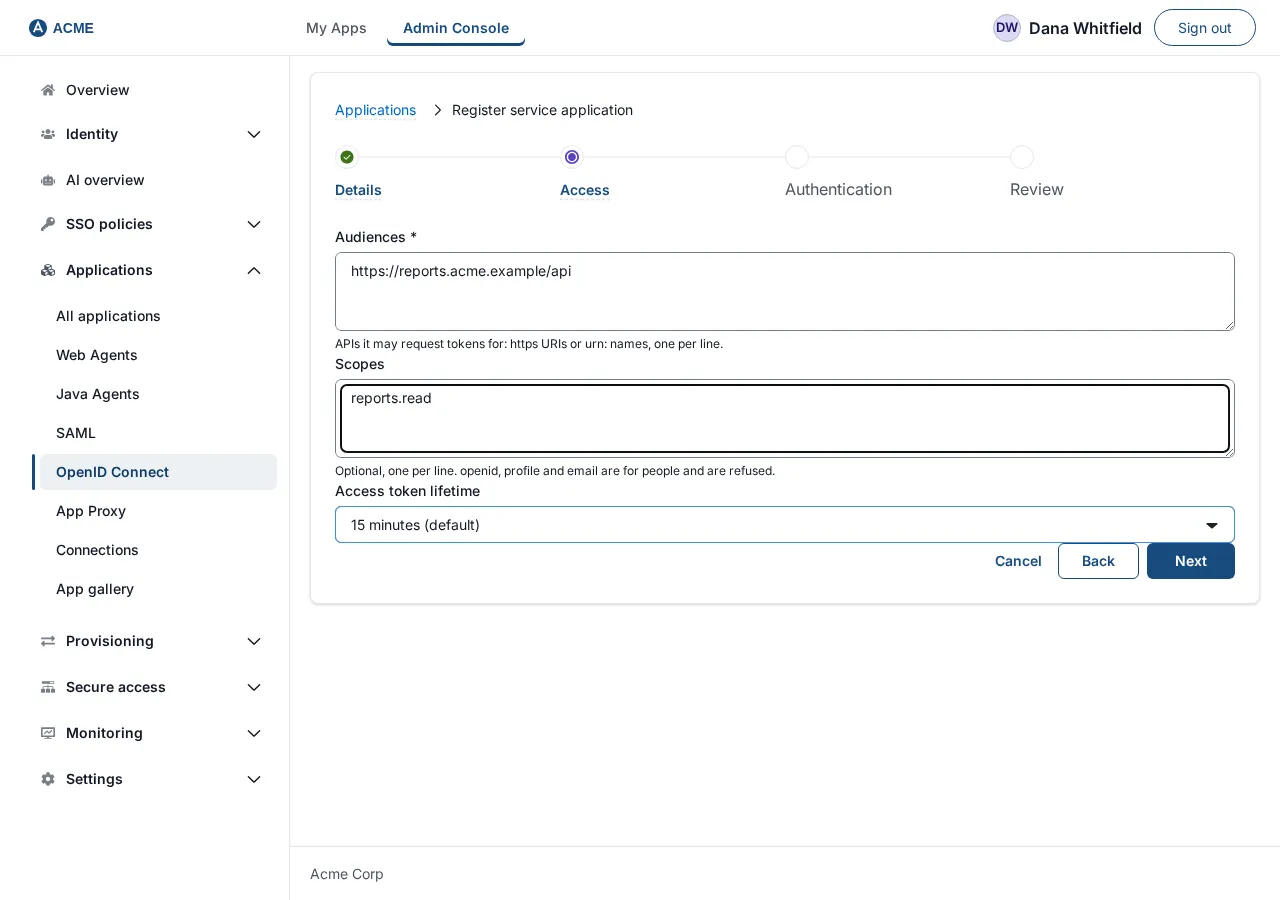
-
Authentication. Under Method choose:
- Private key JWT (you supply the public keys), then paste the Public keys (JWKS) (“Public keys only, at most 5, each with a unique kid.”), or
- Client secret (generated for you): “A client secret is generated and shown once.”
-
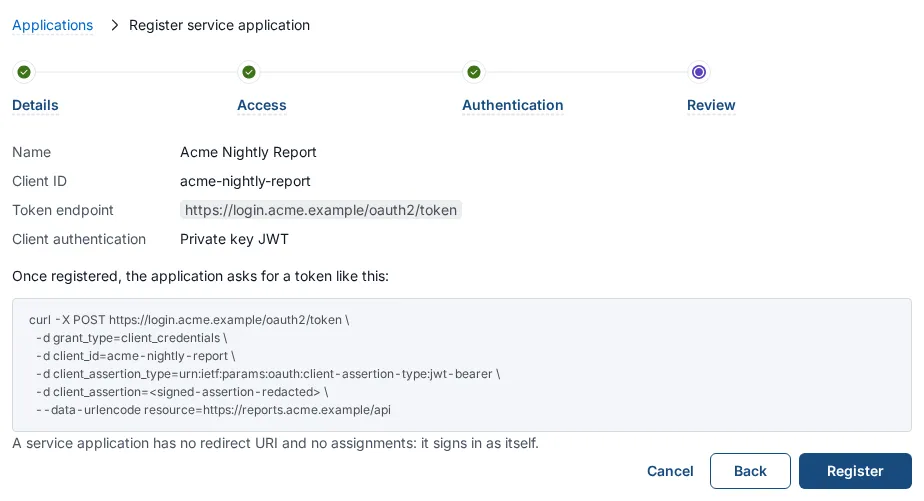
Review. Shows Name, Client ID, Token endpoint and Client authentication, and a sample request: “Once registered, the application asks for a token like this:”. The note says “A service application has no redirect URI and no assignments: it signs in as itself.” Select Register.
-
If you chose Client secret, a page titled “Acme Nightly Report is registered” shows the secret once, with the warning “You will not see this again. Copy the secret now and store it in your secret manager.” Select I have copied it. With a private key you go straight to the application.
A service application is active as soon as it is registered. Some scopes let a service application act on SSOGEN’s own automation interface; registering such a scope is limited to super administrators.
If registration is refused, the message names the cause, for example “The keys were refused (key 1): …”.
Make a key pair
Section titled “Make a key pair”For Private key JWT you create a key pair and give SSOGEN only the public half. This example uses Python with the jwcrypto package (pip install jwcrypto):
from jwcrypto import jwk
key = jwk.JWK.generate(kty="EC", crv="P-256", kid="acme-nightly-report-1")open("acme-nightly-report.private.json", "w").write(key.export_private())print('{"keys": [' + key.export_public() + ']}')
Paste the printed text into Public keys (JWKS). Keep the .private.json file in your secret store; it never goes to SSOGEN. SSOGEN accepts RSA keys (for RS256, 2048-bit or larger) and EC P-256 keys (for ES256). Keys containing private values are refused: “contains private key material. Paste public keys only.”
Ask for a token
Section titled “Ask for a token”The application sends a request to the token endpoint, https://sso.acme.example/oauth2/token.
With a client secret:
curl -X POST https://sso.acme.example/oauth2/token \ -u acme-nightly-report:"$CLIENT_SECRET" \ -d grant_type=client_credentials \ --data-urlencode resource=https://reports.acme.example/apiWith a private key. The application signs a short-lived assertion with its private key and sends it:
import time, uuidfrom jwcrypto import jwk, jwt
key = jwk.JWK.from_json(open("acme-nightly-report.private.json").read())now = int(time.time())claims = {    "iss": "acme-nightly-report",    "sub": "acme-nightly-report",    "aud": "https://sso.acme.example/oauth2/token",    "iat": now,    "exp": now + 120,    "jti": str(uuid.uuid4()),}token = jwt.JWT(header={"alg": "ES256", "kid": "acme-nightly-report-1"}, claims=claims)token.make_signed_token(key)print(token.serialize())
curl -X POST https://sso.acme.example/oauth2/token \ -d grant_type=client_credentials \ -d client_id=acme-nightly-report \ -d client_assertion_type=urn:ietf:params:oauth:client-assertion-type:jwt-bearer \ -d client_assertion="$ASSERTION" \ --data-urlencode resource=https://reports.acme.example/apiThe rules for the assertion, all checked by SSOGEN: it is signed with RS256 or ES256 (never none or a shared-secret algorithm); iss and sub both equal the client ID; aud is a single value equal to SSOGEN’s issuer (https://sso.acme.example) or its token endpoint address; exp is present and no more than 300 seconds after iat; and jti is unique, because each assertion can be used once. Allow about a minute of clock difference between the machines. The kid in the header must be one you registered (it may be left out if exactly one key is registered).
The answer is a JSON document with access_token, token_type (Bearer), expires_in (seconds) and scope. There is never a refresh token: ask for a new access token when it expires.
| Request detail | Rule |
|---|---|
resource |
The audience the token is for. It must be one of the registered Audiences. Leave it out only if exactly one audience is registered. Only one resource is allowed. A wrong one gives invalid_target. |
scope |
Optional, space-separated. Each must be a registered scope. Leave it out to get every registered scope. An unregistered one, or openid, profile or email, gives invalid_scope. |
What the API checks
Section titled “What the API checks”The API that receives the token (a “resource server”) should:
- Fetch SSOGEN’s signing keys from the JWKS address (
https://sso.acme.example/oauth2/jwks) and verify the token’s signature. - Check
issishttps://sso.acme.example,audis the API’s own identifier (https://reports.acme.example/api), andexphas not passed. - Check the token’s scope covers what the call needs.
Keep the Access token lifetime short. If the service application is disabled afterwards, SSOGEN treats its tokens as inactive when asked (UserInfo and introspection), but an API that checks the token locally goes on accepting it until it expires.
Not covered here
Section titled “Not covered here”- Dynamic client registration (SSOGEN does not offer it).
- Per-client access token lifetime for people’s sign-ins (fixed at five minutes).