Register a SAML application in SSOGEN
This guide shows how to register a SAML application in SSOGEN with SAML 2.0: the entity ID, the assertion consumer service (ACS) URL, the metadata file, the certificates and the name ID, so that people open it from their SSOGEN My Apps without a separate password. It follows one worked example from the application’s side and SSOGEN’s side, in the order you do them.
What SAML is, in plain words
Section titled “What SAML is, in plain words”With SAML, two parties agree to trust each other:
- The service provider (SP) is the application people want to use. In this guide: a fictional expense-reporting service called ExpenseDesk, which Acme Corp subscribes to at
https://acme.expensedesk.example. - The identity provider (IdP) is the one that knows who people are and proves it. Here, SSOGEN is the identity provider.
When Maria Lopez opens ExpenseDesk, ExpenseDesk sends her browser to SSOGEN with a SAML request. SSOGEN signs her in (or recognizes that she is already signed in), checks that she may use ExpenseDesk, and sends her browser back to ExpenseDesk with a signed assertion: a small document saying “this is Maria, here is her email”. ExpenseDesk trusts the assertion because it is signed with a certificate it was told to expect.
For the two parties to trust each other, each must be told the other’s values. Several are matched exactly, so one wrong character is a refused sign-in.
| Value | What it is | Who owns it |
|---|---|---|
| SP entity ID | The application’s name for itself, often a URL. | The application |
| Assertion consumer service (ACS) URL | Where the assertion is delivered. | The application |
| Single logout URL (optional) | Where the application accepts sign-out messages. | The application |
| IdP entity ID | SSOGEN’s name for itself. | SSOGEN |
| Single sign-on URL | Where the application sends the person to sign in. | SSOGEN |
| Signing certificate | The public certificate that proves an assertion came from SSOGEN. | SSOGEN |
Before you start
Section titled “Before you start”- You can sign in to the SSOGEN Admin Console with a role that may write applications.
- A sign-in policy exists (SSO policies, then Policies) and is either the default or the one you will pick in step 4. See Choose how to connect an application.
- You can sign in to the application as an administrator and open its single sign-on settings. Many products charge extra for SAML or need a support request to turn it on. That is outside SSOGEN.
- SSOGEN’s public address is reachable by people’s browsers. In this guide it is
https://sso.acme.example.
Part A: collect the application’s values (on the application’s side)
Section titled “Part A: collect the application’s values (on the application’s side)”This part happens in ExpenseDesk, not in SSOGEN.
-
Sign in to ExpenseDesk as an administrator and open Settings, then Security, then Single sign-on.
-
Choose SAML 2.0 as the method. Do not turn it on yet. ExpenseDesk now shows the values it uses as a service provider:
ExpenseDesk shows Value in this example Entity ID https://acme.expensedesk.example/saml/metadataReply URL (ACS) https://acme.expensedesk.example/saml/acsLogout URL https://acme.expensedesk.example/saml/sloSign-in page for SSO https://acme.expensedesk.example/sso/loginMetadata download a link to https://acme.expensedesk.example/saml/metadata.xml -
If the application offers a metadata file (an XML file, often named “SP metadata”), download it. It makes Part B quicker and avoids typing errors. If not, copy the values by hand.
-
Note that ExpenseDesk also needs a sign-in page for SSO, the address that starts a SAML sign-in. You will use it as the Launch URL in Part B.
Part B: register the application in SSOGEN
Section titled “Part B: register the application in SSOGEN”-
Sign in to the Admin Console. In the left menu open Applications, then SAML.
-
The list is titled SAML Select Register SAML app.
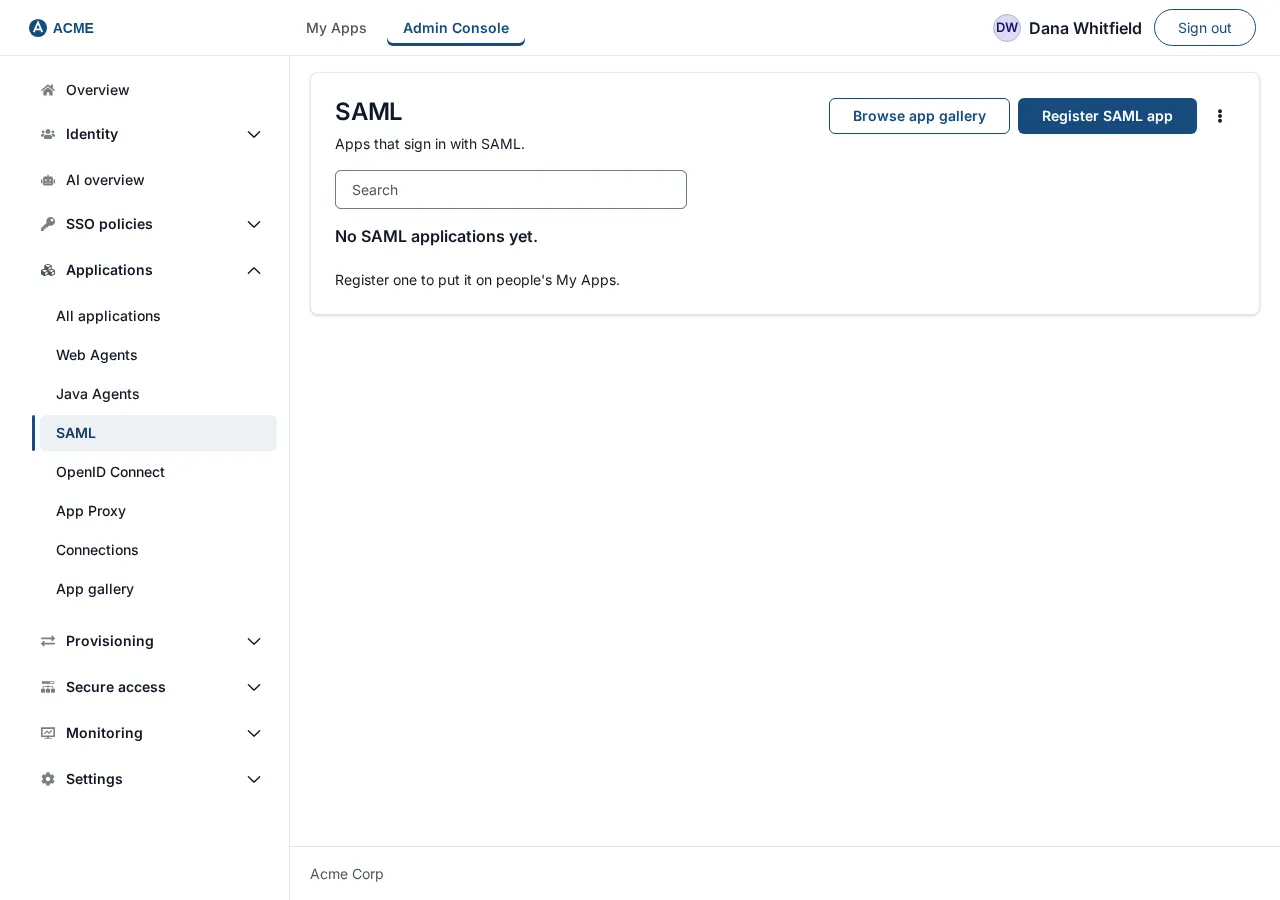
With no applications yet, the list says “No SAML applications yet.” and “Register one to put it on people’s My Apps.”
The Register application wizard opens, with the step list General, Access mode, Connection, Sign-in policy, Identity sent to app, Launch, Try it, Review and activate. A breadcrumb Applications at the top goes back to the list.
Step 1: General
Section titled “Step 1: General”-
Fill in:
Field Example Notes Name (required) Acme ExpensesShown to people in My Apps. Slug (required) acme-expenses“Used in URLs. Taken from the name until you change it.” Lowercase letters, numbers and single hyphens. Application ID (required) app_acme_expenses“Used in links and audit records. It cannot be changed later.” Taken from the name. Lowercase letters, numbers, underscores and hyphens. Category FinanceFree text. Default Custom.My Apps icon (required) choose one The picture on the tile. Pick one from the library (recent icons first; search by name, for example Expense) or select Upload an image (PNG, JPEG, GIF or SVG up to 2 MB; it is resized to fit automatically). Next stays off until you choose an icon. You can change the icon and the category later.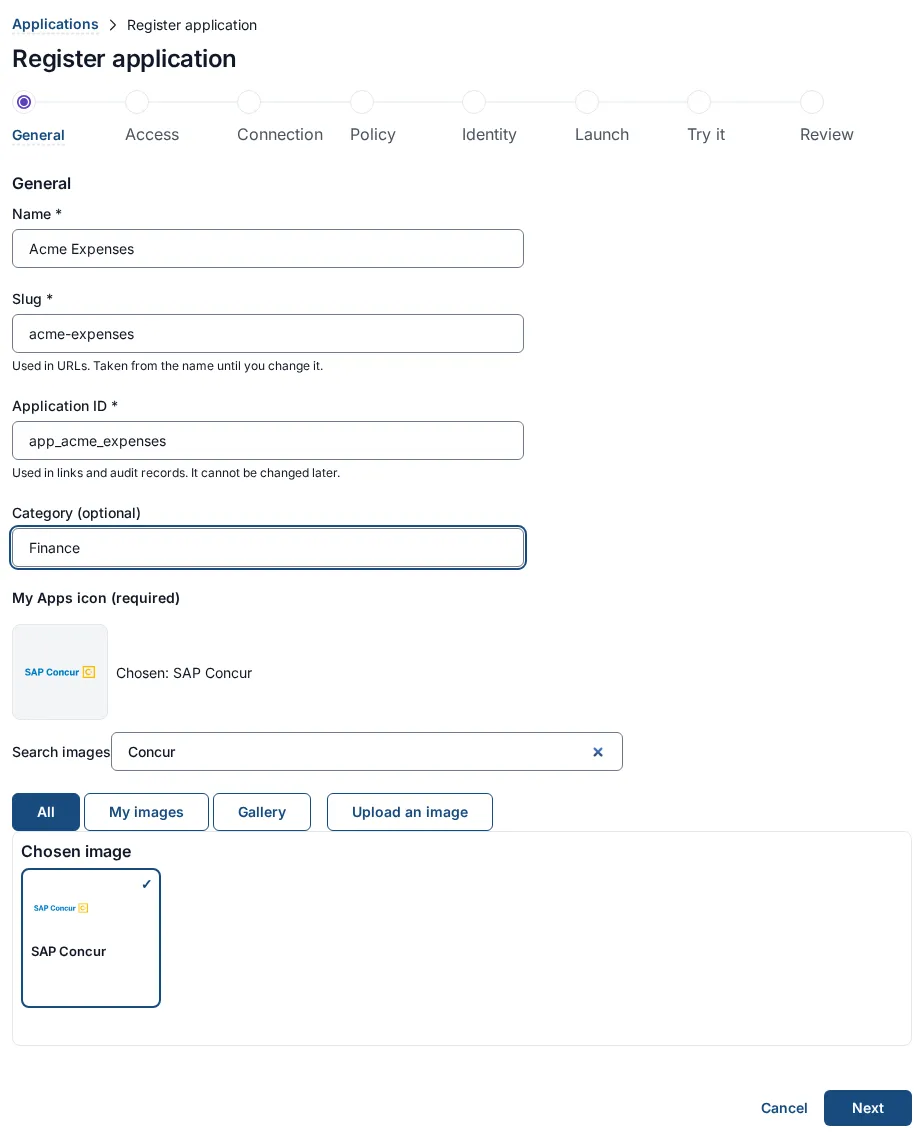
-
Select Next.
If a required field is empty you stay on the step and see “Enter an application name.”, “Enter a slug, for example payroll.” or “Enter an application ID, for example app_payroll.” beside the field. A slug with capitals or spaces shows “Use lowercase letters, numbers and single hyphens.”
Step 2: Access mode
Section titled “Step 2: Access mode”-
Under “How is this application reached?” choose SAML. Its description reads: “App is a SAML service provider.” Select Next. Because you started from the SAML list, SAML may already be chosen.
If you try to continue with nothing chosen, you see “Choose how this application is reached.”
Step 3: Connection
Section titled “Step 3: Connection”-
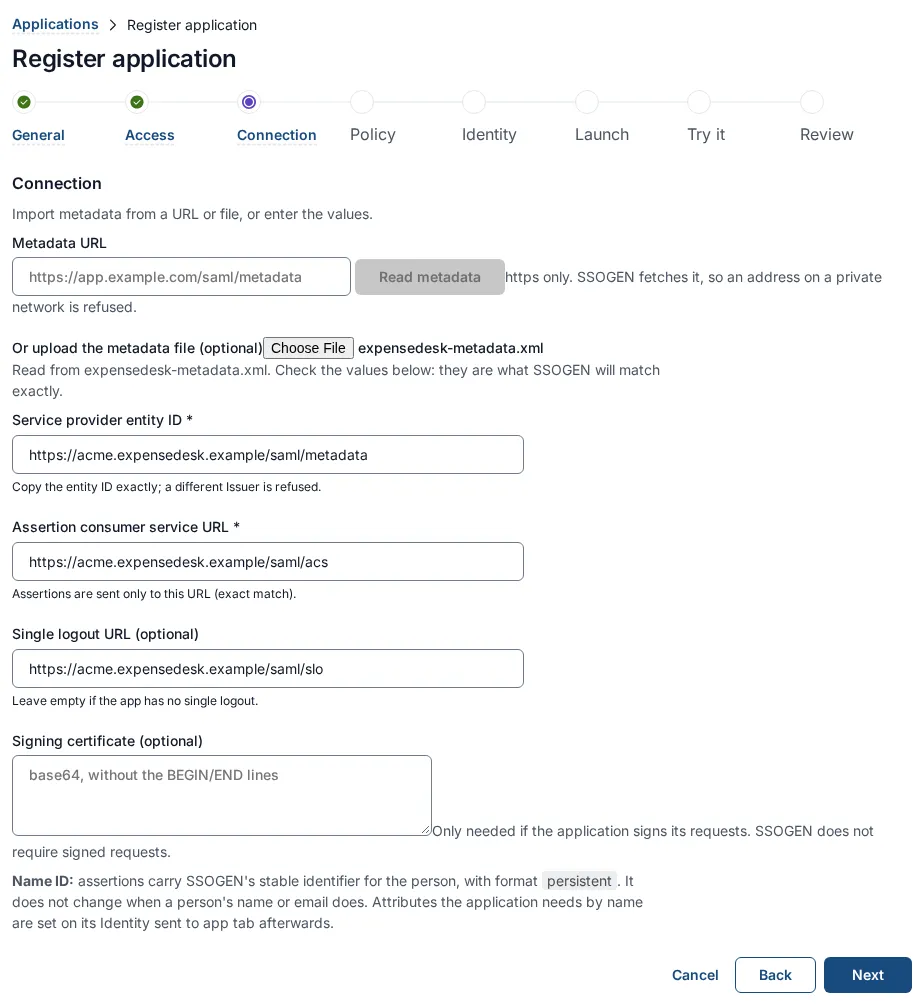
The step says: “Import metadata from a URL or file, or enter the values.”
-
Either type the application’s Metadata URL (https only; SSOGEN fetches it, so an address on a private network is refused) and select Read metadata, or select Or upload the metadata file (optional) and choose the XML file you downloaded in Part A. SSOGEN shows Review what the metadata declares: the entity ID, the single logout URL, the name ID formats, the assertion consumer service endpoints and the signing certificates, with whether the metadata is signed. Pick the endpoint and certificate you want and select Use these values. The fields below fill in, and a note appears: “Read from metadata.xml. Check the values below: they are what SSOGEN will match exactly.” Nothing is saved until you finish the wizard. Or skip the import and type the values by hand.
If the metadata cannot be used, the console shows one of these messages:
Message Meaning The metadata URL must start with https:// (a plain http address is not fetched). Use the https address. Could not fetch metadata. Check the https URL. SSOGEN could not download it. Not service provider metadata. Upload the application’s own SAML metadata file. Wrong file, for example the identity provider’s metadata. No usable entity ID, or more than one service provider. The file is incomplete or describes several applications. Enter the values by hand. No HTTP-POST assertion consumer service endpoint found. SSOGEN sends assertions by HTTP-POST only. That file is empty. / That file is larger than 256 KiB, which is more than service provider metadata needs. Use the right file. Signature failed (SHA-256 only; SHA-1 is refused). Ask the vendor for SHA-256 signed metadata, or use an unsigned copy. The metadata is signed but the signature does not verify. When SSOGEN reads a metadata file, it uses the delivery address for the HTTP-POST binding, since that is how SSOGEN sends assertions, and a signing certificate (not an encryption one).
-
Check or type these fields:
Field Example Notes Service provider entity ID https://acme.expensedesk.example/saml/metadata“Copy the entity ID exactly; a different Issuer is refused.” Required. It is often a URL but does not have to resolve. Assertion consumer service URL https://acme.expensedesk.example/saml/acs“Assertions are sent only to this URL (exact match).” Required, and must start with https://.Single logout URL (optional) https://acme.expensedesk.example/saml/slo“Leave empty if the app has no single logout.” Must start with https://if given.Signing certificate (optional) leave empty “Only needed if the application signs its requests. SSOGEN does not require signed requests.” Paste the certificate as base64 text, with or without the BEGINandENDlines.Below the fields the step states the Name ID that assertions carry: “assertions carry SSOGEN’s stable identifier for the person, with format
persistent. It does not change when a person’s name or email does. Attributes the application needs by name are set on its Identity sent to app tab afterwards.” You can change what the name is on the Identity sent to app step (step 5 below). Most applications want the email address. -
Select Next. If something is missing you stay here and see one of: “Enter the service provider’s entity ID. It is in the application’s own SAML settings.”, “Enter the assertion consumer service URL, where SSOGEN posts the assertion.”, “The assertion consumer service URL must use https.”, “The single logout URL must use https.”
Step 4: Sign-in policy
Section titled “Step 4: Sign-in policy”-
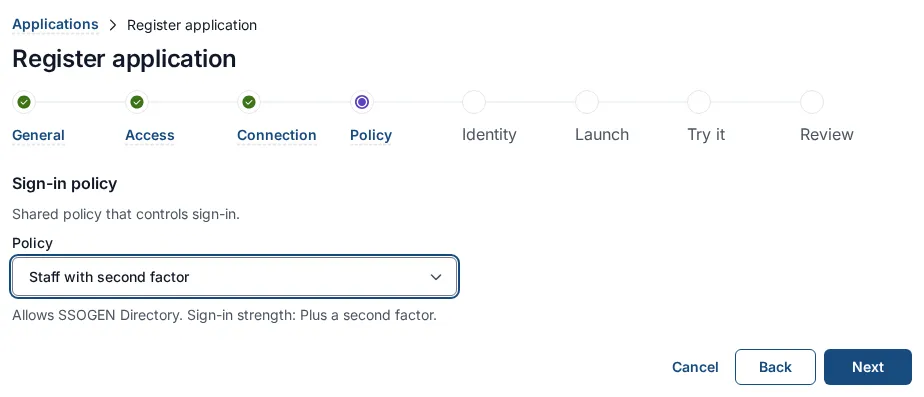
The step is titled Sign-in policy: “Shared policy that controls sign-in.”
Under Policy, choose:
- Use the default policy to use whichever policy is marked as the default. If no policy is marked as the default, this choice reads Use the default policy (none is set) and cannot be selected; or
- a named policy, for example
Staff with second factor. The default one is marked “(default)”.
When you pick a policy, a line under it summarizes it, for example “Allows Acme Directory. Sign-in strength: Plus a second factor.”
If no policy exists, or none is marked as the default and you leave Use the default policy chosen, the step explains it: “No policy exists. Create one under Policies.” or “No default policy. Choose one here or set a default under Defaults.”
-
Select Next.
Step 5: Identity sent to app
Section titled “Step 5: Identity sent to app”-
The step is titled Identity sent to the application. Under Identify the person by, choose what ExpenseDesk will use as the person’s name. For a SAML application the choices are:
Choice What ExpenseDesk receives as the NameID SSOGEN user ID, permanent (recommended)(the default)SSOGEN’s permanent identifier for the person, in format persistent. It never changes and is never given to anyone else.email — mail addressThe email address. username — the SSOGEN account nameThe account name. A warning appears: “A username can be given to someone else later; this application would then treat the new person as the old one.” source_name,source_username,source_subject,display_name,subject — SSOGEN's user IDThat value. The help under the choice says: “Sent as the NameID of the SAML assertion. Refused if the person has no value.” In practice: if you choose
emailand a person has no email address in SSOGEN, their sign-in is refused. SSOGEN shows the person a “Sign-in refused” page.Set the NameID format in the application’s own settings to match what SSOGEN sends (see the table in Part C). For ExpenseDesk, which wants the email address, choose
emailhere and the formatemailAddressthere. -
Optionally add extra attributes. ExpenseDesk wants the person’s display name and groups:
- Select Add an attribute.
- In the box Header or cookie name (the placeholder is that, even for SAML) type the attribute name the application expects, for example
displayName. - Choose the value from the list next to it, for example
display_name. The list holds SSOGEN’s own attributes (email,display_name,username,given_name,family_name,groups,subject,source_name,source_username,source_subject). - Leave Sent as at Request header (the other choice is Browser cookie). For a SAML application the value travels as an attribute in the assertion; the choice only matters for Web Agent applications, because SAML has nowhere to put a cookie.
- Select Add an attribute again for the next one:
groups←groups.
The step says: “Optional extra attributes. Add them later.” Select Remove beside a row to delete it.
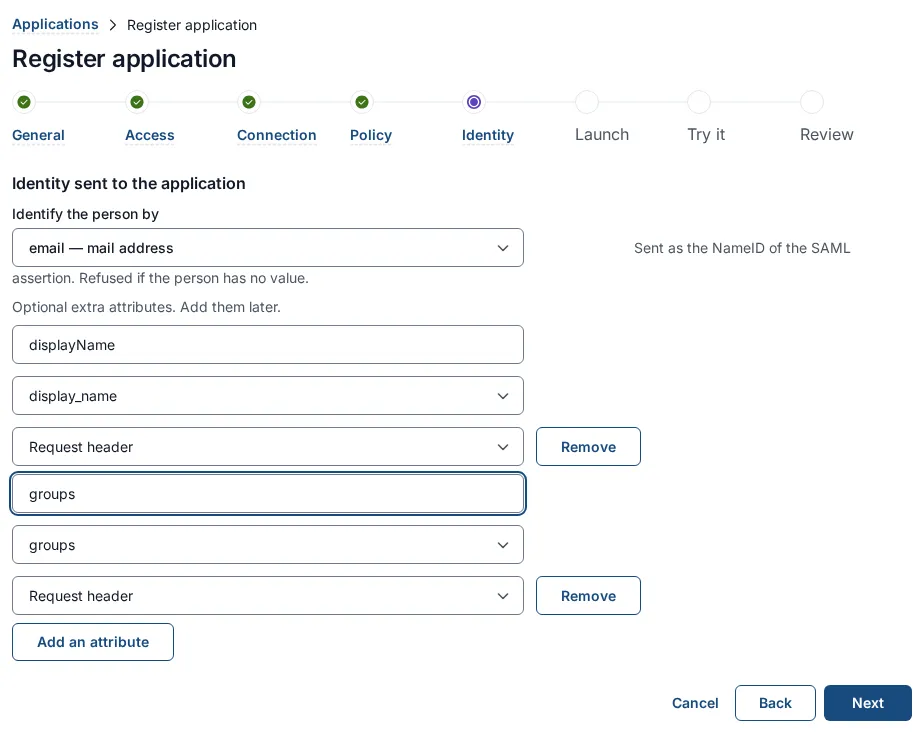
The attributes are sent with the “basic” attribute name format, a plain name.
-
Select Next.
Step 6: Launch
Section titled “Step 6: Launch”-
In Launch URL (https), type the address that starts an SSO sign-in at the application:
https://acme.expensedesk.example/sso/login. The help says: “Where My Apps sends a person. Without one the application is listed as Incomplete and cannot be launched.”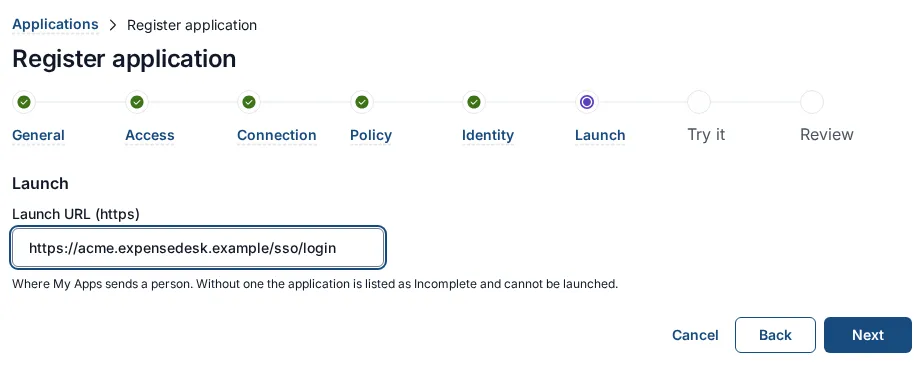
-
Select Next. This is the step that saves the application. The console shows progress lines in turn: “Saving the application…”, “Saving the access mode…”, “Saving the service provider…”, “Saving the sign-in policy…” and, if you changed anything on the Identity sent to app step, “Saving the identity sent to the application…”. The application is now saved but not active: nobody can open it yet.
If a save fails, the wizard stays on the step with a message. If the application itself could not be created, it says “Nothing was saved.” together with the reason, for example “That application ID is already in use. Choose a different one.” Go back and change it. If the application was created but a later part failed, the message reads “Acme Expenses was saved, but the service provider could not be saved: …. Press Next to try again.” Select Next again; only the part that did not save is sent.
After the save, the General, Access mode and Connection answers become read-only in the wizard (“Acme Expenses is saved. These answers are read-only here; change them on the application’s record.”).
Step 7: Try it (optional)
Section titled “Step 7: Try it (optional)”-
The step says: “This step is optional. It previews what Acme Expenses would do for a person you choose: whether they would get in, and exactly what the application would receive. It signs nobody in and does not affect your own session. Choose Next to skip it; you can activate the application without trying it.” Under Person search for and choose Maria Lopez. Leave Signs in through and Signed in with at their defaults, or choose how she would sign in. Select Run test.
The result starts with a sentence: “Maria Lopez can open Acme Expenses.”, “Maria Lopez would be asked for a second factor.” or “Maria Lopez cannot open Acme Expenses.” Below is a checklist, each line starting Passed, Failed or Not checked. Because the application is not active yet, the line for availability says “Failed: Activates in the next step.” That is expected. A line “Failed: Maria Lopez is not assigned to Acme Expenses, directly or through a group.” gives you an Assign Maria Lopez button; selecting it assigns her and re-runs the test.
Under the checklist a card titled SAML assertion shows what ExpenseDesk would receive: NameID, authentication context, audience, recipient, and the attributes with their values. Check the NameID shows the email address and that your extra attributes are present.
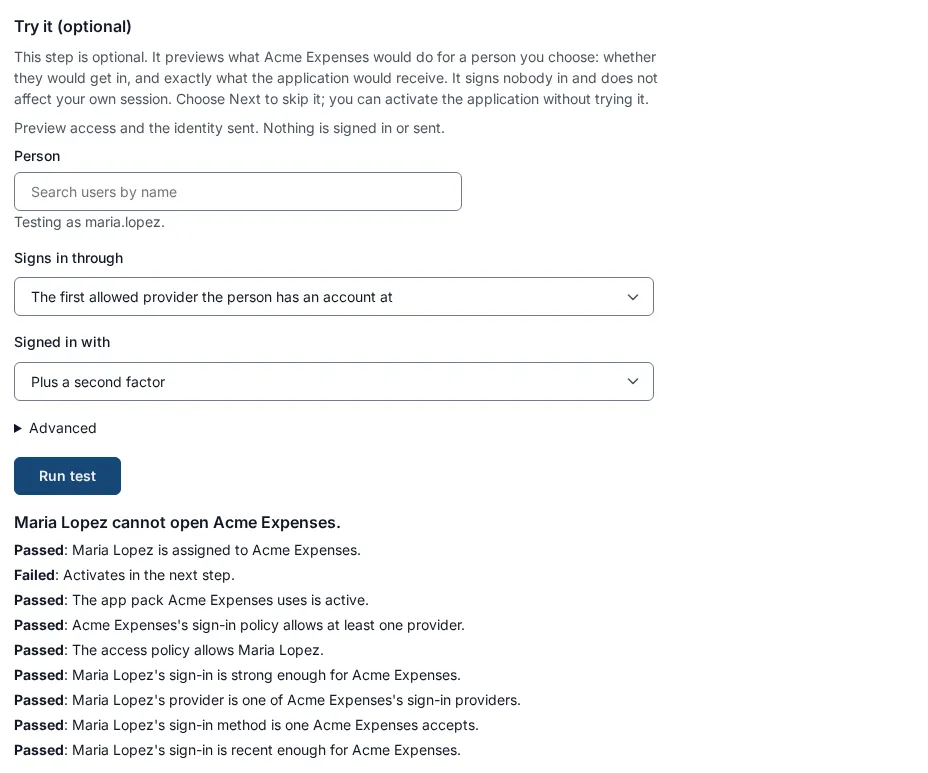
Nobody is signed in and nothing is sent to ExpenseDesk by this test.
-
Select Next.
Step 8: Review and activate
Section titled “Step 8: Review and activate”-
The step lists everything: Name, Application ID, Slug, Category, My Apps icon, Reached by (SAML), Service provider entity ID, Assertion consumer service, Single logout, Sign-in policy, Identified by, Extra attributes and Launch URL. The first line shows the last test, for example “Tested as Maria Lopez: allowed once active”.
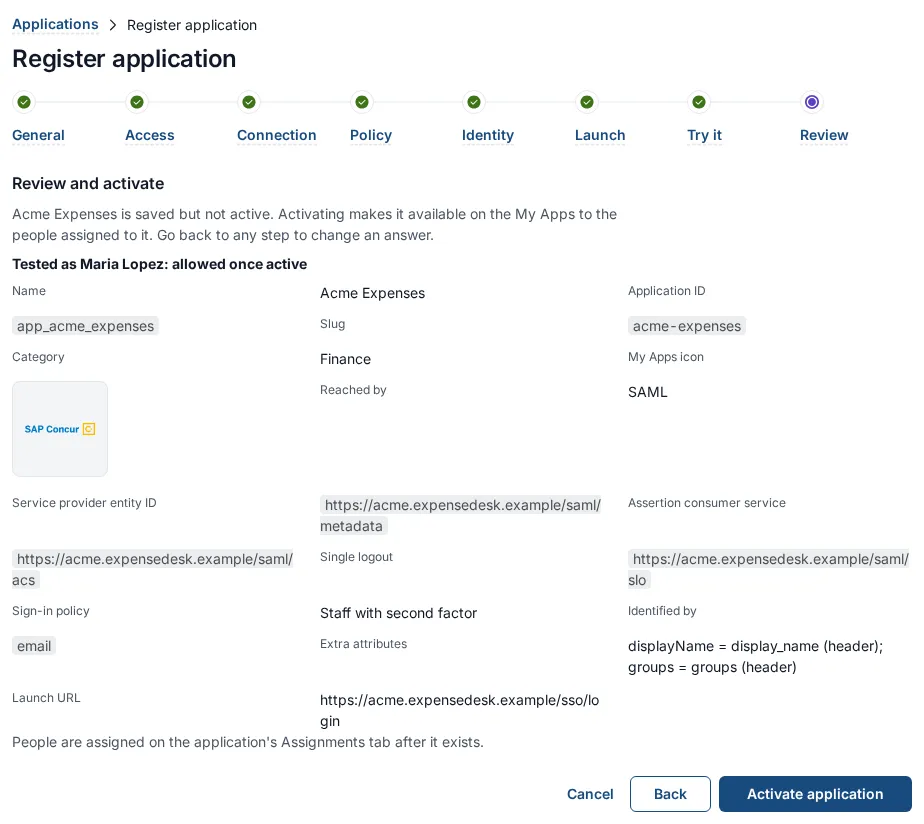
-
Select Activate application. SSOGEN makes the application available and opens it on its Assignments tab, “what is left to do”. The console then shows the application’s page, whose status is Unused until someone is assigned, and Ready after.
If activation is refused you see “Acme Expenses is saved but could not be activated: …”. The common reason is “This application uses the default sign-in policy, and no default is set, so nobody could sign in to it. Choose a sign-in policy for it, or set a default policy, then activate it.” Go Back to Sign-in policy, choose a named policy, select Next through to Review and activate, and try again.
Part C: give SSOGEN’s values to the application
Section titled “Part C: give SSOGEN’s values to the application”-
In the Admin Console open Applications, SAML, then select Acme Expenses. Open the Integration tab.
-
You see two sections.
SSOGEN as your identity provider (“What the service provider needs to trust assertions from here”):
Setting Value in this example Why IdP metadata https://sso.acme.example/saml/idp/metadataImport this into the service provider and everything below is configured for it, including the certificate. IdP entity ID https://sso.acme.example/saml/idpThe Issuer of every assertion. Single sign-on URL https://sso.acme.example/saml/idp/ssoHTTP-Redirect and HTTP-POST bindings are both served here. Single logout URL https://sso.acme.example/saml/idp/sloHTTP-POST binding. NameID format urn:oasis:names:tc:SAML:2.0:nameid-format:persistentThe format used when the application identifies people by the default. Signing certificate a long base64 text The certificate on the assertions. What is registered for this application shows the SP entity ID, assertion consumer service, single logout service and Status (
Active) that you entered. “Single logout service” reads “Not configured” if you left it empty: “signing out of SSOGEN does not sign the person out of it.”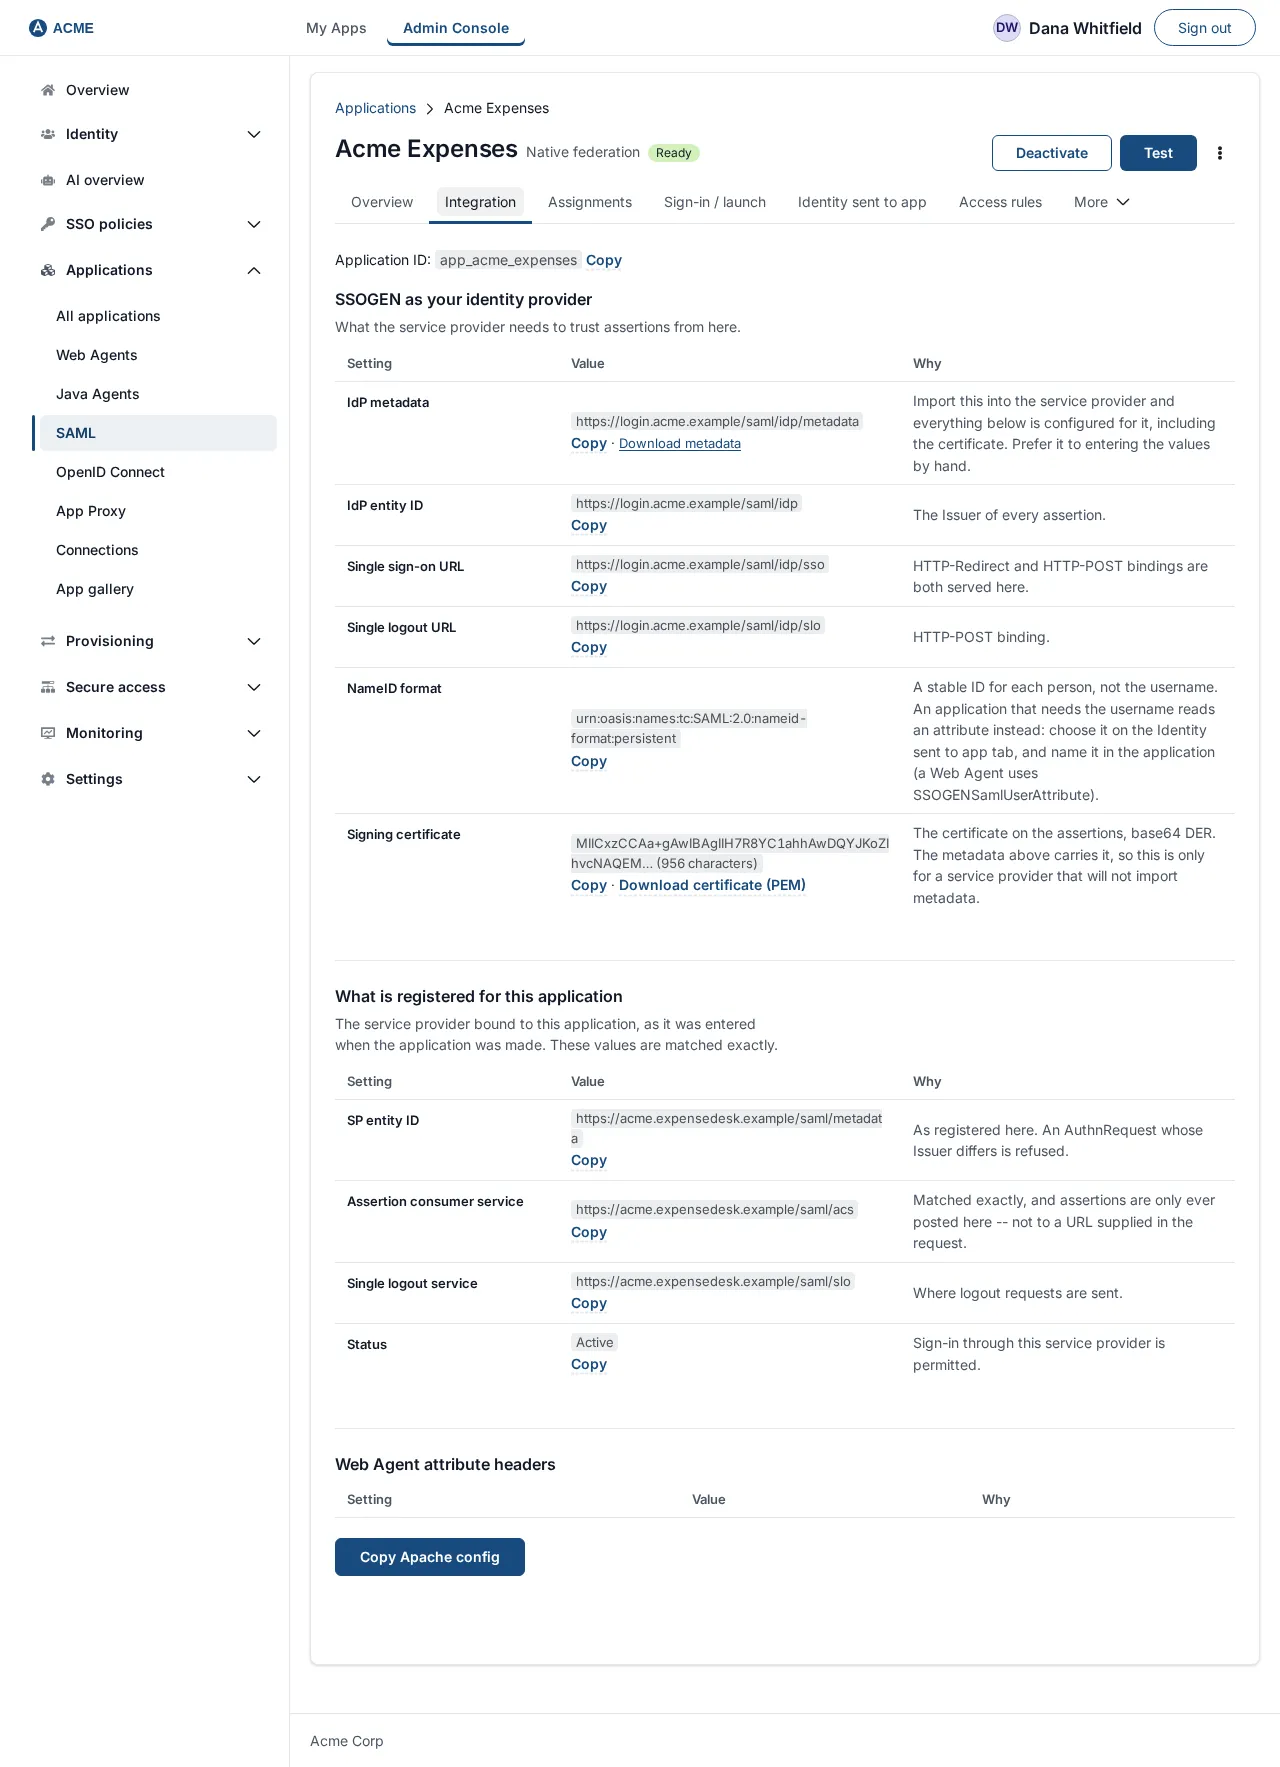
The values are shown with your own SSOGEN address, not the example one.
-
Switch to ExpenseDesk’s Single sign-on page (Part A) and enter the values. The easiest way is to open the IdP metadata address in a browser, save the XML, and upload it to ExpenseDesk. If ExpenseDesk wants fields by hand:
ExpenseDesk field Enter Identity provider entity ID the IdP entity ID Identity provider sign-in URL the Single sign-on URL Identity provider logout URL (if it has one) the Single logout URL Identity provider certificate the signing certificate (some products want a .pemfile: save it with-----BEGIN CERTIFICATE-----and-----END CERTIFICATE-----around the text, wrapped at 64 characters per line)Name ID format match what you chose in step 5 ( persistentfor the default;emailAddressif you choseemail)User matching attribute Email, if you chose emailSign requests / Require signed assertions assertions from SSOGEN are signed; leave “require signed assertions” on Encrypted assertions Off, unless you also register the application’s encryption certificate in SSOGEN (see “Change something later”) -
Save the settings in ExpenseDesk and turn SAML single sign-on on, in the way ExpenseDesk’s page describes. Keep a way to sign in as an administrator without SSO (many products offer a “break-glass” account) until you have proved that SSO works.
Part D: give people access and try it
Section titled “Part D: give people access and try it”- In SSOGEN, open Acme Expenses, then the Assignments tab. Under People, use Assign a person to search for and choose Maria Lopez. Under Groups, use Assign a group for a group such as
Finance. See Assign people, set the sign-in policy, test and activate for the details. - As Maria Lopez, sign in to SSOGEN and open My Apps. The tile Acme Expenses is there. Select it.
- The browser goes to ExpenseDesk’s sign-in page, then to SSOGEN, then back to ExpenseDesk, signed in as Maria. If SSOGEN already knows her, she sees no second password prompt (she may be asked for a second factor if the sign-in policy requires one).
- You can also start from ExpenseDesk directly: open
https://acme.expensedesk.example/sso/login.
If it does not work
Section titled “If it does not work”SSOGEN refuses a SAML sign-in with a page titled Sign-in refused, a sentence, a reason code and a correlation identifier you can quote to an administrator. The sentences are:
| What the page says | What to do |
|---|---|
| No service provider is registered here with that entity ID. | The application sent an entity ID SSOGEN does not know. Compare the SP entity ID in the Integration tab with the one the application uses. They must match character for character. |
| That service provider is registered but is not linked to an application, so there is no policy to decide who may sign in. Link it to an application and try again. | The registration is not linked to this application. Re-register through the wizard. |
| You are not assigned to that application. Ask whoever administers it to assign you, or a group you belong to. | Assign the person or one of their groups on the Assignments tab. |
| That application is marked unavailable at the moment. | Activate the application. |
| That application’s app pack is not active. | See App Packs. |
| That application has no authentication policy. | Choose a policy on the Access rules tab. |
| That application’s policy allows no sign-in method, so nobody can be signed in to it. | Edit the policy and allow at least one identity provider. |
| That application’s policy denies this sign-in. | The access policy refused this person. Use Test on the application to see why. |
| That application’s policy asks for a stronger sign-in than its sign-in route can provide, so the sign-in is refused. Ask whoever administers it. | Lower the required strength or add a stronger route in the policy. |
| That application requires an attribute the directory does not have for this person. The sign-in is refused rather than sent without it. | An attribute is marked required but empty for this person. Fix the person’s profile, or untick Required. |
| That application identifies people by an attribute this sign-in cannot supply… | The person has no value for the attribute chosen under Identify the person by. |
| The authentication request could not be read, or was not valid. | Something other than a real SAML request reached SSOGEN. Start from the application. |
If the page comes from the application (for example “invalid signature”, “audience mismatch”, “user not found”) the cause is on its side: the certificate was not imported, the entity ID it expects differs from IdP entity ID, or the person does not exist there.
The Test tab of the application (and the wizard’s Try it step) explains in words why a particular person would be refused, without signing anyone in.
Change something later
Section titled “Change something later”- The Application ID cannot be changed.
- To change the SAML values (entity ID, assertion consumer service URL, single logout URL), add certificates, or turn the connection off and on, use the SAML apps screen. It is not in the left menu; open it by changing the end of the console address to
#/saml-apps, for examplehttps://sso.acme.example/admin/#/saml-apps. Its list is titled SAML apps. Select the entry (its Entity ID is shown), then:- Edit opens a short form with four steps: General (the identifier is read-only), Endpoints, Certificates and Application binding.
- Deactivate (in the actions menu) and Activate stop and restart sign-ins through this service provider.
- Delete permanently removes it.
- Under Certificates, the boxes Signing certificate (base64 DER) and Encryption certificate (base64 DER) start empty because SSOGEN never shows certificates back. Leaving a box empty removes the certificate that was there, so paste it again to keep it. Registering an Encryption certificate makes SSOGEN encrypt assertions to this application.
- To change who the NameID is, or the extra attributes: open the application, then Identity sent to app, make changes and select Save. The message “Saved. New sign-ins to this application carry these.” confirms it.
- To change the launch address: Sign-in / launch tab, then Save.
- To change the policy: Access rules tab.
Not covered here
Section titled “Not covered here”- Encrypted assertions in detail, and signed SAML requests from the application (a signing certificate may be registered; signed requests are not required).
- Starting a sign-in from SSOGEN without a request from the application. SSOGEN does not do this today.
- How single logout behaves with a particular product; test it with yours.