Bulk user import CSV and user management
A user is one person’s account in SSOGEN. People arrive in three ways: you create them by hand (this guide), you do a bulk user import from a CSV file (below), or they come from a connected directory or an HR system (Connect Active Directory or LDAP, Inbound provisioning with SCIM). This guide covers everything you can do to a user once they exist.
1. The Users list
Section titled “1. The Users list”Open Identity → Users. The page is titled Users: “Users, sign-in methods, access and sessions.”
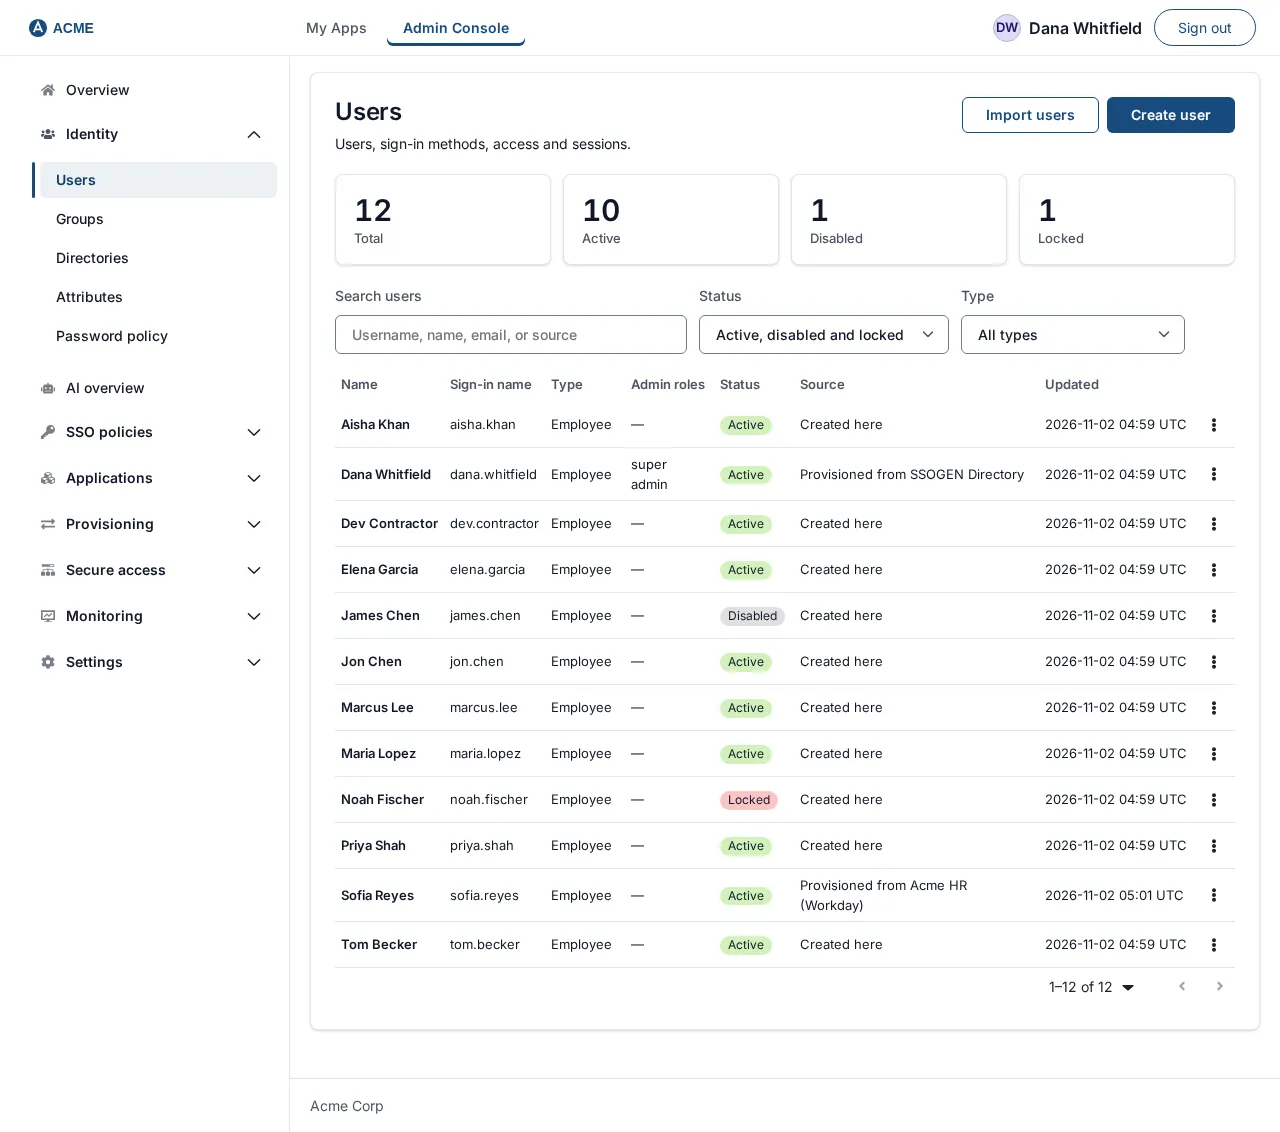
- Four counters sit above the list: Total, Active, Disabled and Locked.
- Search users filters as you type. It searches username, name, email and source (the box says Username, name, email, or source).
- Type narrows the list to one user type (All types, Employee, Contractor, Partner, Customer or Other). Status narrows the list to Active, disabled and locked (the default), Active, Disabled, Locked, Archived or All, archived included.
- The table User list has the columns Name, Sign-in name, Type, Admin roles, Status, Source and Updated. Type is what the person is to your organization (see below). Source says where the account came from: Created here (you made it), Provisioned from name (a directory, or a SCIM client such as your HR system), or Unknown.
- Open a person by clicking their row, or use the row’s menu and choose View details. The list shows 50 people per page by default; the paging controls at the bottom change the page size and move through pages.
- With no matches the table says No matching users; with no users at all it says No users yet. Clear search (or Clear search and filter) resets the filters.
Archived accounts (for example a person deleted by your HR system over SCIM) are hidden by default. Set Status to Archived, or All, archived included, to find one, then click the row. An archived person’s record is read-only: it says the account is archived, when it was last changed (the archive, unless something touched it since) and its source, and the Actions menu offers Restore account. The audit log records who archived it and why.
2. Add a person
Section titled “2. Add a person”-
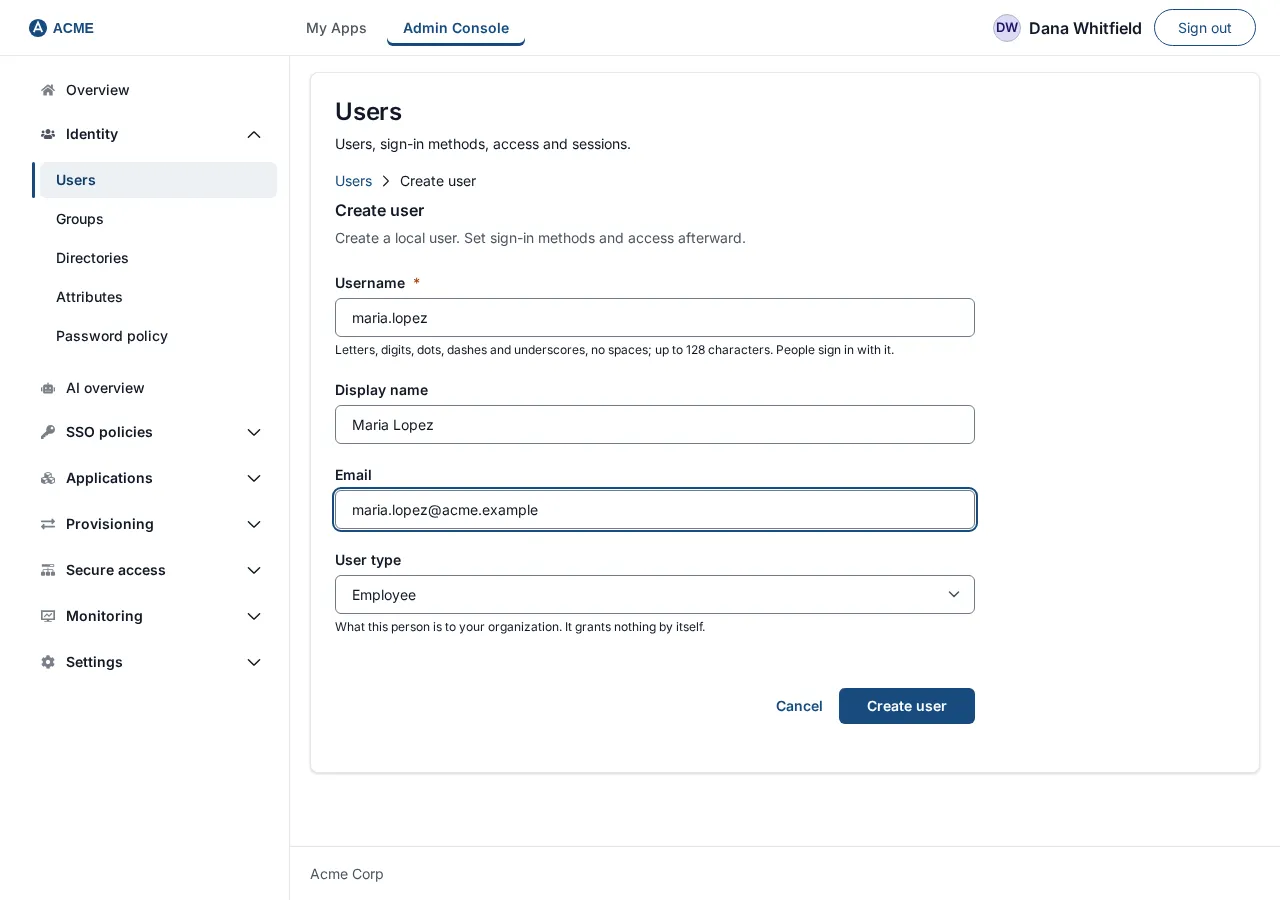
On Identity → Users choose Create user. The page Create user opens, with the text “Create a local user. Set sign-in methods and access afterward.”
-
Fill in:
Field What to enter Example Username (required) The sign-in name: letters, digits, dots, dashes and underscores, no spaces, up to 128 characters. People sign in with it. maria.lopezDisplay name The name shown in lists and on the person’s pages. Maria LopezEmail Must look like an address. maria.lopez@acme.exampleUser type What this person is to your organization: Employee (the default), Contractor, Partner, Customer or Other. It grants nothing by itself. Employee -
Choose Create user. Cancel (or the Users breadcrumb) goes back without creating anyone.
What you see next: the message User maria.lopez created. and the list, filtered to the username you just typed, with Maria’s row. Her Source is Created here and her status is Active.
If you leave Username empty the form says Enter a sign-in name. and puts the cursor in the field. An email that is not shaped like an address says Enter an email address like name@example.com. A username that is not allowed or is already taken (archived accounts count) is refused beside the field with a sentence that says which. Any other refusal reads The user was not created. Check the details and try again.
Invite the person by email
Section titled “Invite the person by email”Create user also has the switch Send an invitation email and a step that puts the person in up to 10 groups. With the switch on, the account exists at once with no password, and the person gets an email with a link that sets the first password. The link works once and lasts 7 days by default; a Super admin sets 1 to 30 days under Settings → Security. The switch needs a working mail server. An address at a domain that an identity connection claims is refused, because those people sign in through the connection.
The link ends sooner when the person gets a password, passkey, authenticator or paired phone, signs in, or changes address, and when the account is disabled, locked, archived or deleted. Re-enabling the account does not bring the link back.
The person’s record then shows when the invitation was sent and when it ends, or Invitation not accepted, with Resend invitation and Cancel invitation. The Users list has an Invitation column and a filter for invitations not accepted; select people there to resend to all of them at once. An account whose invitation is not accepted is never deleted automatically. The full guide, with what the person sees, is Invite people; to let people ask for an account themselves, see Let people create their own accounts.
Add many people from a file
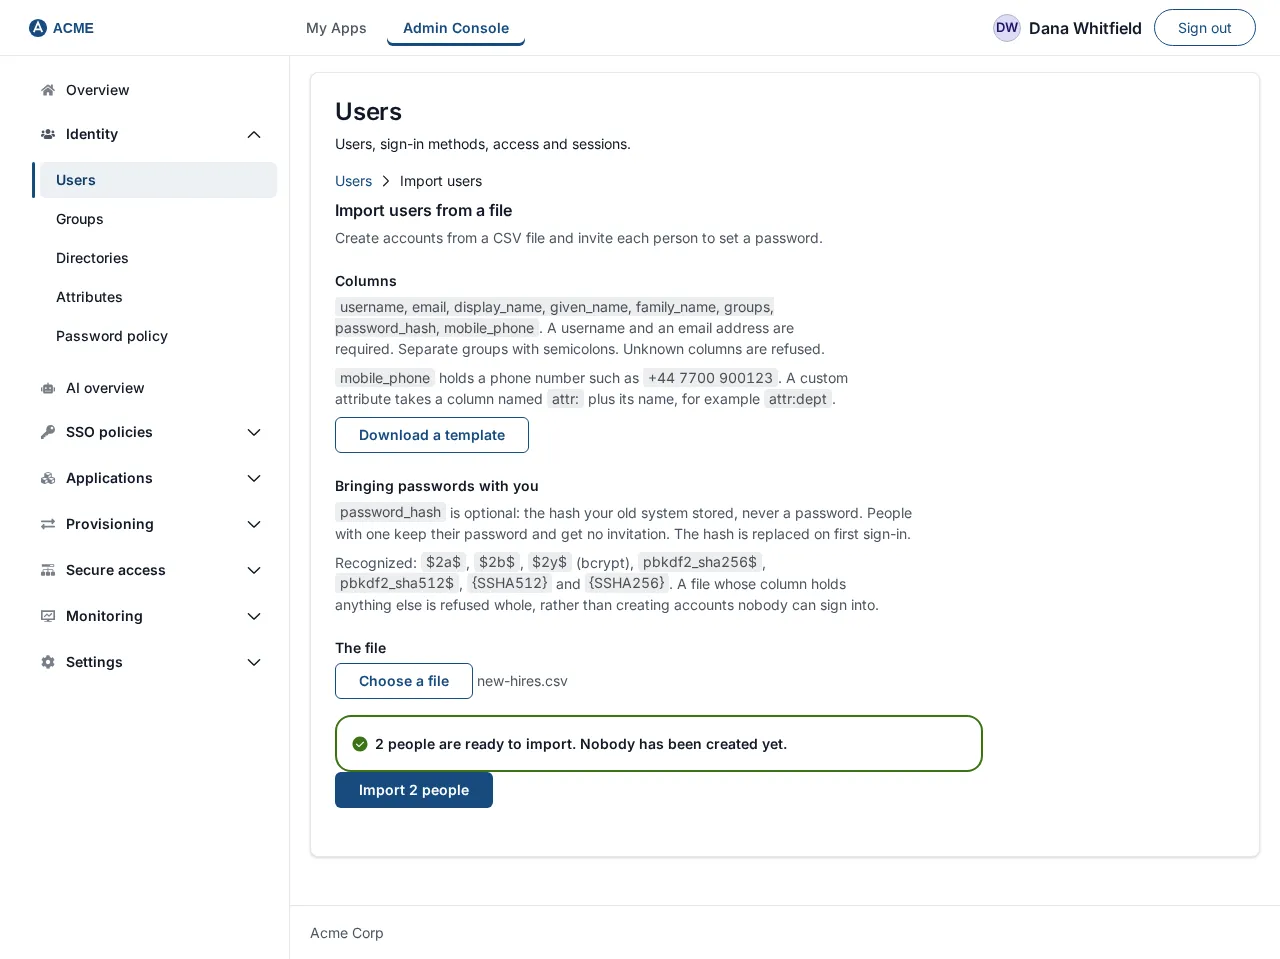
Section titled “Add many people from a file”- On Identity → Users choose Import users. The page Import users from a file opens: “Create accounts from a CSV file and invite each person to set a password.”
- Choose Download a template for a ready file (
ssogen-users-template.csv). The columns areusername, email, display_name, given_name, family_name, groups, password_hash, mobile_phone. The page says “A username and an email address are required.” The rest may be empty. Separate several groups with semicolons, for examplestaff;engineering. A group name that matches no group does not stop the person being created; their row says created, but the group “name” could not be applied and you add the membership by hand. A column the product does not recognize makes the whole file refused, so a misspelled header is a message instead of a silently missing value. - To fill a custom attribute (Custom profile attributes) add a column named
attr:followed by its name, for exampleattr:badge_number. A name that is not defined is refused. - Bringing passwords with you.
password_hashis optional and holds the hash your old system already stored, never the password itself. A person with a hash keeps signing in with the password they know and is not sent an invitation. Recognized forms: bcrypt ($2a$,$2b$,$2y$),{SSHA512},{SSHA256}, Django’spbkdf2_sha256$<iterations>$<salt>$<hash>(salt as plain text) and passlib’s$pbkdf2-sha256$<rounds>$<salt>$<hash>(salt in base64), each PBKDF2 layout also assha512. A file whose column holds anything else, or a hash that could never be checked (for example more than 600,000 PBKDF2-SHA256 iterations), is refused whole. - Choose Choose a file and pick your
.csv. SSOGEN checks it first without creating anyone. If it finds problems it says “Nothing was imported. Fix these and upload again.” and lists each one. A file is limited to 2 MB and 5,000 rows. - When the file is good the page says, for example, 2 people are ready to import. Nobody has been created yet. and shows the button Import 2 people. If the file has phone numbers or attribute values it adds a line such as “1 mobile phone and 1 custom attribute value will be recorded as imported.”
- Choose Import 2 people. The result reads, for example, 2 created, 0 already here, 0 failed. 2 invited to set a password. and a table What happened to each row lists Line, Username, Outcome (created, skipped or failed) and Detail. A username that already exists is skipped with the detail “already in the directory”.
The import uses the same invitation as Create user: an email with a one-use link to choose a password, valid for 7 days by default (the Settings → Security value, 1 to 30 days). Invitations are sent only when the deployment can send email and the row has an email address; the result line says how many were invited. If the link expires, choose Resend invitation on the person’s record.
3. The user record
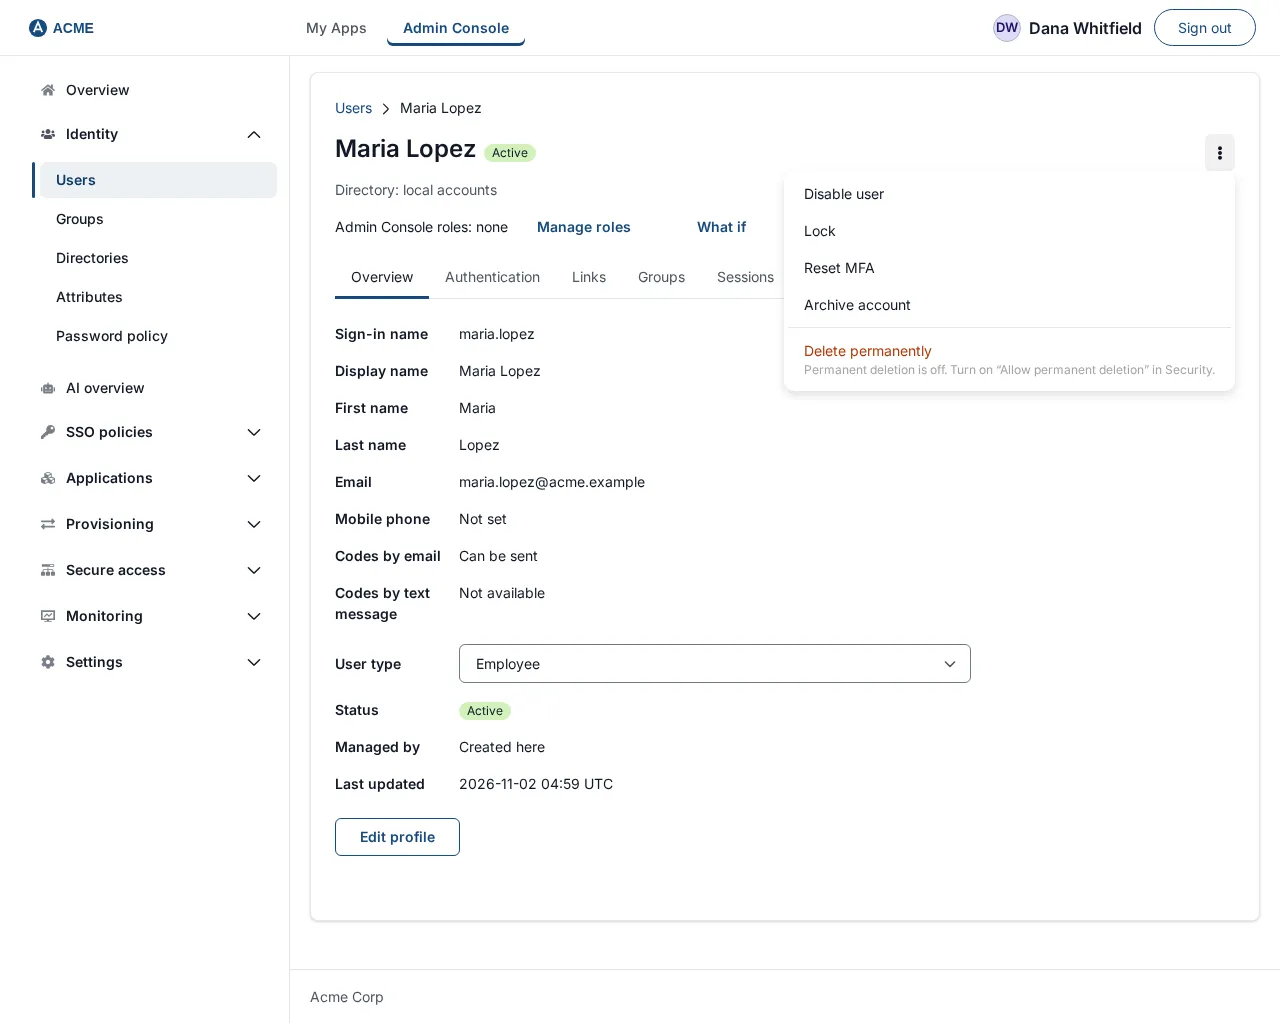
Section titled “3. The user record”Click a person to open their record. The header shows their name (or username), a status badge (Active, Disabled, Locked or Archived) and, to the right, an Actions for name menu (the three-dot button). Below the header:
- a line saying which directory the account lives in, for example Directory: local accounts,
- Admin Console roles: the administrator roles they hold, or none, with the links Manage roles (opens Admin roles under Settings; shown to a Super admin) and What if (opens the policy simulator for this person; shown to roles that may use it),
- and nine tabs: Overview, Authentication, Links, Groups, Sessions, Devices, Applications, Activity and Diagnostics.
The Actions menu
Section titled “The Actions menu”| Item | What it does |
|---|---|
| Disable user (shown while the account is active) / Enable user (otherwise) | Disable asks Disable username? “username cannot sign in until re-enabled. Nothing is deleted.” Choose Disable to confirm. Enable acts at once with no question. The last administrator who can still sign in to the Admin Console cannot be disabled (see Admin Console sign-in and lockout protection). |
| Lock / Unlock | Lock asks Lock username? “username cannot sign in until you unlock the account. Nothing is deleted.” and is unavailable while the account is disabled. A locked account shows the badge Locked, and its menu offers Unlock (no question) instead of Disable and Lock. |
| Reset MFA | See section 8. Not offered on an archived account. |
| Archive account / Restore account | See section 9. The last administrator who can sign in to the Admin Console cannot be archived. An archived account’s menu holds only Restore account and Delete permanently. |
| Delete permanently (red) | See section 9. Grayed out unless permanent deletion is allowed. |
After a status change the badge updates, a message such as User disabled. They cannot sign in., User locked. They cannot sign in until you unlock them. or User enabled. They can sign in again. appears, and the Users list reflects it. If the change fails the console shows The account was not disabled. Try again., The account was not locked. Try again. or The account was not enabled. Try again. (unlock also reports as enabling), or the server’s own explanation when it gives one, such as for the last administrator.
A person disabled by a directory import shows a reason beside the badge on the Overview tab: Removed from directory or Disabled in directory; one disabled by an administrator shows By an administrator. See Directory sync.
Overview tab
Section titled “Overview tab”A list of the person’s details: Sign-in name, Display name, First name, Last name, Email, Mobile phone, any custom attributes you defined (each with where its value came from, such as CSV import, Set by an administrator or Set by the person), Codes by email and Codes by text message (Can be sent or Not available), User type (a drop-down, with Save type once you change it, for an administrator who may change people), Status, Managed by, and Last updated. A missing value reads Not set. Managed by names the connected directory or HR system that owns the person, or says Created here.
If a directory manages the person, a note says “Managed by directory. Its fields are read-only.”
4. Edit a profile
Section titled “4. Edit a profile”-
On the Overview tab choose Edit profile.
-
The form lists these fields. Limits are in brackets.
Field What it is Display name (256) The name shown in lists. First name (128), Last name (128) Kept separately because applications behind SSOGEN ask for them separately. Email (256) The person’s identity email. Mobile phone (32) Their phone number, for example +1 415 555 0142.Email for sign-in codes (256) Where one-time codes can go, kept apart from the email above. Help text: “Separate from the identity email. Used once the person confirms it.” Phone for sign-in codes (256) The same for text messages. Help text: “Separate from the mobile phone. Used once the person confirms it.” -
Choose Save profile (it shows Saving… meanwhile) or Cancel.
A field you leave alone is not touched. A field that the person’s directory or identity provider supplies is shown as plain text with Managed by name and cannot be edited, because the next sync or sign-in would overwrite it; change it at the source.
If the save fails the console says:
| Message | Meaning |
|---|---|
| A value you changed is managed by name. Change it there. | You changed something the source owns. (Without a name it reads “managed by its directory or identity provider”.) |
| The email for sign-in codes is not a valid address. | |
| The phone for sign-in codes is not a valid number in an allowed country. | Only numbers in the countries your deployment allows are accepted. |
| The mobile phone is not a valid number. | |
| User profile update failed: a value is not valid. | Another field was not valid. |
| User profile update failed. | Any other failure. |
5. Set a temporary password
Section titled “5. Set a temporary password”This is how an administrator gives someone a password, for example a new hire or a person who is locked out and has no email.
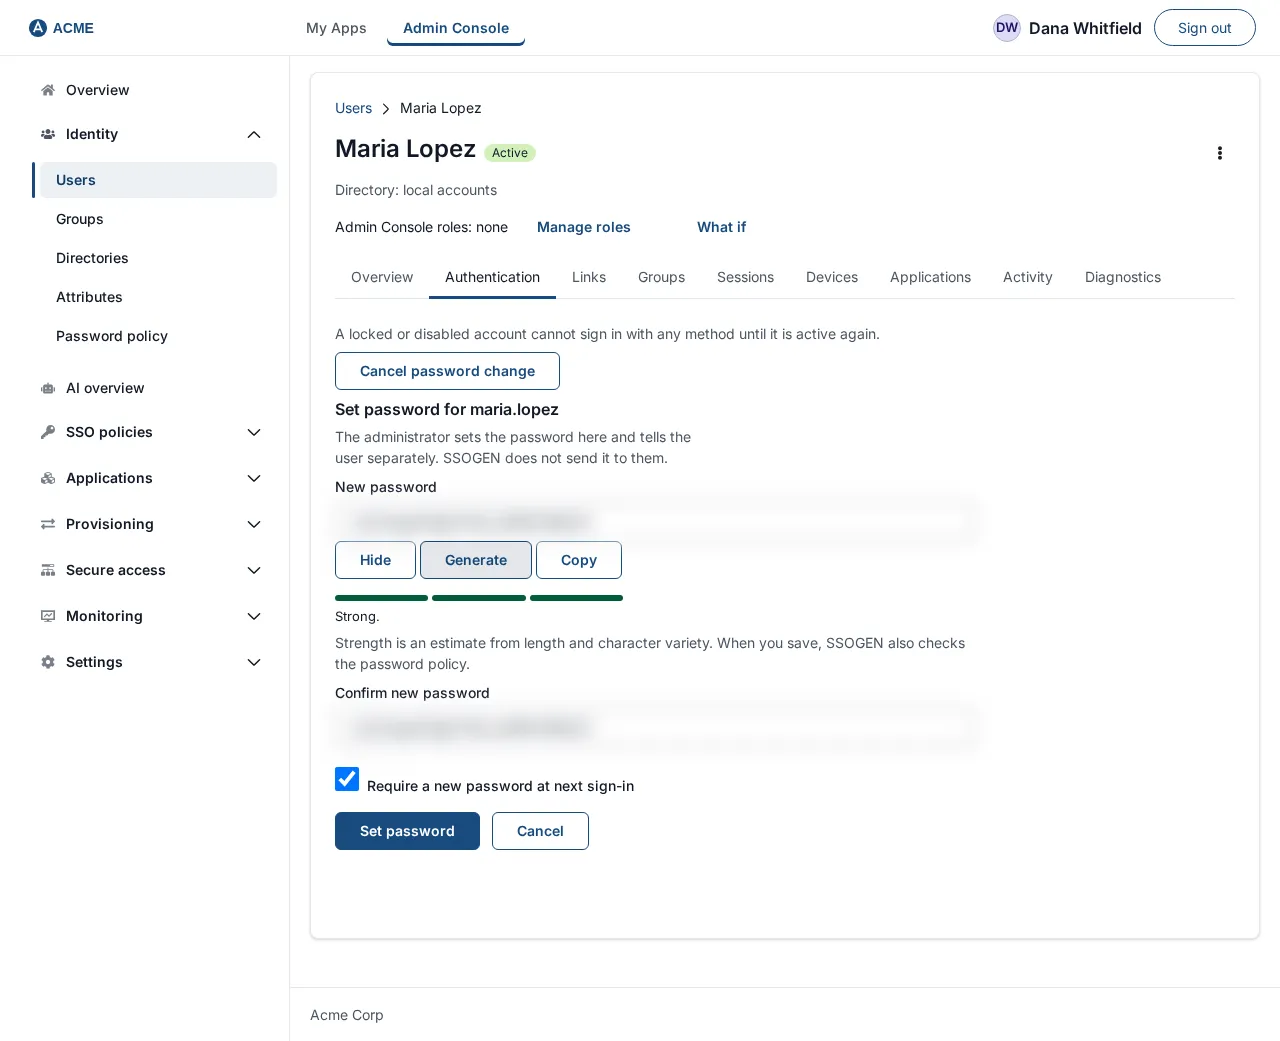
- Open the person, go to the Authentication tab. It begins “A locked or disabled account cannot sign in with any method until it is active again.”
- Choose Set password. A panel Set password for username opens: “The administrator sets the password here and tells the user separately. SSOGEN does not send it to them.”
- Enter New password (at least the minimum length set by your password policy, at most 256 characters). A strength meter says Too short, Weak, Fair or Strong with a hint; it is an estimate from length and character variety, and when you save SSOGEN also checks the password policy. Show reveals the text, Generate fills in a random password for both fields and reveals it, so you can read it to the person, and Copy copies it.
- Enter Confirm new password. A mismatch says The two passwords do not match.
- Leave Require a new password at next sign-in ticked. This makes it a temporary password: after signing in with it the person must choose their own. Untick it only for a password the person is meant to keep.
- Choose Set password. The message reads Password set. The user must choose a new one at next sign-in. (or Password set. when unticked). Cancel or Cancel password change (the button that opened the panel) closes the panel without changing anything.
Tell the person the password through a separate, trusted channel. SSOGEN never emails it.
People whose password lives in a directory. For someone who comes from Active Directory or LDAP the panel instead says “Sets the password in the owning directory, so it applies everywhere that directory is used. The directory’s own policy applies and may refuse it.” The minimum is 12 characters. There is no Require a new password box, because SSOGEN cannot set that in someone else’s directory. The message reads Password set in the directory. It applies to every system that uses it. This works only if a Super admin has switched on Write passwords to the directory under Settings → Security, section Directories (off by default); see also Connect Active Directory or LDAP. People who come from a SCIM client or a SAML or OIDC provider have no password in SSOGEN to set.
Errors you may see in the panel:
| Message | Meaning |
|---|---|
| That password does not meet the password policy. followed by what to change | The password breaks your password policy. |
| That password is the wrong length. Use between 12 and 256 characters. | A directory password outside its bounds. |
| Too many password changes from this address. Wait a minute and try again. | A rate limit. |
| Sign-in name “name” belongs to another account. Rename this one or use that account. | |
| The server rejected the password. Try again, or check the server log. | Any other refusal. |
| The server did not answer. Check your connection and try again. | Network problem. |
6. Reset a forgotten password
Section titled “6. Reset a forgotten password”There is no “send reset link” button on the user record. The person resets their own password:
- On the sign-in page they type their username and choose Forgot password? (without a username the page says Type your username above first, then choose Forgot password.). An administrator can hide or reword this link in the branding settings.
- The page says If that account can be reset here, a message is on its way. The link lasts fifteen minutes. It says the same whether or not the account exists, on purpose.
- They open the email Reset your password, follow the link within 15 minutes (the default; a Super admin can change it with Reset link lifetime (minutes) under Settings → Security, section Accounts and recovery) and enter a New password that meets the password policy on the page Choose a new password, then choose Set password. The page confirms Your password has been changed, and every session you had has been signed out. and offers Sign in.
For this to work:
- The deployment must be able to send email.
- The person needs a usable address for codes. By default an address that an administrator, import, directory or provider supplied is trusted; the security setting that controls this can be turned off, in which case people must confirm their own address first. Which profile field holds the address is chosen under Identity → Attributes (Custom profile attributes).
- If the person’s password lives in a directory SSOGEN cannot write to, the email tells them to reset it the way they normally do for their company account; if the directory refuses the new password the page says Your directory did not accept the new password. Reset it the way you normally do.
Errors on the reset page: That password was not accepted. followed by the password rule; That link has expired or has already been used. Go back to the sign-in page and choose Forgot password to get a new one. (with a Back to sign in button); This link has now been used. Ask for a new one from the sign-in page.; The password could not be changed. Try again.
If the person cannot receive email, use section 5 instead.
7. Groups, links, sessions, applications, activity
Section titled “7. Groups, links, sessions, applications, activity”Groups tab
Section titled “Groups tab”Lists the groups the person belongs to with Group, Status and a Remove button on each. To add the person to a group, type in Add to group, search for the group and select it; the person is added at once. Empty state: “This user is not a member of any listed groups yet.” Failures read The membership was not changed. Try again. or The member was not removed. Try again. For groups that SSOGEN maintains or that follow a rule, a note (Maintained by SSOGEN or Set by the group’s rule) shows in place of the button.
For people who come from a directory, the groups it provides are managed by the directory import (Directory sync). A group whose membership follows a rule cannot be edited; see Manage groups.
Links tab
Section titled “Links tab”“Active identity links for this user. Upstream subjects are omitted from this inventory.” A table with Connection, Protocol, Source username, Last seen and Created shows each external identity (a directory, SAML or OIDC provider) linked to the person. Empty state: No identity links, “This user has no active identity connections linked yet.” Previous and Next page through the list. Retry appears if it could not be loaded (Unable to load identity links.).
Sessions tab
Section titled “Sessions tab”“Revoking a session signs that browser out immediately.” Each active sign-in of the person to SSOGEN is listed as a short code, the methods used (for example Password, Authenticator, Passkey), the assurance (Single-factor, Multi-factor or Phishing-resistant) and when it was last seen, with a Revoke button. Empty state: No active sessions. A failure reads That session was not signed out. Try again.
Below, Application sign-ins lists the applications this person is signed in to (for example through OpenID Connect): Application, Signed in, Last renewed, Ends if unused, Ends at the latest. Revoke there asks Revoke person’s sign-in to application? “application can no longer renew access for person. Tokens it holds stop working where this server checks them.” Confirm with Revoke sign-in. Empty state: No application sign-ins. If the sign-in already ended the console says That sign-in has already ended.
Applications tab
Section titled “Applications tab”“Access granted through a group is listed separately and is removed by changing group membership.” Direct assignments lists applications assigned to the person alone, each with a Revoke button (No direct application assignments when empty). Group-derived assignments lists applications reached through a group, marked “via group membership” (No group-derived application assignments when empty). Direct assignments show the application’s name; group-derived and open applications show its ID. Applications that need no assignment are listed under Open to everyone. To assign an application to a person, use the application’s own page. Roles that cannot read applications see a refusal message instead.
Activity tab
Section titled “Activity tab”“Security events for this user. Full audit search is under Monitoring.” Lists the last 20 events with the result and time; empty state No recent security activity.
Devices tab
Section titled “Devices tab”Devices shows what the person has set up to sign in:
- Paired phones lists the phones paired with the SSOGEN Authenticator: Name, Phone, App version, Key protection, Push, Last seen and State. Revoke phone ends a phone’s access for good; the person must pair it again. If phone approval is paused for the person after repeated denials or “This wasn’t me”, the tab says Push suspended with the reason and a Clear push suspension button.
- Passkeys lists the passkeys the person added under My Account, read-only: name, when it was added, when it was last used and whether it works for sign-in on its own. Reset MFA removes them.
- Browsers lists the browsers the person signed in on. Forget one to ask for the second step on it again.
Diagnostics tab
Section titled “Diagnostics tab”Shows the User ID and the Account source code of the account, for support requests.
8. Reset multi-factor authentication
Section titled “8. Reset multi-factor authentication”Use this when someone loses their phone and has no recovery codes.
- Open the person, choose Actions for name → Reset MFA.
- The dialog Reset multi-factor authentication for username? warns: “Their paired phones, authenticator apps, passkeys and all remaining recovery codes stop working immediately. At their next sign-in the sign-in policy that applies to them decides: if it asks for a second factor and offers set-up, they are offered to set one up after their first factor, for 72 hours after this reset; otherwise they are told to contact the help desk. Under a policy that asks for a second factor, the first factor by itself never signs them in. Make sure you are talking to the right person.” The number of hours is Set-up window after a reset (hours) under Settings > Authenticator (1 to 720, 72 by default).
- Choose Reset MFA. The message reads, for example, Multi-factor authentication reset for maria.lopez. 1 authenticator credential revoked, 0 passkeys removed, and recovery codes cleared. They must enroll a new factor.
Verify the person’s identity first (a call back, a manager’s confirmation). If the console refuses, it says that your role may not do this. It also refuses when the person is the only administrator who can still sign in to the Admin Console: “This is the only administrator who can still sign in to the admin console, and without their second factor nobody could. Nothing was reset.” followed by advice to give another administrator who can sign in the Super Admin role first.
If the person signs in through an identity provider and their only email address and phone number came from that provider, the reset does not let them set up a new factor at sign-in: no set-up code is sent to an address the provider supplied, because whoever holds the provider password could have changed it. The dialog says so. Instead, add an email address or phone number to their account that the provider does not supply, or let them set up the SSOGEN Authenticator under My Account while a sign-in policy that does not ask for a second factor applies to them.
9. Archive or delete an account
Section titled “9. Archive or delete an account”| Archive account | Delete permanently | |
|---|---|---|
| Effect | Leaves the list, every session ends, the person cannot sign in. History stays and the sign-in name is not given to anyone else. | Account, credentials, sessions, group memberships and application assignments are removed. The audit trail keeps the record. |
| Undo | Restore account from the same menu. The account comes back disabled: “Account restored, and left disabled. Enable it when you are ready.” | None. |
Archive. Choose Archive account; the dialog Archive username? says: “The account leaves the directory list, every session ends, and they can no longer sign in. Their history stays in the audit trail and their sign-in name is not released to anyone else. You can restore the account later if this was a mistake.” Confirm with Archive account. The message reads Account archived. It is no longer listed and cannot sign in. Failure: Could not archive the account. To restore, open the person’s record and choose Restore account. To find an archived person, set Status to Archived on the Users list. Failure: Could not restore the account.
Delete permanently. The menu item is grayed out, with the note Permanent deletion is off. Turn on “Allow permanent deletion” in Security., until a Super admin ticks Allowed under Allow permanent deletion in Settings → Security, section Data retention and deletion. Then:
- Choose Delete permanently. The dialog Permanently delete username? says “The account, credentials, sessions, group memberships and application assignments are removed. This cannot be undone. Audit entries are kept. Archiving instead keeps the account recoverable.”
- Type the username to confirm and choose Delete permanently.
- The message reads Account deleted. The audit trail records it. and the list reappears.
You cannot delete the account you are signed in as (You cannot delete the account you are signed in as.). If deletion is switched off the console says Permanent deletion is off. Turn on “Allow permanent deletion” in Security. Any other failure: Could not delete the account.
For a person who has left, prefer Disable user or Archive account: you keep the history and can undo it.
End-to-end example: onboarding Maria Lopez and handling a lost phone
Section titled “End-to-end example: onboarding Maria Lopez and handling a lost phone”- Identity → Users → Create user. Username
maria.lopez, display nameMaria Lopez, emailmaria.lopez@acme.example. Create user. - Open Maria, Authentication → Set password → Generate, leave Require a new password at next sign-in ticked, Set password. Read the password to her by phone.
- Maria signs in at the sign-in page with
maria.lopezand the temporary password, and is asked to choose a new one. - Overview → Edit profile: First name
Maria, Last nameLopez, Mobile phone+1 415 555 0142. Save profile. - Add her to the group Engineering from the Groups tab (Add to group). See Manage groups.
- Months later she loses her phone. After confirming it is her by video call: Actions for Maria Lopez → Reset MFA → Reset MFA. The Sessions tab shows her old sessions; Revoke any she does not recognize. She signs in with her password and enrolls the new phone.
- She leaves Acme. Actions → Disable user → Disable. Her sessions stop working and she cannot sign in; nothing is deleted. Later, if policy requires, Archive account.
Troubleshooting
Section titled “Troubleshooting”| Symptom | Cause and fix |
|---|---|
| Create user says The user was not created. Check the details and try again. | Check the values; a username that is taken or not allowed is named beside the field. Search for the username first. |
| A person cannot sign in | Check the badge: Disabled, Locked or Archived; and Authentication for whether they have a password at all. |
| Edit profile shows a field as Managed by name | A directory or provider owns it. Change it there. |
| Set password is refused for a directory person | The setting Write passwords to the directory is off, or the directory’s own policy refused. The message says what to change. |
| “Forgot password” email never arrives | The deployment may have no email, or the person has no usable address (see section 6). The page gives the same answer either way. |
| Delete permanently is grayed out | A Super admin must allow permanent deletion in Settings → Security. |
| Disable, archive or Reset MFA is refused for an administrator | They are the last administrator who can sign in to the Admin Console. Give another account the Super Admin role first, and make sure it can pass the Admin Console sign-in. |
| Everything you try is refused | Your role is read-only, or your admin mode ended. |