Remote Access sessions: web-based SSH, RDP and VNC
With Remote Access sessions, people open a terminal (SSH) or a desktop (RDP or VNC) on a server in their browser, with no VPN and no client software. The connection goes through your SSOGEN Gateway, which sits in your network and is the only thing that talks to the server. The administrator can store the account the Gateway signs in with, and decides which host to trust by pairing it; the employee just clicks. This guide covers the administrator’s setup and what the employee sees. It uses the fictional company Acme Corp, a gateway group called eg_acme_hq, a Linux server build01.acme.example and a Windows server fin-rdp01.acme.example.
Terms used here
- Resource: one host somebody may reach (a name, a protocol, an address and port, and the rules around it).
- Gateway group: the group of gateways that carries the connection (see Install and enroll an SSOGEN Gateway).
- Remote access origin: the web address browsers use to reach that gateway group for remote sessions.
- Stored account: one account on the host (a password, or an SSH key) that SSOGEN keeps for the resource and uses to sign people in, so they type nothing. It is write-only: nobody can read it back.
- Pairing: the step in which you, the administrator, check the host’s identity and trust it. People are never asked to accept a host key.
- Reach through: connect to the host directly from the Gateway, or through an Outbound Connector when the Gateway cannot reach it.
- Standing access: everyone allowed can open the resource at any time. Just-in-time access: a person asks, an approver says yes, and access lasts for a limited time.
- Capability: a way data can enter or leave the session, for example the clipboard or file transfer. Every capability is off until an administrator turns it on, with a written reason.
Before you start
Section titled “Before you start”- An SSOGEN Gateway, version 4.3.0 or later for stored accounts, pairing and Reach through, enrolled in a group and running the App Proxy (an App Proxy token, which carries Remote Access). See Install and enroll an SSOGEN Gateway.
- An application registered in SSOGEN for the host. People are given access through the application’s assignments, so assign it to the people or groups who should reach the host.
- You are signed in to the Admin Console as an administrator who may change Secure access settings.
- Network: the gateway must be able to reach the host (SSH usually TCP 22, RDP TCP 3389, VNC TCP 5900). Employees only need to reach the gateway group’s remote access origin.
1. Set the Remote access origin for the gateway group
Section titled “1. Set the Remote access origin for the gateway group”Browsers need an address to send remote sessions to. Until you set it, people cannot open any remote resource through this group.
- Open Secure access, then Gateways.
- Find the section headed with your group name, for example
eg_acme_hq. - In Remote access origin, type the address, for example
https://remote.acme.example. It must start withhttps://, be lower case and have no path. A port is allowed (written after the name, as:<port>). - Select Save origin. The text under the field says “Remote access origin saved.” and, when people are connected, a count such as “2 live remote sessions.”

- Publish the origin’s host through the gateway: add an App Proxy route for this group whose host is the origin’s name (here
remote.acme.example), then publish the routes (see Publish an internal app through the App Proxy). The gateway answers only for hosts a route lists, so without it every session fails with “The gateway has no route for this remote host.” Until the route exists the field says “This host has no Gateway route yet, so remote sessions through this group will not connect.”, and the Add resource form shows the same with a link to App Proxy routes.
Before the first save the help text reads “Not set, so remote sessions cannot be opened through this group.” Changing an origin that was already saved asks you to confirm in a dialog titled Change where eg_acme_hq sends remote sessions? You must type the new address to proceed, because browsers will send each session’s authorization, keystrokes and host passwords to the new address. Sessions already open keep their connection.
2. Prepare the host (outside SSOGEN)
Section titled “2. Prepare the host (outside SSOGEN)”An SSH host (Linux)
Section titled “An SSH host (Linux)”You need the server’s host key fingerprint, so SSOGEN can recognize the real server. On the server:
ssh-keygen -lf /etc/ssh/ssh_host_ed25519_key.pubThe output looks like 256 SHA256:<43 characters> build01 (ED25519). Copy the part starting SHA256:. If the server offers several key types, pin the one the gateway will see (an Ed25519 key is the usual one). You do not have to type it into SSOGEN: step 4 shows how to pair the host and compare this fingerprint with the one the Gateway saw.
Create the account SSOGEN will sign in with, or a normal account for people to sign in with themselves. You have two ways to sign in (step 3): each person types their own account, or SSOGEN signs in with an account you store once. For a stored SSH key, SSOGEN gives you one authorized_keys line to add to that account’s ~/.ssh/authorized_keys on the host.
A Windows host (RDP)
Section titled “A Windows host (RDP)”-
Allow remote desktop: Settings, System, Remote Desktop, switch Remote Desktop on, and keep Require devices to use Network Level Authentication on. SSOGEN always requires TLS, and requires Network Level Authentication (NLA) unless you turn it off for a resource (step 4).
-
Add the people’s accounts to Remote Desktop users.
-
Windows presents its own self-signed certificate unless you installed one. To pin it, read the SHA-256 fingerprint of the whole certificate from a machine that can reach it:
openssl s_client -connect fin-rdp01.acme.example:3389 </dev/null 2>/dev/null \| openssl x509 -noout -fingerprint -sha256Remove the colons and use lower case to get 64 hexadecimal characters.
A VNC host
Section titled “A VNC host”Run a VNC server that offers TLS with a certificate (the VeNCrypt security types) wherever possible. For the recommended method (step 5) the server needs the account-and-password type with an X.509 certificate. How to enable that depends on the VNC product and is outside SSOGEN. Keep the certificate authority that signed the server’s certificate: SSOGEN verifies it.
3. Add the resource
Section titled “3. Add the resource”-
Open Secure access, then Remote Access. The page has three tabs: Resources, Requests and Live sessions.
-
On Resources, select Add resource. With none yet you see “No remote resources yet” and an Add resource button.
-
In What do you want to give access to? choose one of:
- SSH: a terminal to a Linux or Unix server
- RDP: a Windows desktop
- VNC: a Linux or appliance desktop
An internal website is not a resource here: publish it as an App Proxy route.
The port fills in for you (22, 3389 or 5900).
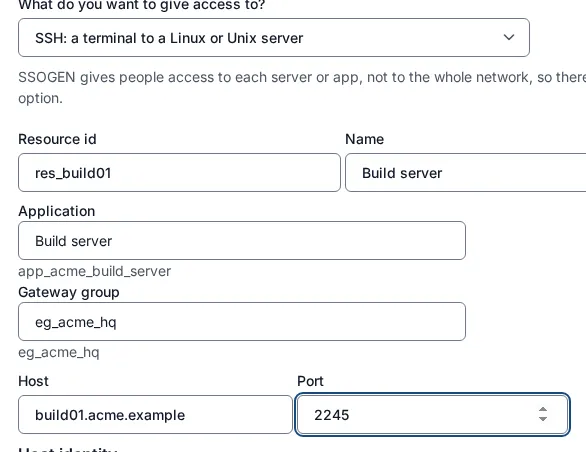
- Fill in the common fields:
| Field | What to put | Example |
|---|---|---|
| Resource id | A unique id: a lower-case letter first, then 2 to 127 lower-case letters, digits, _ or -. It cannot be changed later. |
res_build01 |
| Name | What people see on My Apps. | Build server |
| Application | The application people are assigned to. Choosing it fills in Gateway group when the application is already served by one group. | Build server |
| Gateway group | The group that carries the connection. | eg_acme_hq |
| Host | One exact host name or IP address (no range, wildcard or port). Only administrators see it; employees never do. | build01.acme.example |
| Port | The host’s port. | 22 |
| Who signs in to the host | User types it (the default: each person enters their own account) or Stored account (SSOGEN signs people in; see below). | Stored account |
| Reach through | Direct: the Gateway connects to the host itself, or Through an Outbound Connector: a connector in the private network connects to the host with a Connector group. See Outbound Connector for private networks. | Direct |
| Idle timeout (seconds) | Closes a session with no activity. Default 900. The gateway accepts 60 to 86400. | 900 |
| Maximum session (seconds) | The longest a session may last. Default 28800 (8 hours). The gateway accepts 300 to 86400. | 28800 |
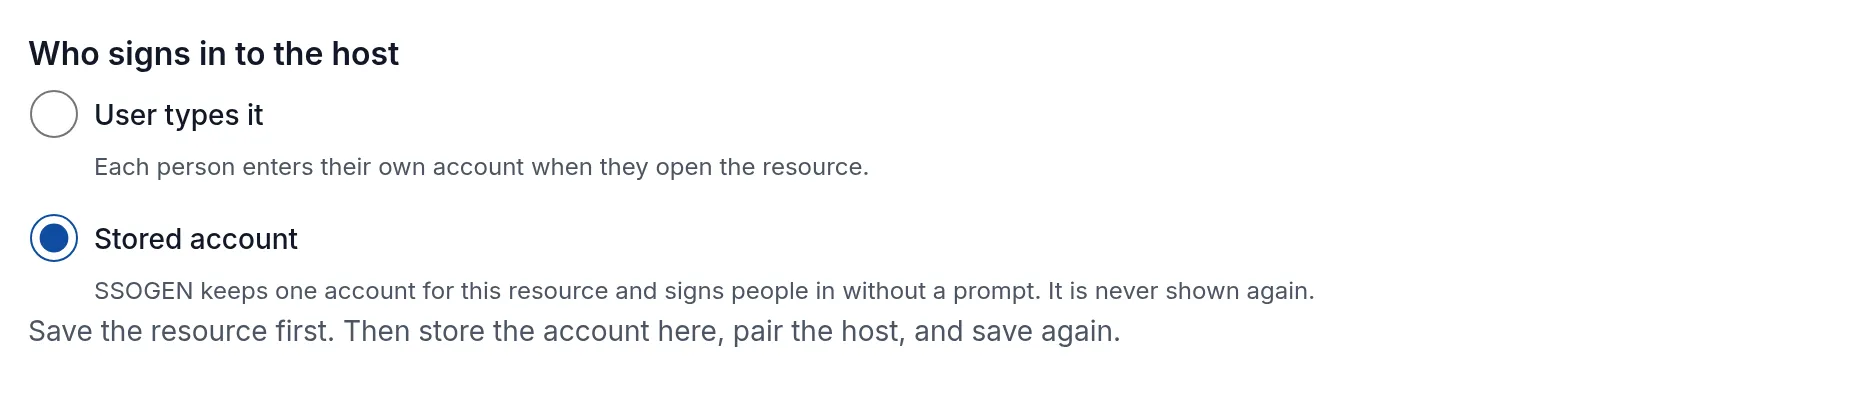
- Fill in the host identity section for your protocol (steps 4 and 5 below), then select Save resource. A stored account and pairing need a saved resource: with Stored account chosen the editor says “Save the resource first. Then store the account here, pair the host, and save again.” The button stays disabled until every field can be saved, and the line above it names the field to fix, for example “Port: enter a number from 1 to 65535.” If the chosen gateway group has no remote access origin, or its origin has no App Proxy route yet, a warning under Gateway group says so with a link to fix it (step 1). A green message reads “res_build01 saved.” If the id is taken: “A resource with this id already exists. Choose another id, or edit that resource.”
A new resource has no clipboard and no file transfer. Port forwarding and drive, printer and USB redirection are not offered at all.
Store the account SSOGEN signs in with (optional)
Section titled “Store the account SSOGEN signs in with (optional)”By default User types it applies: each person enters their own account on the host when they connect. Choose Stored account when you want people to open the host with one click and no prompt, for example a shared build server or a Windows desktop used by a team. SSOGEN keeps one account for the resource and signs in with it. It is write-only: after you store it nobody, including you, can read the password or key back.
A stored account is released only to a host that proves who it is, so the host must be paired first (next step). SSH needs a pinned host key; RDP needs Network Level Authentication and a pinned certificate; VNC needs an encrypted method with a pinned certificate. A plain VNC password cannot be stored: “A stored account is released only to a host that proves who it is…”.
-
Save the resource with Stored account chosen under Who signs in to the host. Open it again.
-
Under Stored account, give the Account name (letters, digits and
._@-, up to 64 characters), for exampledeploy. -
For SSH, choose How SSOGEN signs in:
-
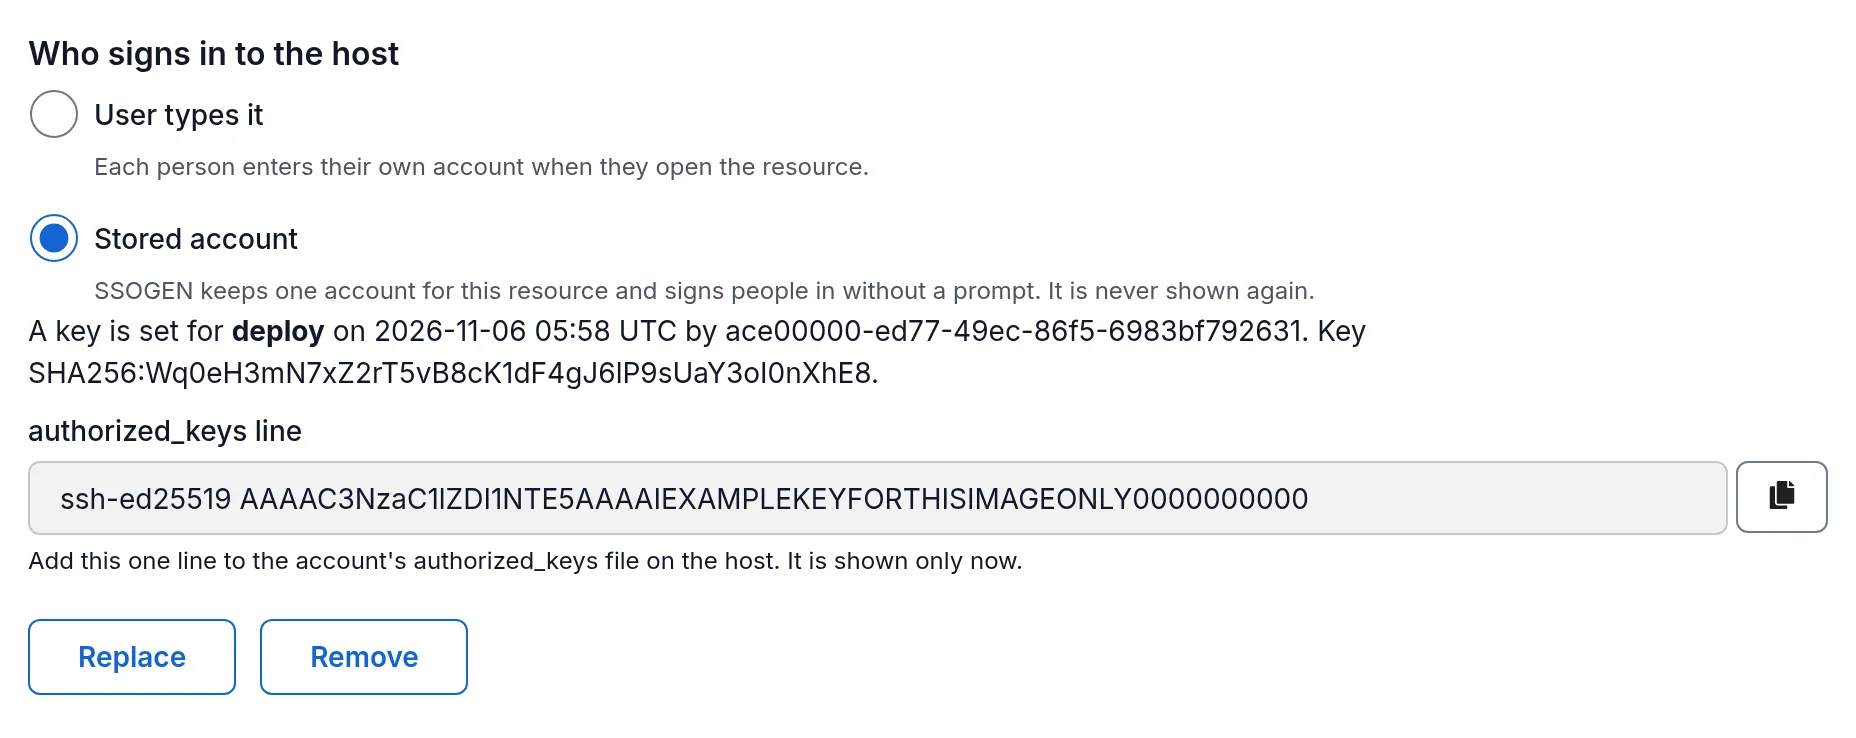
Generate a key (recommended). Select Generate key. SSOGEN makes an Ed25519 key, keeps the private half and shows one line labelled authorized_keys line with a copy button, “Add this one line to the account’s authorized_keys file on the host. It is shown only now.” Add it on the host, then continue.
-
Upload a private key. Choose the Private key file (OpenSSH or PKCS#8: Ed25519, ECDSA P-256 or P-384, or RSA of at least 2048 bits). If the key is encrypted, type its Passphrase (only if the key is encrypted); SSOGEN uses it once to decrypt the key and does not keep it. Select Store key.
-
Password. Type the Password and select Store password.
For RDP type the Password (and, if the account is a domain account, the Domain (optional)) and select Store password. For VNC, type the account’s Password and select Store password.
-
-
The section now reads, for example, a line such as “A key is set for deploy on …” (or “A password is set for …”), with who set it and, for a key, its
SHA256:fingerprint, and the buttons Replace and Remove. Remove asks “Remove the stored account?” and warns that “People can no longer open this resource without typing an account until you store another.”
If a stored account is refused with “That key is too weak. Use Ed25519, ECDSA P-256 or P-384, or RSA of at least 2048 bits.”, “That passphrase does not open the key.” or “That key is encrypted. Enter its passphrase…”, fix the key and store it again.
What SSOGEN does with it. When a person opens the resource, the Gateway connects to the host and checks the host’s identity against the pin you trusted. Only then does the Gateway ask SSOGEN for the account, and SSOGEN gives it to that session’s Gateway once, within 120 seconds, after it checks again that this person may open the resource. If anything does not match, nothing is sent and the person is told to ask you. The browser never receives the account, the host name or the port.
If the host rejects the account. The next session ends with “The host did not accept the account your administrator stored for it. Ask your administrator.”, and the resource editor shows “The host refused the stored account. Replace the password or key, or fix the account on the host.”
4. Trust the host (SSH and RDP)
Section titled “4. Trust the host (SSH and RDP)”Under Host identity you choose how SSOGEN recognizes the server. The default is Verify the host (recommended).
SSH, verify. Either paste the fingerprint from step 2 into Host key fingerprint (it has the form SHA256: followed by 43 characters, otherwise the form says “A host key fingerprint has the form SHA256: followed by 43 characters.”), or leave it empty and pair the host as described next. Nothing is trusted on first use: a new SSH resource with no pinned key starts in pairing, and nobody can open it until you trust the host. A person who tries sees “This resource is not ready yet. An administrator has to confirm its host first.”
RDP, verify. Give Certificate pins (one SHA-256 per line) (at most 16, each 64 hexadecimal characters; a pinned certificate is trusted as it is, so a self-signed Windows certificate works), or a Server certificate trust bundle (optional): the certificate authority that issued the desktop’s certificate (the certificate must name the host; with a bundle, pins only narrow the choice). Choose Paste the CA certificate and paste it (PEM, from -----BEGIN CERTIFICATE-----), or A file on each Gateway host and give its secret:// reference, a file on the gateway host as described in Install and enroll an SSOGEN Gateway. With neither pins nor bundle, no session opens until you pair the host (Pair, below) or trust the certificate from the first refused session’s timeline (step 9).
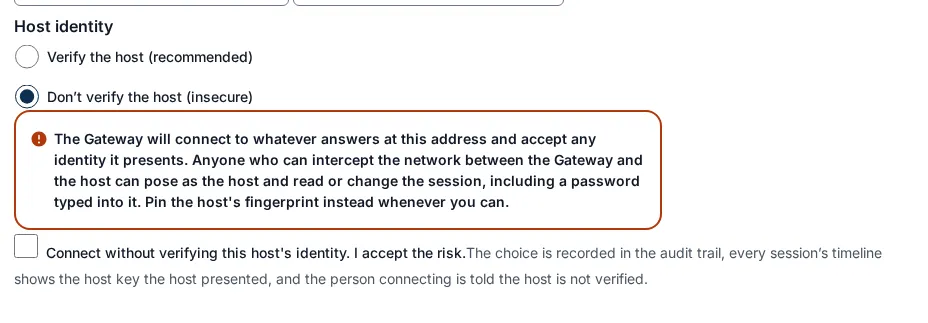
Don’t verify the host (insecure). An explicit choice. It shows a red warning (“The gateway will connect to whatever answers at this address and accept any identity it presents…”) and requires you to tick Connect without verifying this host’s identity. I accept the risk. The choice is recorded in the audit trail, every session’s timeline shows the key or certificate the host presented, and the person connecting is told the host is not verified.
RDP, Network Level Authentication. Require Network Level Authentication (NLA) (recommended) is on for every new RDP resource. Turn it off only for a host that cannot use NLA, such as a Linux desktop served by xrdp: the form then shows a red warning (“Without Network Level Authentication, the host starts a desktop session and shows its own sign-in screen before anyone has signed in to it…”) and requires you to tick Connect to this host without Network Level Authentication. I accept the risk. TLS and the host identity check stay on. A session to a host that will not use NLA ends at once; its timeline says “This server does not support Network Level Authentication (NLA), or offers only legacy RDP security, so nothing was sent to it.”
Pair, test and trust the host (administrator)
Section titled “Pair, test and trust the host (administrator)”Trusting a host is your decision, never the employee’s: people are not shown a fingerprint and are not asked to accept one. Do this in the resource editor of a saved resource, under Pair and test the host.
-
Select Pair. (Once a key or certificate is pinned the same button is called Test.) The Gateway connects to the host without sending any account and reports what the host presents. The page says “Waiting for the Gateway to reach the host…” and waits up to a minute. If it ends with “The Gateway did not answer in a minute. Check that it is running and can reach the host, then test again.”, check the Gateway and the route to the host.
-
The page shows “The host presented” and the fingerprint (
SHA256:…for an SSH key, 64 hexadecimal characters for an RDP or VNC certificate). -
Compare it with what the host says about itself. For SSH run
ssh-keygen -lf /etc/ssh/ssh_host_ed25519_key.pubon the host and paste the whole output into Paste the output of ssh-keygen -lf on the host. For RDP or VNC type the certificate’s SHA-256 into Type the certificate’s SHA-256 as the host shows it (with or without colons; section 2 shows the command). The line under it reads “It matches.” or “It does not match what the Gateway saw.” Trust stays disabled until it matches.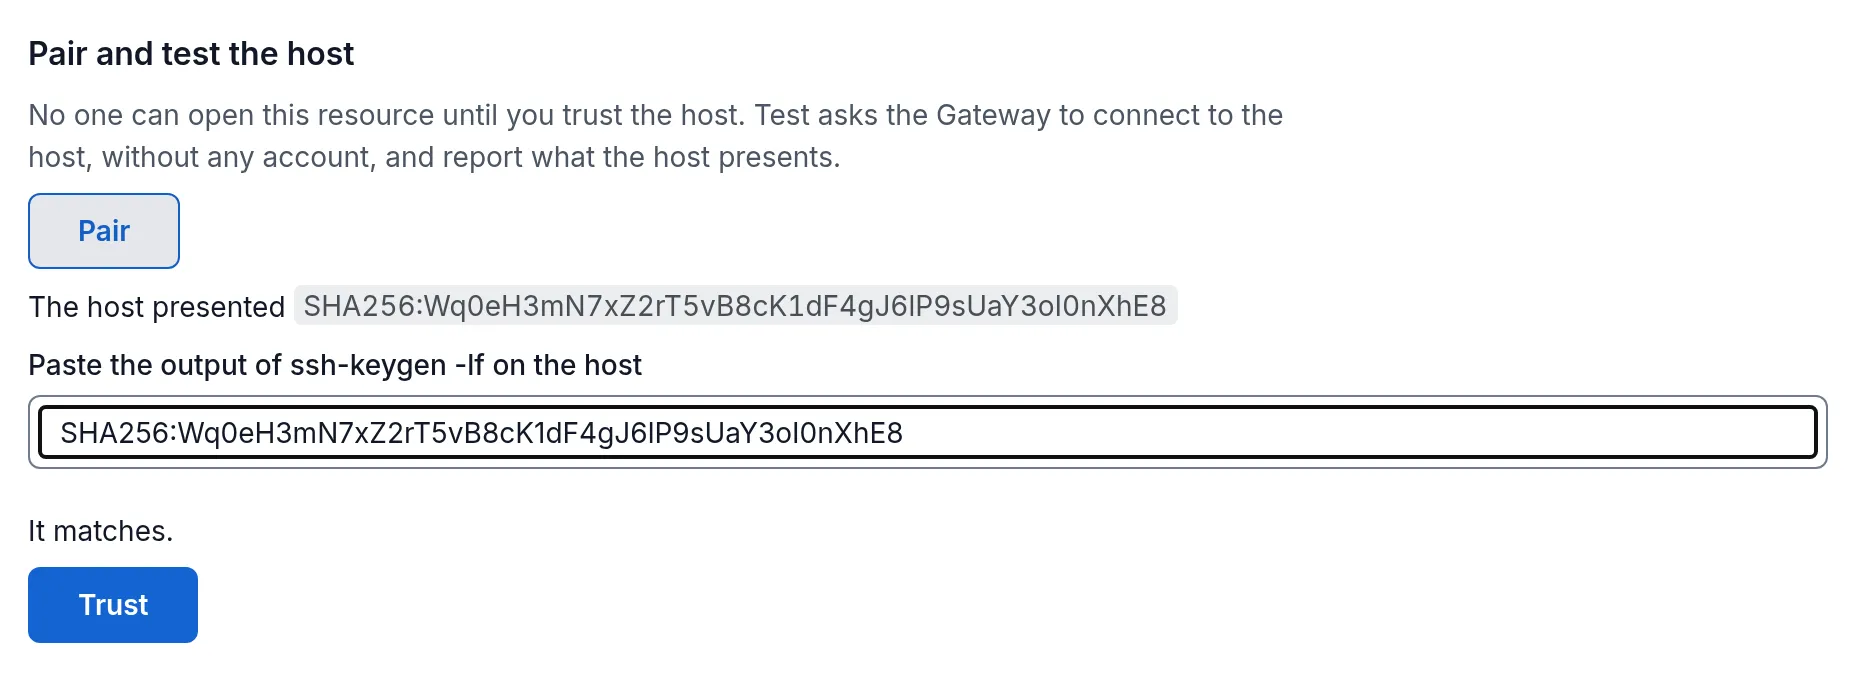
-
Select Trust. The dialog Trust this host? says “From now on the Gateway accepts this host only while it presents … Sessions open now are ended, because the resource changes.” Select Trust and pin. The page says “Trusted. The next session verifies the host against it.”
If the host later presents a different key or certificate, for example after a rebuild, no one can open a session until you check and replace the pin: run Test, and the page shows “This is not the key pinned now. No one can open a session until you press Update key.” Compare as before and select Update key (dialog Update the trusted key?, button Update key). The page says “Key updated. People can open sessions again.” If the host presents the pinned key, the page says “This is the one already pinned. Nothing to change.”
Each of these steps is in the audit trail (“Host test requested”, “Host identity observed by the Gateway”, “Host identity trusted by an administrator”).
5. VNC security
Section titled “5. VNC security”A VNC resource asks for a Security method instead:
| Method (as shown) | Needs |
|---|---|
| Encrypted (TLS with certificate), account and password — recommended (default) | Trust bundle; account name and password |
| Encrypted (TLS with certificate), VNC password | Trust bundle; VNC password |
| Encrypted (TLS with certificate), no sign-in (insecure) | Trust bundle; acknowledgement |
| Unencrypted, VNC password (insecure) | Acknowledgement |
| Unencrypted, no sign-in (insecure) | Acknowledgement |
- The three insecure methods show a red explanation and require the box Confirm that you accept an unencrypted or unauthenticated connection to this host.
- The encrypted methods require Server certificate trust bundle, pasted (Paste the CA certificate) or as A file on each Gateway host (a
secret://reference) (“This method needs a server certificate trust bundle.”). The host’s certificate is always verified; there is no option not to. Certificate pins (optional, one SHA-256 per line) only narrow what is accepted; each pin is 64 hexadecimal characters. - Sign-in to the host is Ask the person at sign-in or Use a stored account (secret reference). (When you choose Stored account under Who signs in to the host in step 3, SSOGEN keeps the account itself and this choice is not shown; a plain VNC password cannot be stored.) A stored account takes a Password reference (
secret://…, a file on the gateway) and, for the account-and-password method, an Account name. With the two “no sign-in” methods the only choice is No sign-in. - Display width and Display height (default 1280 by 800) set the desktop’s starting size.
6. Decide who may connect (the Access tab)
Section titled “6. Decide who may connect (the Access tab)”Open the resource (select its row), then the Access tab. The other tabs are Overview (the form above), Requests, Sessions and Timeline.
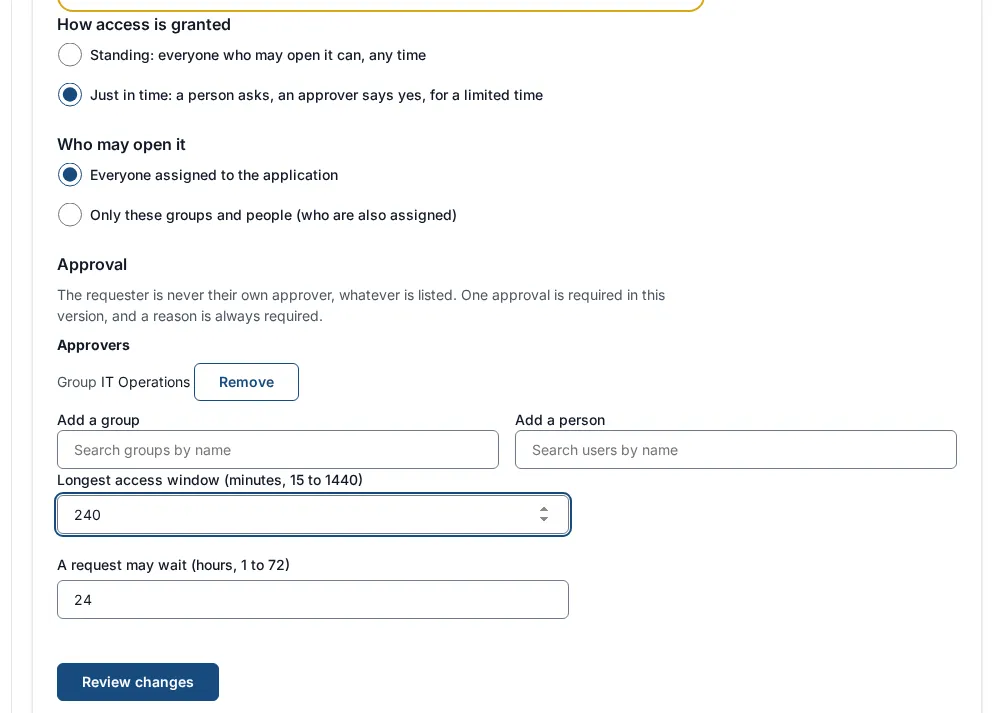
Until you save, the tab warns: “Access has not been set up for this resource. It is just-in-time with no approver, so nobody can request or open it until you save a policy here.”
- How access is granted:
- Standing: everyone who may open it can, any time
- Just in time: a person asks, an approver says yes, for a limited time
- Who may open it:
- Everyone assigned to the application, or
- Only these groups and people (who are also assigned): use Add a group and Add a person and pick from the directory. You must choose at least one: “Choose at least one group or person, or allow everyone assigned to the application.”
- For just-in-time, an Approval group appears. One approval is required, a reason is always required, and a requester is never their own approver:
- Approvers: add at least one group or person (“Choose at least one approver.”).
- Longest access window (minutes, 15 to 1440): “The longest access window is a whole number of minutes from 15 to 1440 (24 hours).”
- A request may wait (hours, 1 to 72): how long a request stays open for a decision.
- Select Review changes. A section Who loses access now says “Nobody loses access.” or “N people lose access now.” and lists each person with Could open or request access, Pending request revoked or Approved access revoked, live session ended.
- Select Save access. The page says “Access saved.”
The sign-in strength people need is not set here; it follows the application’s sign-in policy.
Capabilities (clipboard and file transfer)
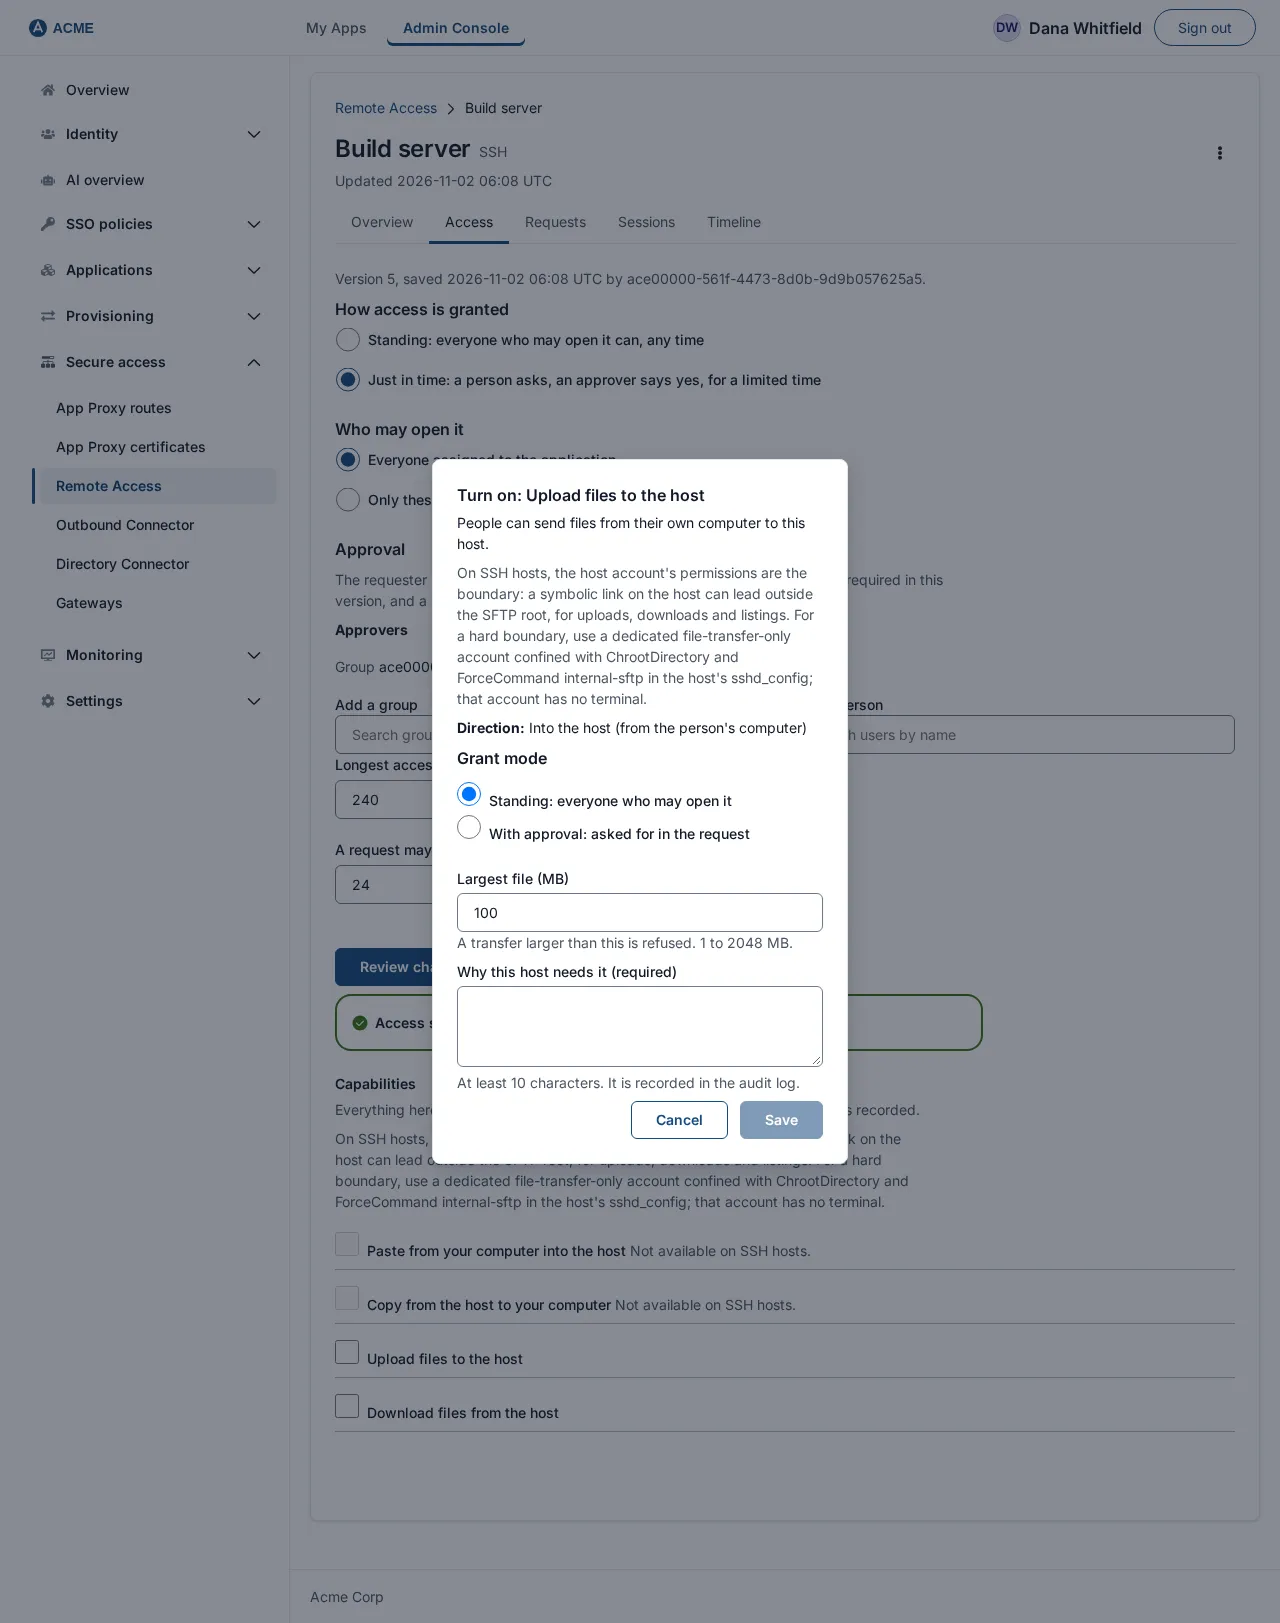
Section titled “Capabilities (clipboard and file transfer)”Below the access settings is Capabilities: “Everything here is off unless you turn it on. Each one asks for a reason, which is recorded.” Four switches:
- Paste from your computer into the host (not available on SSH hosts)
- Copy from the host to your computer (not available on SSH hosts)
- Upload files to the host (not available on VNC hosts)
- Download files from the host (not available on VNC hosts)
Ticking one opens Turn on: …, which explains the risk in a sentence and asks for:
- Grant mode: Standing: everyone who may open it or With approval: asked for in the request (the second needs just-in-time access).
- Largest file (MB), the first time a file capability is turned on: 1 to 2048, default 100. A larger transfer is refused.
- Why this host needs it (required): 10 to 500 characters (“Say why this host needs it, in at least 10 characters.”). It goes into the audit log.
Unticking opens Turn off: … and also asks for a reason. Turning off takes effect on the next session, even for a request that already approved it.
7. The employee opens it
Section titled “7. The employee opens it”Standing access
Section titled “Standing access”- The employee signs in to SSOGEN and opens My Apps. Below the application tiles is a Remote Access section with one tile per resource they may reach, showing the protocol and name (for example
SSH · Build server). It never shows the host name, port or account. - They select Open. The session page opens.
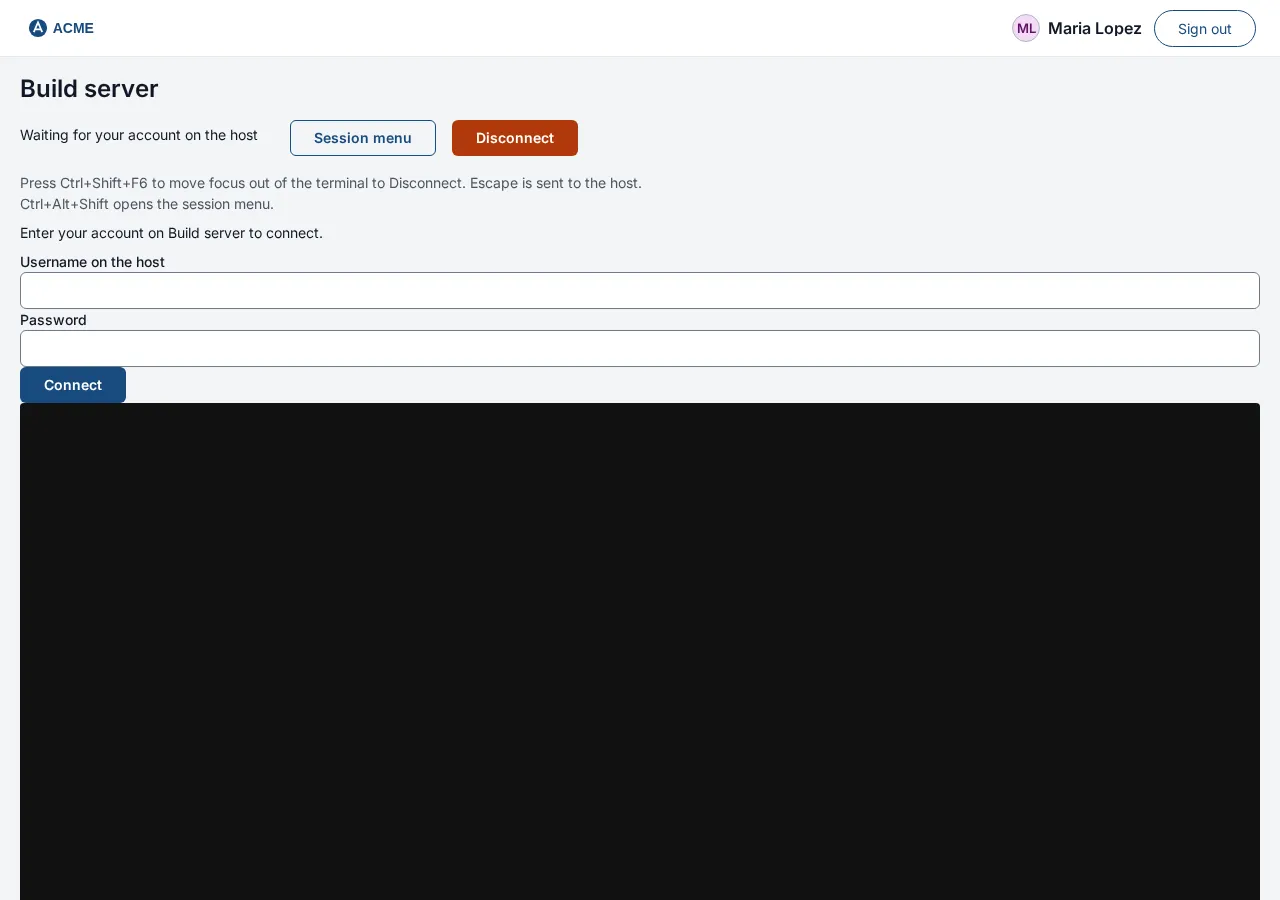
- If the resource has a Stored account, the person types nothing: the session goes straight to the terminal or desktop. Otherwise the account on the host is entered by the person (for VNC when you chose “ask”). The page says “Enter your account on Build server to connect.” with Username on the host, Password and Connect. A VNC password has no username and the page notes “VNC passwords use at most 8 characters”. The credentials are used once and not stored.
- The terminal or desktop appears. If the resource is still waiting for you to pair its host, the tile or page says “This resource is not ready yet. An administrator has to confirm its host first.” If the host’s identity is not trusted yet, the session is refused with “This host is not trusted yet: an administrator must confirm its identity before a session can open.” If sign-in fails the page says “The host did not accept the sign-in. Enter an account to try again.”

Just-in-time access
Section titled “Just-in-time access”On a just-in-time resource the tile says Requires approval · up to 4 h (the longest window you set) with Request access.
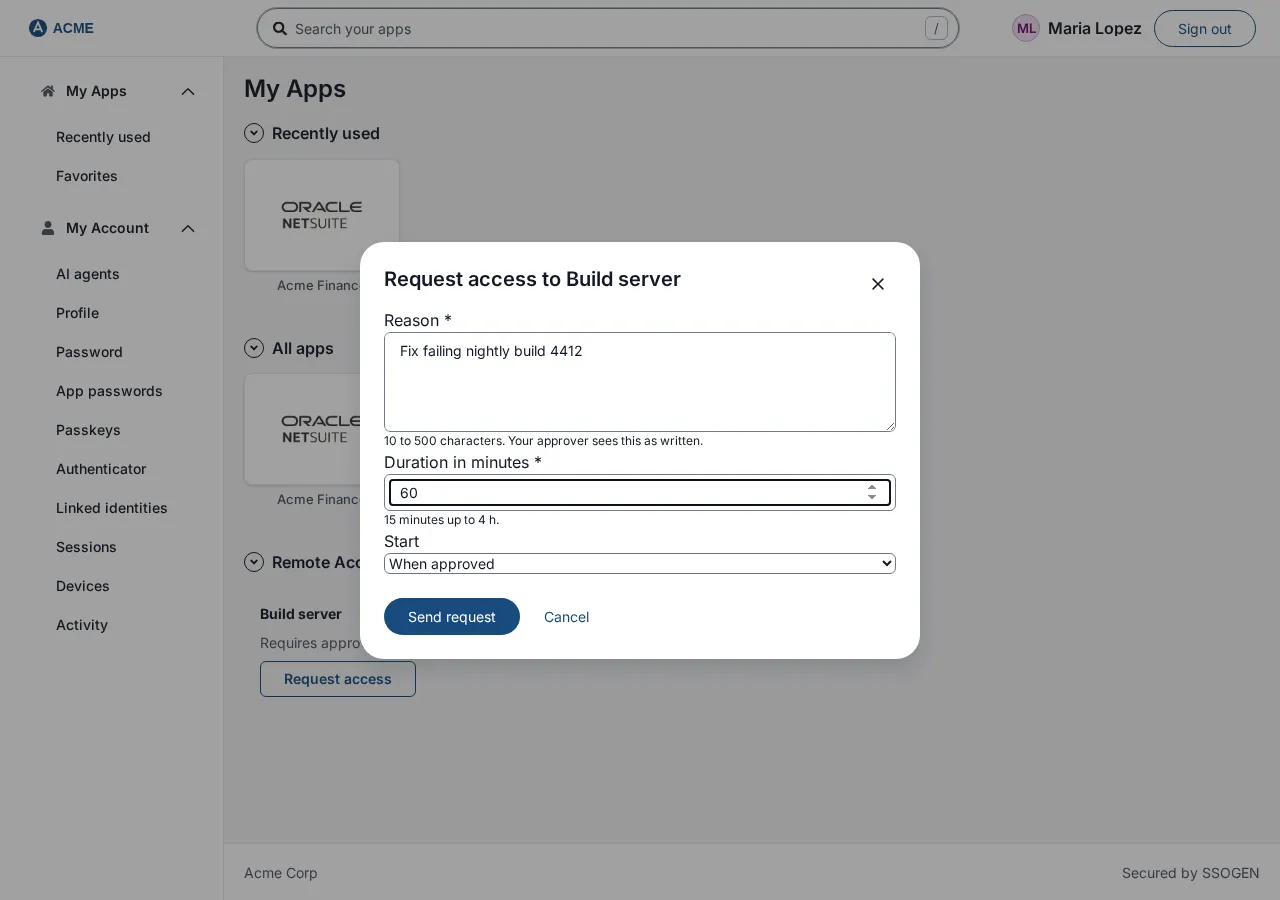
- The employee selects Request access. A dialog Request access to Build server asks for:
- Reason (required, 10 to 500 characters; the approver reads it as written),
- Duration in minutes (15 up to the maximum),
- Start: When approved or At a time within 7 days (then Start at),
- Also allow: the capabilities that need approval on this resource.
- They select Send request. The tile now says Waiting for approval with Cancel request.
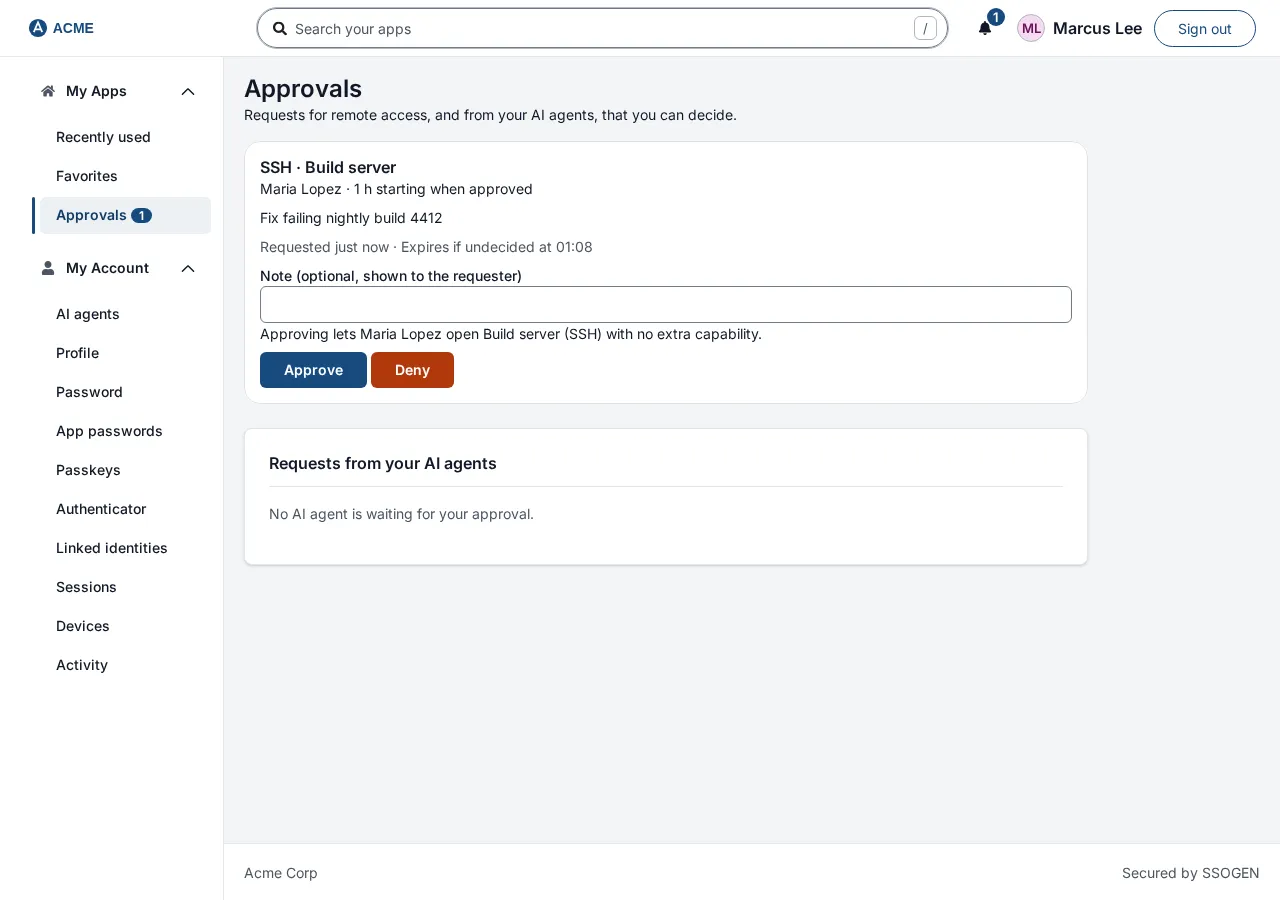
- The approver opens Access requests waiting for your approval (a link on their My Apps page; the page is titled Approvals). Each request shows who is asking, the resource, the reason and the window. The approver may untick capabilities (the line then reads “Approve with: …” or “Approve with no extra capability”), add a Note (optional, shown to the requester), and select Approve or Deny.
- After approval the tile says Approved · from … to … and, once the window opens, Access until … (… left) with Open. A denied, expired or revoked request shows Denied, Expired or Revoked (with who decided and the note) and Request again.
A tile that cannot be used says why: Turned off by your administrator, Access has not been set up yet, Not reachable yet; your administrator is still setting it up (the origin is not set), Temporarily unreachable or The application is unavailable.
8. In the session: web SSH terminal and desktop
Section titled “8. In the session: web SSH terminal and desktop”The web SSH terminal
Section titled “The web SSH terminal”A browser terminal opens and follows the page size. Pasting more than one line asks first: “This paste has more than one line, so it would run as soon as it lands.” with Paste anyway and Cancel. Session menu (or press Ctrl+Alt+Shift together) opens a side panel with Keys, Display, Terminal (Color scheme: Dark, Light, Green on black, White on black; Font size, 10 to 24) and, when turned on, Files. Ctrl+Shift+F6 moves focus out of the terminal to Disconnect. Escape goes to the host.
The desktop (RDP and VNC)
Section titled “The desktop (RDP and VNC)”The desktop is drawn in the page; keyboard and mouse go to the host. The session menu adds Ctrl+Alt+Del, Windows key, Alt+Tab, Ctrl+Esc and Ctrl+Alt+F (F1 to F12), and Full screen / Exit full screen. VNC desktops follow the browser size; RDP desktops keep the size they started with.
Clipboard
Section titled “Clipboard”If clipboard is on, the Clipboard part of the session menu is a text box. Text copied on the host appears there; select Copy to my computer to put it on your own clipboard. To send text, type or paste it and select Send to host. Only plain text moves, and a text that is too long is not copied (“The clipboard text was too long for this session, so it was not copied. The session goes on.”). VNC carries Latin-1 text only and warns when characters were left out. If a direction is off, the box says so (“Sending text to the host is not allowed for this session.”).
If file transfer is on, Files shows “Drop files here to upload them to the host, or” a Choose files to upload button, and a Transfers list with progress, Cancel and outcomes such as Refused, Too large, Could not be read. On SSH, a folder listing lets people open folders and select Download on a file. Uploads land under a temporary name ending .ssogen-partial and are renamed when complete. Over RDP the host sees one redirected drive (uploads appear at its root; downloads go in a Download folder).
Ending a session
Section titled “Ending a session”Disconnect ends it. The page also tells people why a session ended, for example “The session was closed after being idle for too long.”, “Your access window ended or the session reached its time limit.”, “An administrator ended this session, or your access was withdrawn.”, “The host could not be reached.” or “The host’s identity did not match; nothing was sent to it.”
9. Watch, terminate and audit (administrator)
Section titled “9. Watch, terminate and audit (administrator)”- Live sessions (a tab on the Remote Access page, and Sessions inside a resource): a table of Person, Resource, Gateway, State, Started and Time left. The filter starts on Live; others are Authorized, not yet started, Active, Ending, Ended and Never started. Open a session for its details and timeline.
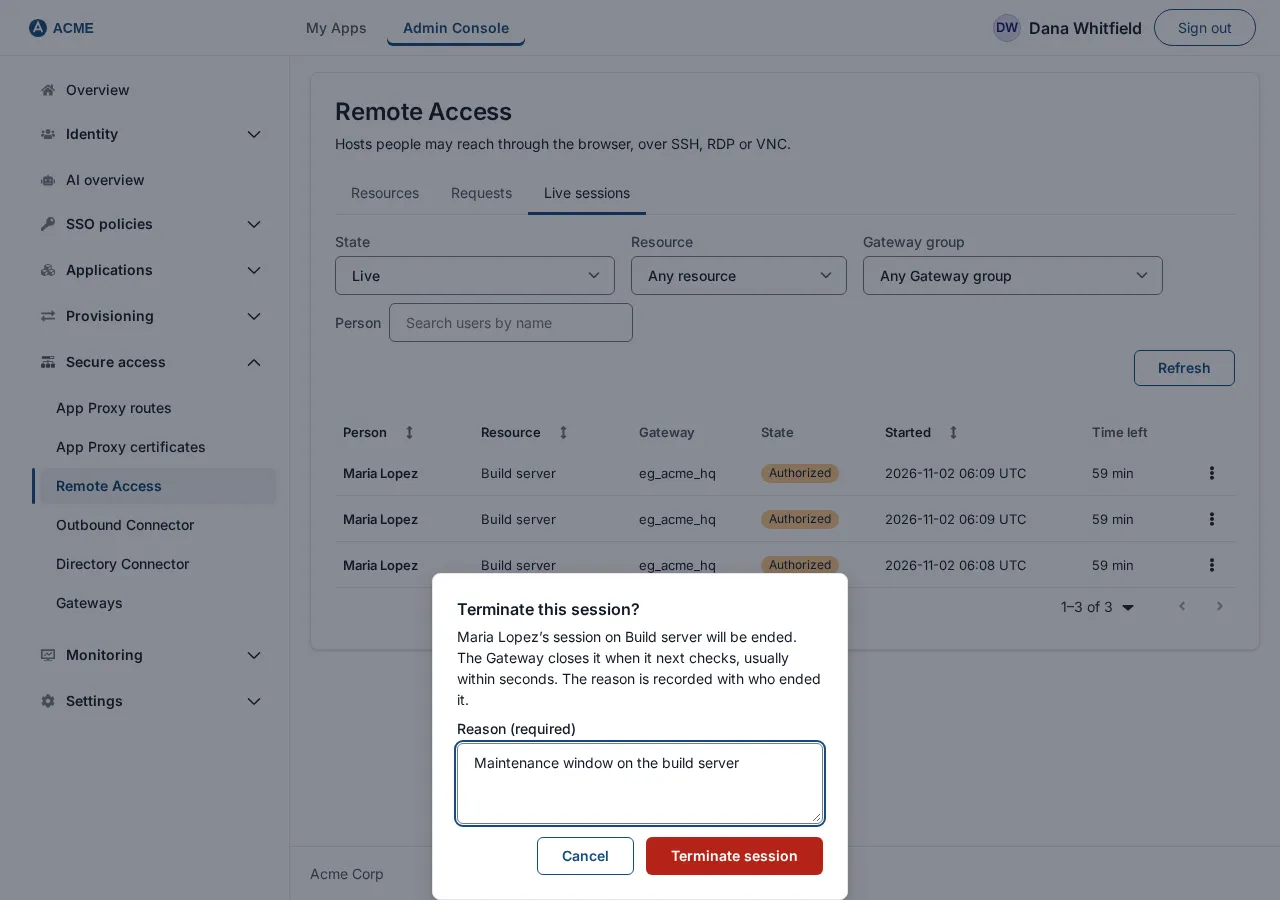
- Terminate: on a live session choose Terminate. The dialog Terminate this session? says the session “will be ended. The gateway closes it when it next checks, usually within seconds. The reason is recorded with who ended it.” Enter a Reason (required) (up to 500 characters) and select Terminate session. The row then reads Ending… and later Ended, confirmed by the gateway (or Not confirmed by the gateway).
- Requests tab: every access request with Requester, Resource, State, Reason, Asked for, Requested and Decided by; filter by state, resource or person. An approved request has Revoke; it asks “Revoke …’s access?” and also ends any open session.
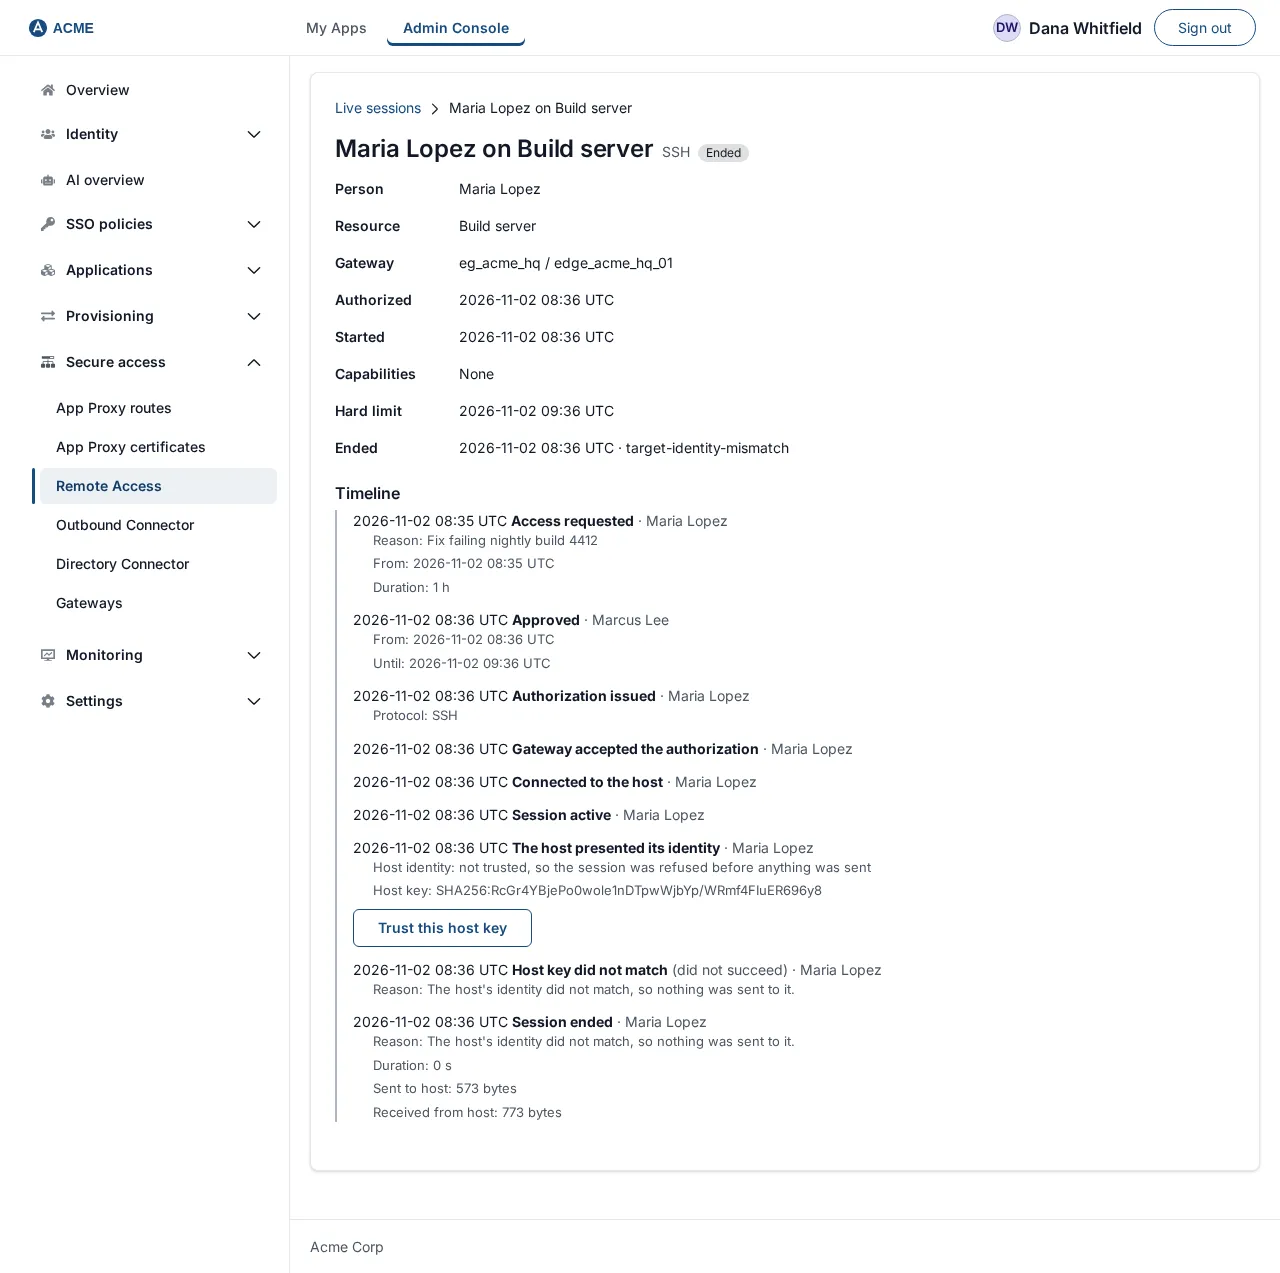
- Timeline tab: the step-by-step record, oldest first, in plain words, for example Access requested, Approved, Authorization issued, The host presented its identity, Signed in to the host, Session active, Clipboard used, File transferred, Blocked: not allowed for this session, Session ended. Host-identity rows say Host identity: verified, not verified (allowed for this resource) or not trusted, so the session was refused before anything was sent, and show the Host key or Certificate SHA-256.
When a host is not trusted yet, the row has a Trust this host key (or Trust this certificate) button. It opens Trust this host’s identity?. Compare the fingerprint with the host’s own, then select Trust and pin: the fingerprint is pinned on the resource and sessions open now are ended. The row then says “Pinned. The next session verifies the host against it.”
To remove a resource, use Remove resource in its row menu or on the resource page. People can then no longer open it, and what was done stays in the audit trail.
Limits
Section titled “Limits”- The audit log records session events, not screen content.
- VNC desktops follow the browser size.
- No port forwarding, agent forwarding, printer, USB or audio redirection.
- A stored account is one account per resource, not one per person. Per-person stored accounts are not offered.
- Only the administrator trusts a host. People cannot accept a host key themselves.
Check it worked
Section titled “Check it worked”- The group’s Remote access origin is saved.
- The resource shows in Remote Access, Resources, with its protocol and group.
- A test employee sees the tile under Remote Access on My Apps and can open it (or request it and be approved).
- The first session’s timeline shows Host identity: verified.
- With a stored account: the test employee opens the host without typing an account, and the timeline shows Signed in to the host. The resource’s timeline also lists Stored account set, Host test requested and Host identity trusted by an administrator.
If something goes wrong
Section titled “If something goes wrong”| What you see | What it means |
|---|---|
| Tile says Not reachable yet; your administrator is still setting it up | The group has no Remote access origin (step 1). |
| This host is not trusted yet… | No pinned key or certificate. Pair and trust the host (step 4), trust it from the timeline (step 9) or pin it on the resource. |
| The host’s identity did not match; nothing was sent to it. | The host’s key or certificate changed or is not the one you pinned. Verify it, then pin the new one. |
| The host did not accept the sign-in. | Wrong username or password on the host. |
| The host did not accept the account your administrator stored for it. Ask your administrator. | The stored account was refused. Replace the password or key (step 3), or fix the account on the host, for example by adding the generated authorized_keys line again. |
| This host has changed since your administrator trusted it, so nothing was sent to it. Ask your administrator. | The host presents a different key or certificate than the pinned one. Run Test, compare, and select Update key (step 4). |
| The stored account could not be used right now. Try again in a moment; if it keeps happening, ask your administrator. | The Gateway did not receive the account (code SSO-EDGE-403-CREDENTIAL: The stored account for this host was not released.). Causes: the stored password was cleared after a change, more than 120 seconds passed, the host was not paired, or SSOGEN could not be reached. Check the resource editor’s banner. |
| This resource is not ready yet. An administrator has to confirm its host first. | A new SSH resource is in pairing. Pair and trust the host (step 4). |
| The connector that reaches this host is not connected. Ask your administrator. | The resource reaches the host through an Outbound Connector and no tunnel is up. See Outbound Connector. |
| The host would not use the security this connection requires, so nothing was sent to it. Tell your administrator. | The host refused the encryption or authentication this resource requires (for example Network Level Authentication). |
| The host could not be reached. | The gateway cannot connect to the host and port. Check the firewall and the address. |
| Tile says Access has not been set up yet | Save an access policy (step 6). |
| The gateway is busy. Try again in a moment. or The gateway is restarting. | The gateway is at its limit or being restarted. |
For problems with the gateway itself, see Troubleshooting.