Test SAML SSO and activate an application
Registering an application connects it to SSOGEN. These steps decide who may use it and how they sign in, and let you test SAML SSO (and OpenID Connect, Web Agent and App Proxy sign-in) with a dry run that shows the assertion or claims the application would receive, before anyone tries. They are the same for SAML, OpenID Connect, Web Agent and App Proxy applications.
The examples use the application Acme Expenses from Register a SAML application and the people Maria Lopez and the group Finance at Acme Corp.
The application page
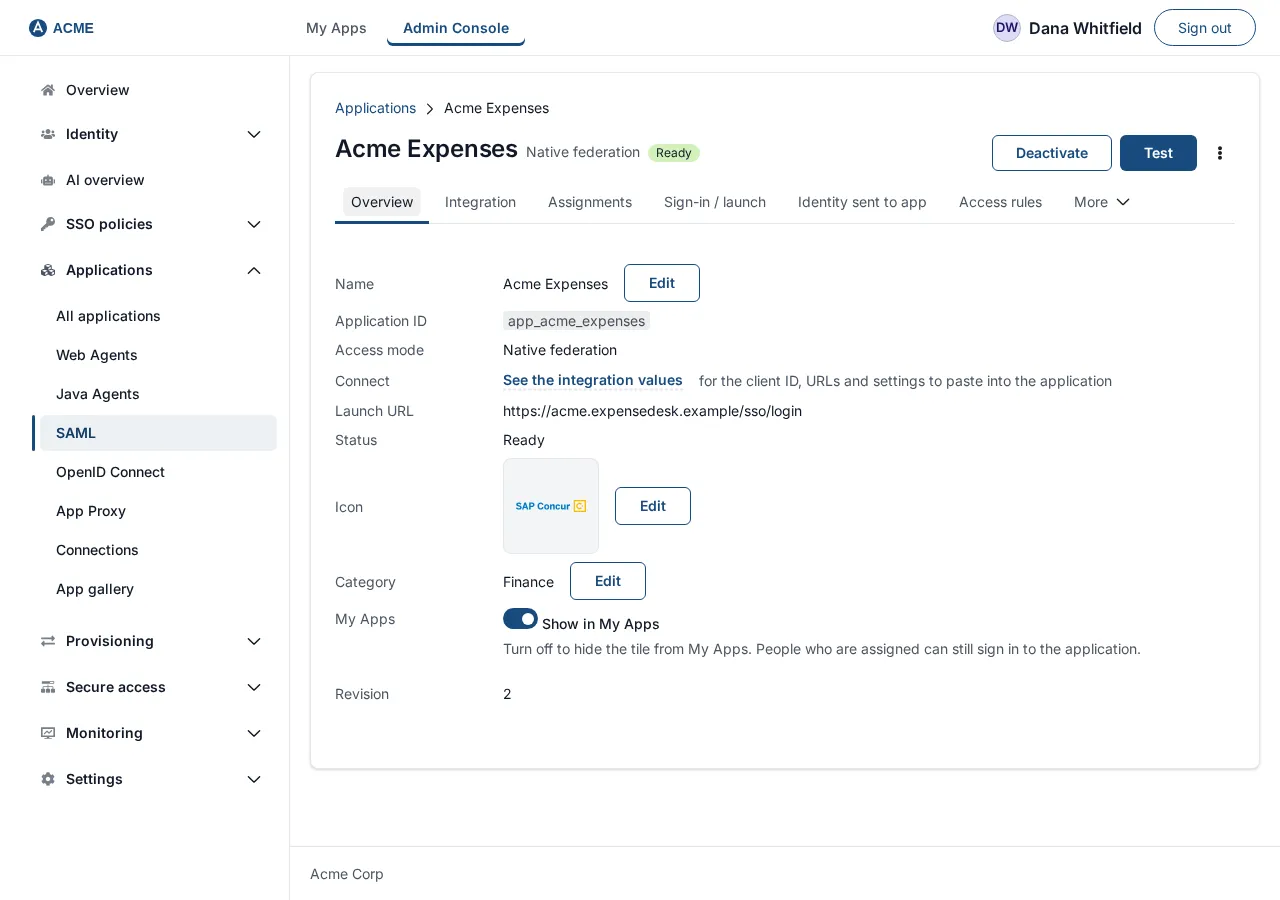
Section titled “The application page”Open Applications in the left menu, choose the list for your kind of application (All applications, Web Agents, SAML, OpenID Connect, App Proxy or Bookmarks), and select the application’s name or its Open action. The page has the application’s name as its title, a breadcrumb Applications, a status badge, a Test button, and an actions menu with Delete permanently. Under it are tabs:
| Tab | What it is for |
|---|---|
| Overview | Name, Access mode, Launch URL, Status (and the reason when it is not ready), Revision, category and the Show in My Apps switch. |
| Integration | The values to enter on the application’s side (SAML, OpenID Connect) or the configuration to paste on the web server (Web Agent, including the agent key and the Java agent settings). |
| Assignments | Who may open the application, and the Assignment required switch. |
| Sign-in / launch | How My Apps opens the application: access mode, launch address and App Pack. |
| Identity sent to app | The name and attributes the application receives. |
| Access rules | The sign-in policy for this application. |
| Access mode | The access mode, and the App Proxy route and edge if any. |
| Sign-in tokens | OpenID Connect client settings (only for applications that have an OpenID Connect registration). See Register an OpenID Connect application. |
| Sign-in to the app | How a App Proxy route signs people in to the application itself. See the SSOGEN Gateway guides. |
| Roles | The roles the application understands and who holds each one. |
| Test | A dry run for a chosen person. |
| Non-human callers | Only when AI agents are turned on for the realm. See the AI agents guides. |
| Diagnostics | A read-only summary of how the application is set up and the policy in force. |
A Bookmark application only opens a web address after sign-in to SSOGEN, so it has fewer tabs: no Integration, Identity sent to app, Sign-in to the app or Roles.
Status: what the badge means
Section titled “Status: what the badge means”Every application has a status, shown in the list’s Status column and on its page. The console reads it from SSOGEN; it does not work it out itself.
| Status | Meaning |
|---|---|
| Ready | It can be launched and at least one person or group is assigned. |
| Unused | It can be launched, but “Nobody is assigned, so it appears on no one’s My Apps.” |
| Incomplete | Something is missing. The reason is shown next to the badge (see the table below). |
| Disabled | “Marked unavailable, so its My Apps tile cannot be opened.” This is how an application looks after you save it in the wizard and before you activate it. |
Reasons shown next to Incomplete or Disabled:
| Reason | What to do |
|---|---|
| Its app pack is not active, so every launch is refused. | See App Packs. |
| Its sign-in policy admits no provider, so every launch is refused. | Edit the policy so it allows at least one identity provider. |
| Choose an access mode on the Access mode tab. | Set the access mode on the Sign-in / launch tab. |
| App Proxy apps need both a route and an edge binding. | Fill in App Proxy route ID and App Proxy edge ID on the Sign-in / launch tab. |
| No launch URL, so My Apps tile has nowhere to go. | Fill in Launch URL (https). |
| The launch URL must be an https:// address. | Fix the launch URL. |
| Its launch configuration is not complete. | Check the Sign-in / launch tab. |
Assign people and groups
Section titled “Assign people and groups”A person sees an application in My Apps when they are assigned directly or through a group they belong to. Nobody sees an application that is not assigned to them.
-
Open the application and select the Assignments tab. It has the switch Assignment required and two sections, People and Groups.
-
People. If nobody is assigned directly, the section says “No one is assigned directly” and “Search below to give a person access to this application.” Under Assign a person, start typing a name or sign-in name (for example
Maria), and choose Maria Lopez from the matches. She is assigned at once and appears in the list with a Remove button. The list shows each person’s sign-in name and, after a dot, their full name. The tab lists the first 50 people. -
Groups. If no group is assigned, the section says “No groups are assigned” and “Assigning a group grants the application to every member.” Under Assign a group, search for
Financeand choose it. It appears with a Remove button. Every current and future member of the group can open the application.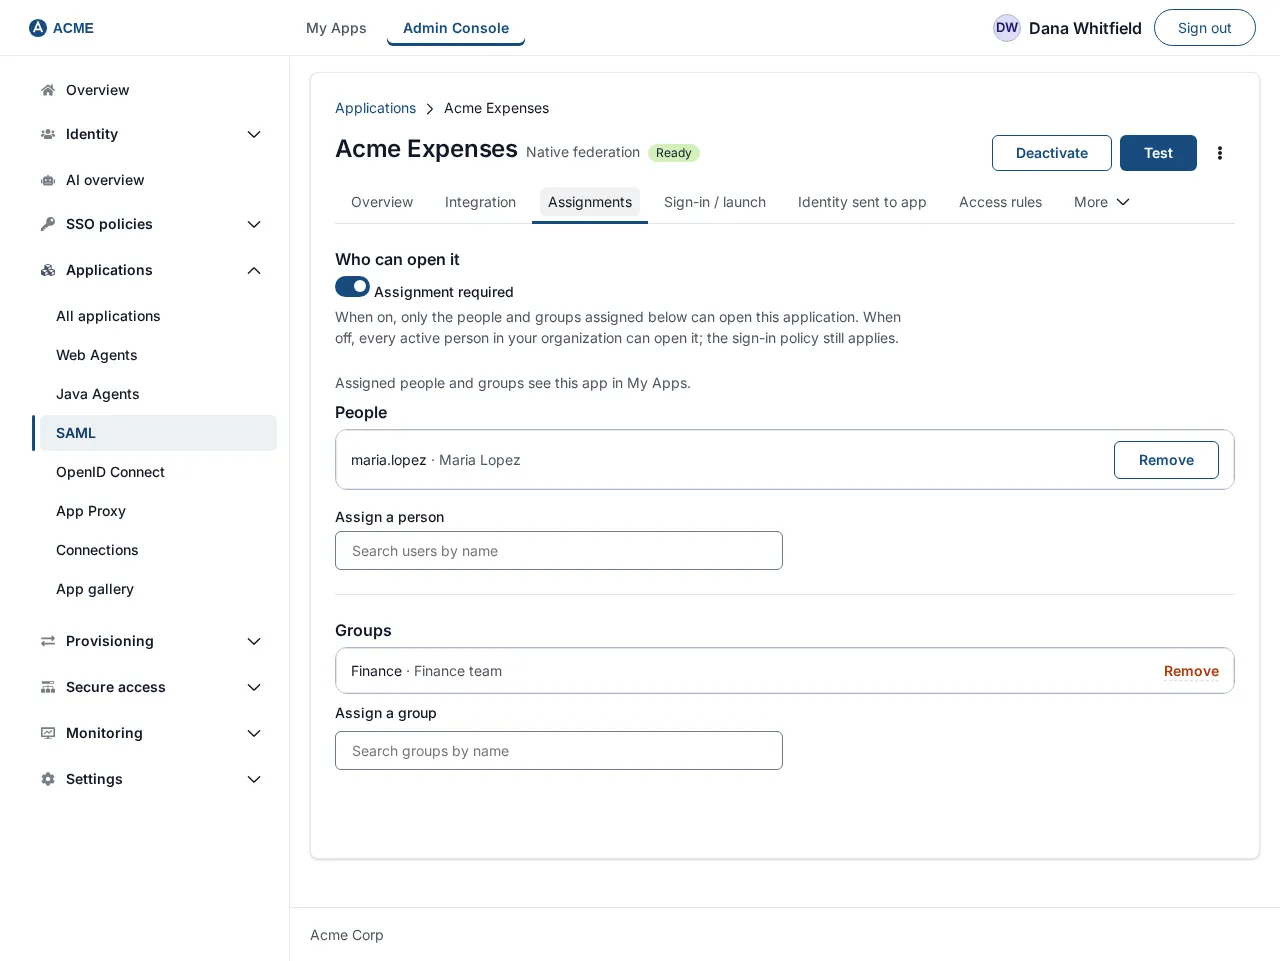
-
To take access away, select Remove beside the person or group. A person who is also in an assigned group keeps access through the group.
If an assignment fails you see “Assignment create failed. Confirm the application exists.” (a person), “Group assignment failed. Confirm the application exists and group_id is a UUID.” (a group), “Assignment revoke failed.” or “Group assignment revoke failed.”
After the first assignment, the status changes from Unused to Ready.
Open an application to everyone: Assignment required
Section titled “Open an application to everyone: Assignment required”On the Assignments tab the switch Assignment required is on by default: “When on, only the people and groups assigned below can open this application. When off, every active person in your organization can open it; the sign-in policy still applies.” Turn it off for an application everyone should have, such as an intranet or a time-sheet service. The tab then says “Assignment is not required: every active person can open this application and sees it in My Apps. Assignments below are kept and apply again if you turn Assignment required back on.” It also warns that every active user in the realm, including users who signed in through an external identity provider, can open the application. A service application has no people, so it cannot be opened to everyone.
Hide the tile without removing access: Show in My Apps
Section titled “Hide the tile without removing access: Show in My Apps”On the Overview tab, the switch Show in My Apps controls whether the application’s tile is listed in My Apps. “Turn off to hide the tile from My Apps. People who are assigned can still sign in to the application.” Use it for an application people reach only through a link in another application.
The Roles tab lists the roles the application understands (“Roles sent to the app at sign-in, based on the rules below. Changes apply at the next sign-in.”). Use Add a role to add one (a Role key and a Role name), and Add a rule to say who holds it: choose the Role and Who gets it. A role can be marked as administrative. For an application that reports its own roles, change keys and names in that application and assign them here.
Choose the sign-in policy
Section titled “Choose the sign-in policy”The sign-in policy says which identity providers may sign a person in to this application, how strongly they must be signed in (for example, with a second factor), and whether passkeys are offered. Policies are named and shared: you create a policy once, under SSO policies, then Policies, and any number of applications use it. Changing a policy changes every application that uses it.
-
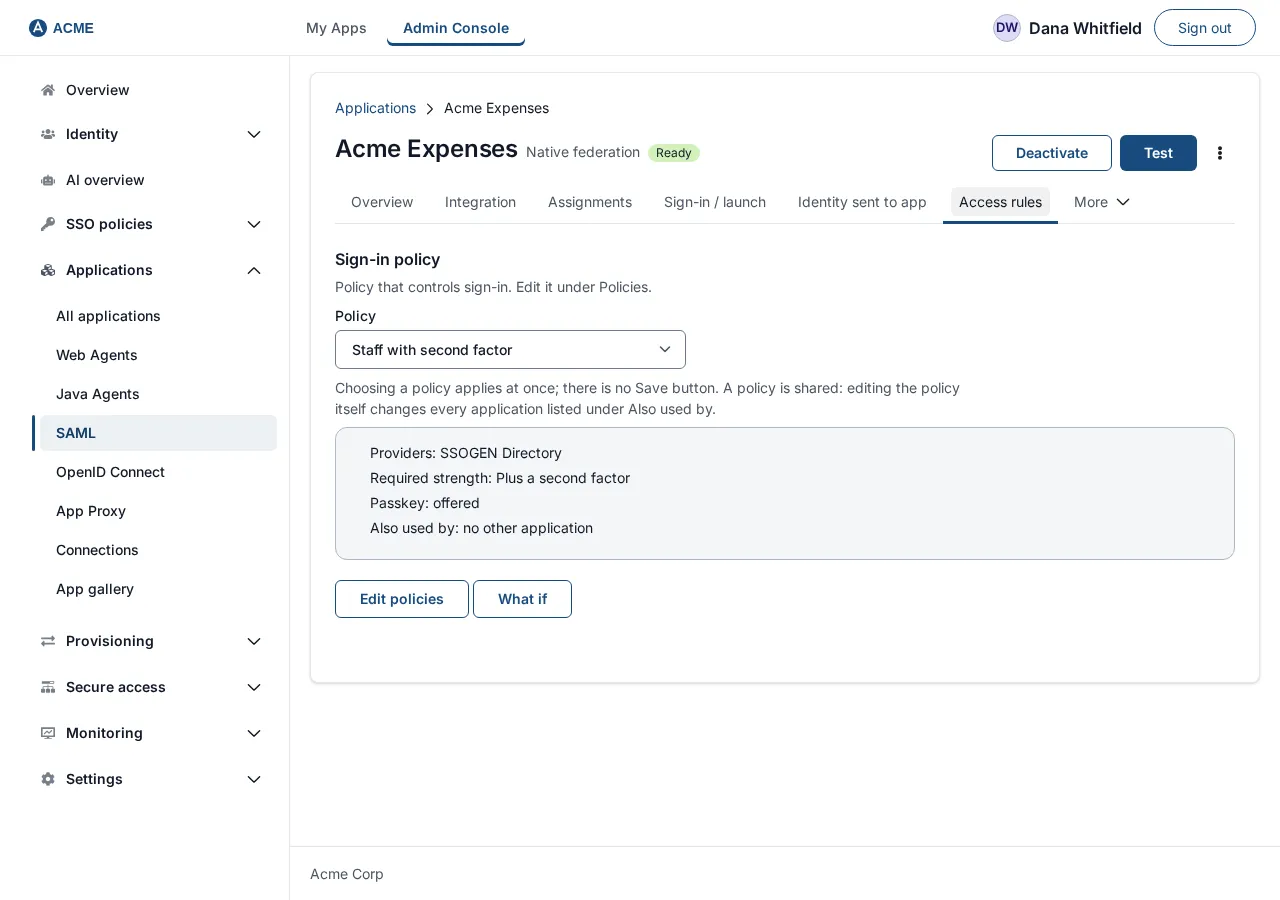
Open the application, then the Access rules tab. The section Sign-in policy says: “Policy that controls sign-in. Edit it under Policies.”
-
Under Policy, choose a policy from the list. It takes effect at once (there is no Save button; a policy is shared, so editing the policy itself changes every application listed under Also used by), and a message “Sign-in policy changed.” appears. Below the list a summary shows:
- Providers: which identity providers are allowed, or “none — sign-in is refused”;
- Required strength: one of Password or single sign-on, Plus a second factor, Passkey or security key;
- Passkey: “offered” or “not offered”;
- Also used by: the other applications on the same policy, or “no other application”.
-
Select Edit policies to go to the policies screen, or What if to ask what would happen for a particular person and application without signing anyone in.
-
If the list says “No policies defined”, create one under SSO policies, then Policies first.
If you see “Could not change the sign-in policy.” the change was not saved; try again. If the message begins “Nothing was saved: a App Proxy hostname this affects would then let people sign in from outside your network zones more weakly than its route’s external hostname…”, the application is published through a App Proxy whose hostname has stricter rules; follow the message: keep a first rule that denies sign-in from outside your network zones, or change the hostname’s policy on the App Proxy screen first.
What the policy does at sign-in
Section titled “What the policy does at sign-in”- If a person signed in more weakly than the policy requires (for example, with a password only, and the policy wants a second factor), SSOGEN asks for the second factor first, then continues.
- If the policy allows no provider, nobody can sign in and the application’s status becomes Incomplete.
- An application with no policy of its own uses the default policy. If there is no default and no policy chosen, the application cannot be activated.
Test sign-in and debug SAML with a dry run
Section titled “Test sign-in and debug SAML with a dry run”Test is a dry run. You pick a person and SSOGEN works out, using the real rules, whether they could open the application and exactly what the application would be sent. Nobody is signed in and nothing is sent to the application. Use it before activating and whenever somebody says “I can’t get in.”
-
Open the application and select the Test button at the top right (or the Test tab).
-
The tab says “Preview access and the identity sent. Nothing is signed in or sent.” Fill in:
Field Example Notes Person Maria LopezSearch for and choose a person. Signs in through the first allowed provider the person has an account at (the default) Or choose one of the policy’s providers. Signed in with Password or single sign-on Also Plus a second factor, Passkey or security key, Hardware-bound key: how strongly the person signed in. Advanced, Network zone empty A network zone the person is in, if your policy depends on it. Advanced, OpenID Connect scope openid profile emailFor OpenID Connect applications. -
Select Run test. (The button is unavailable until you choose a person.) Focus moves to the verdict, one of:
- “Maria Lopez can open Acme Expenses.”
- “Maria Lopez would be asked for a second factor.”
- “Maria Lopez cannot open Acme Expenses.”
-
Under the verdict is a checklist. Each line begins Passed, Failed or Not checked (“Not checked, because an earlier check did not pass.”). The checks that can appear (the list shows the ones that apply to this application), in the words you will see:
Check When it passes When it fails Assigned “Maria Lopez is assigned to Acme Expenses.” “Maria Lopez is not assigned to Acme Expenses, directly or through a group.” Available “Acme Expenses is available.” “Acme Expenses is marked unavailable, so nobody can open it.” App pack “The app pack Acme Expenses uses is active.” “The app pack Acme Expenses uses is not active.” Providers allowed “Acme Expenses’s sign-in policy allows at least one provider.” “Acme Expenses’s sign-in policy allows no provider, so nobody can sign in.” Access policy “The access policy allows Maria Lopez.” “The access policy … refuses this” (it may name the rule). Assurance “Maria Lopez’s sign-in is strong enough for Acme Expenses.” “Maria Lopez would be asked for a second factor: Acme Expenses requires …” Provider admitted “Maria Lopez’s provider is one of Acme Expenses’s sign-in providers.” “That provider is not one of Acme Expenses’s sign-in providers; Maria Lopez would be asked to sign in with one that is.” Sign-in method “Maria Lopez’s sign-in method is one Acme Expenses accepts.” “…signed in with a method Acme Expenses does not accept, so … would be asked to sign in another way.” Authentication age “Maria Lopez’s sign-in is recent enough for Acme Expenses.” “Maria Lopez’s sign-in is too old for Acme Expenses, so … would be asked to sign in again.” Other failure sentences you may see: “A rule asks Maria Lopez for a stronger sign-in than Acme Expenses’s sign-in policy can provide, so Maria Lopez would be refused rather than sent round the same sign-in again.”; “Acme Expenses identifies people by
, and has none for Maria Lopez. Maria Lopez would be refused.”; “ is required and Maria Lopez has no . Maria Lopez would be refused.” If the person has no account at the chosen provider yet, a line says “Maria Lopez has no account at yet.” -
If the person is not assigned, the verdict is followed by an Assign Maria Lopez button. Select it: she is assigned and the test runs again.
-
Under the checklist are cards that show what the application would receive, depending on its kind:
Card For Shows SAML assertion SAML NameID, authentication context, audience, recipient, whether encrypted, and the attributes with their values. ID token claims, UserInfo claims OpenID Connect The claims in each. Web Agent grant and headers Web Agent What the application would receive for this person: the user name in the form the application type expects, and the extra attributes you configured. App Proxy headers App Proxy The identity the App Proxy would pass on. Your application team can read the exact values here. Values that SSOGEN fixes only at sign-in show as “Set at sign-in”. Values that depend on the provider show as “Supplied at sign-in by
if asserted”. Attributes that cannot be sent are listed under “Left out” with the reason: “the name is reserved”, “it would not fit in the size limit”, or “the name is protected”. 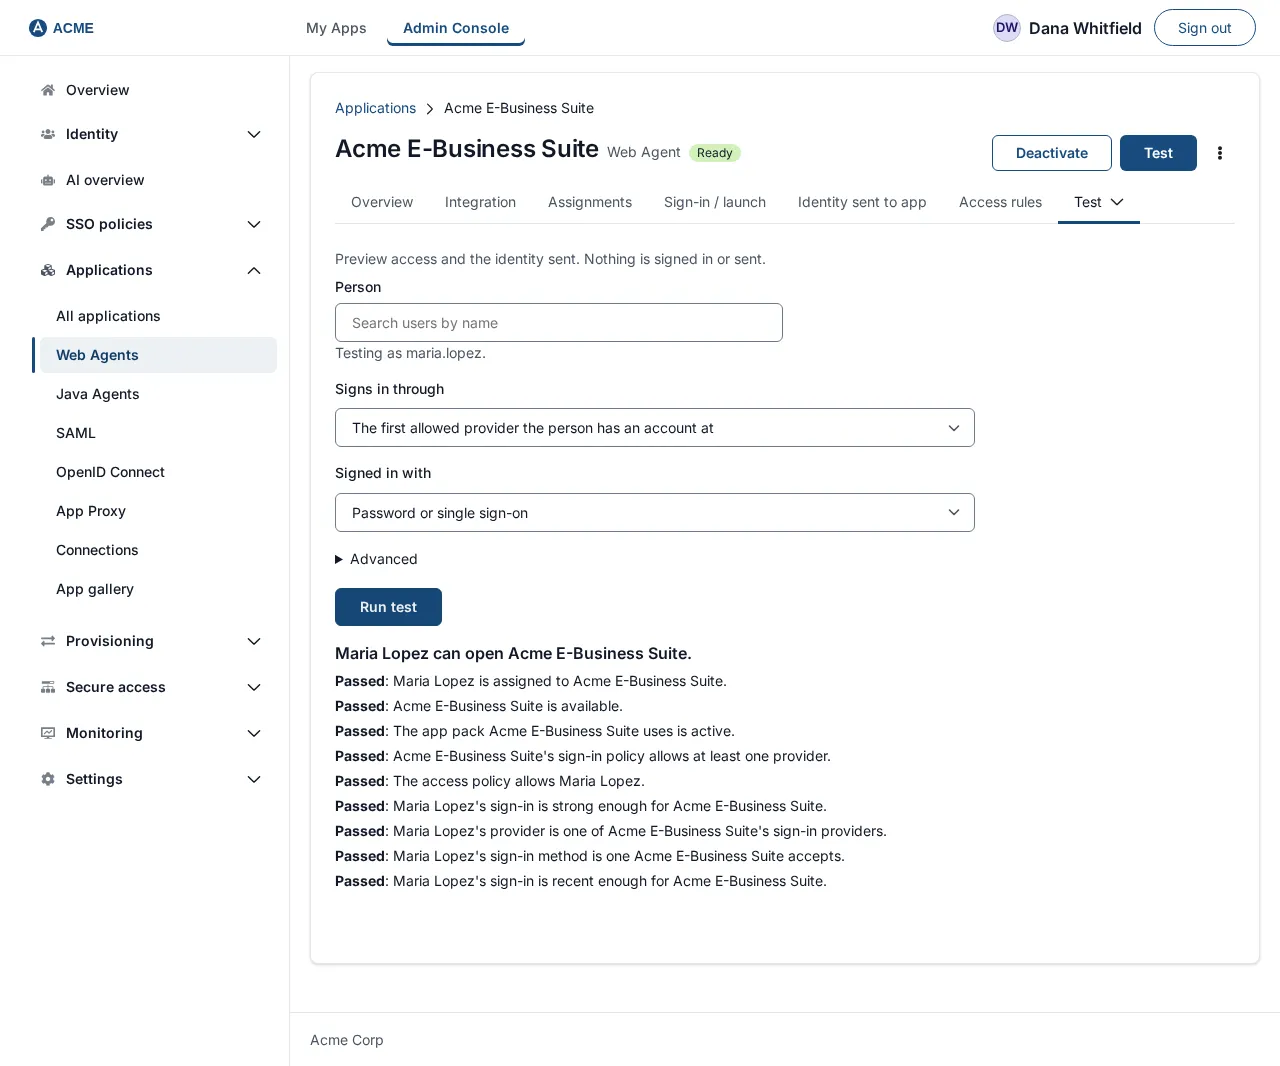
If you lack permission to read the directory, the test says “Testing needs permission to read the directory.”
For App Proxy routes that sign people in to the application itself (Sign-in to the application), the result also shows a section Sign-in to the application with the route and method; see the SSOGEN Gateway guides.
Activate
Section titled “Activate”An application is not available to anyone until it is activated. In the console, activation is a single button on the last step of the Register application wizard, Activate application, on the step Review and activate (see the first guide in this section). Activating:
- makes the application available in My Apps to the people assigned to it;
- is refused with “This application uses the default sign-in policy, and no default is set, so nobody could sign in to it. Choose a sign-in policy for it, or set a default policy, then activate it.” if it relies on the default policy and there is no default.
After the wizard you can switch an application off and on from its page: the buttons at the top right are Test, Deactivate (or Activate when it is switched off) and, in the actions menu, Delete permanently. Deactivate asks first: “People lose access now: all launches, including open sessions, are refused. You can reactivate it any time.” If Activate is refused with “not activated: no policy applies. Assign a policy or set a default.”, choose a sign-in policy on the Access rules tab first. A service application (OpenID Connect, client credentials) is active as soon as it is registered.
Check what the person sees
Section titled “Check what the person sees”-
Sign in as Maria Lopez and open My Apps. The My Apps lists her applications. Use Search applications to find one by name. Each application is a tile: select it to launch.
-
If an application is assigned to her but cannot be opened yet, its tile shows a badge and a reason instead of opening:
Badge Reason shown to the person Unavailable “This application is switched off for now. Try again later or ask your administrator.” or “This application is not available right now. Please ask your administrator.” Not set up yet “Your administrator has not finished setting this application up.” -
If a launch is refused, the person sees one of these messages: “You are not assigned to this application.”, “Application is unavailable.”, “This application has no launch URL configured yet.”, “This application’s launch address is not valid. Please ask your administrator.”, “App Proxy route/gateway binding is not configured for this application.”, “No sign-in method is allowed for this application yet. Please ask your administrator.”, “Access to this application is not allowed.”, “This application asks for a stronger sign-in than it can offer you. Please ask your administrator.”, or, when a second factor was needed and not completed, “Additional verification was not completed, so the application was not opened. Try again.”
The Launch tab
Section titled “The Launch tab”Launch controls how My Apps opens the application.
-
Open the Sign-in / launch tab. It says “How My Apps opens this app.”
-
Fields:
Field Notes Access mode Native federation (SAML and OpenID Connect), Web Agent, App Proxy or Private access. Launch URL (https) Where My Apps sends the person. Must start with https://.App Proxy route ID, App Proxy edge ID Only for App Proxy: “Both come from the route you published under App Proxy.” Both are required. See the SSOGEN Gateway guides to publish a route: Install and enroll an SSOGEN Gateway. App Pack name (optional), App Pack version (optional) Binds the application to an installed App Pack. Both are needed. See App Packs. -
Select Save; the console shows Saved.
Diagnostics: see the policy and protocol in force
Section titled “Diagnostics: see the policy and protocol in force”The Diagnostics tab is read-only. It shows the Protocol (“OpenID Connect”, “SAML”, “Web Agent headers” or “App Proxy”, or “Not configured for an integration yet”; an application can speak both SAML and OpenID Connect), Access mode, Launch readiness, Current revision, and the Application identifier (quote this in a support request). Below it, Authentication in force shows the policy actually applied: policy name, sign-in providers allowed, required strength, maximum authentication age, step-up, passkeys, provider choice and alternatives offered.
Delete an application
Section titled “Delete an application”- Open the application. In the actions menu at the top right, select Delete permanently. (The same action is in the Actions menu on each row of the list, next to Open.)
- If the item is grayed out, permanent deletion is switched off: “Permanent deletion is off. Turn on “Allow permanent deletion” in Security.”
- A dialog “Permanently delete Acme Expenses?” says: “Deletes the application, its assignments, OAuth client and mappings. This cannot be undone. Audit entries are kept.” Type the application’s name to confirm, then select Delete permanently.
- If it is refused, the message says why: “This deployment requires a second factor for administration. Sign in again with one before deleting the application.” or “Your administrator role does not allow deleting an application.”
A client ID used by a deleted service application is retired for good and cannot be used again.
Not covered here
Section titled “Not covered here”- Creating sign-in policies (see the Policies guides).