Identity providers and federated login
An identity provider is the place where a person proves who they are. SSOGEN does not force you to keep a second set of passwords. You tell it which systems already know your people, and it lets them sign in through those systems; when the other system checks the password, that is federated login. This guide explains the four kinds of identity provider, helps you pick, and shows how the Identity providers page works. The step-by-step setup guides for each kind are linked at the end.
The four kinds
Section titled “The four kinds”| Kind | What people type or click | Who holds the password | Typical use |
|---|---|---|---|
| Username and password (local accounts) | A username and a password on the SSOGEN sign-in page | SSOGEN | Your first administrator, small teams, contractors, test accounts, and a way back in if another provider is down |
| Directory (LDAP) | A username and the password they already use at work, on the SSOGEN sign-in page | Your directory (Active Directory, OpenLDAP and similar) | A company that keeps people in Active Directory and wants them to use the same password |
| SAML | A button or automatic redirect to the other system’s own sign-in page | The other system | Microsoft Entra ID, Keycloak, Okta, AD FS, Shibboleth, and a partner company’s provider |
| OpenID Connect | The same redirect as SAML, using a newer protocol | The other system | Microsoft Entra ID, Keycloak, Google Workspace, Okta, and any modern provider |
You can use several at once. A realm commonly has local accounts for a few administrators and one federated provider (SAML or OpenID Connect) or one directory for everybody else.
Words used in this guide
Section titled “Words used in this guide”- Realm: your organization’s own space inside SSOGEN. A new installation has one.
- Federation / federated sign-in: signing in through another system. SSOGEN sends the person there, the other system checks the password (and any second step it requires), and then tells SSOGEN who signed in.
- SAML and OpenID Connect (OIDC): the two standard languages two systems use for federated sign-in. If your other system supports both, either works. OpenID Connect is simpler to set up; SAML is more widely found in older enterprise products.
- Service provider (SP): in SAML, the side that wants to know who the person is. When you add a SAML provider to SSOGEN, SSOGEN is the service provider and the other system is the identity provider.
- Connection: one configured identity provider. Each has a name you choose and a short identifier used in links.
When to use which
Section titled “When to use which”Use this list from the top; stop at the first line that fits.
- Everyone already has an account in Microsoft Entra ID, Okta, Keycloak or a similar cloud sign-in system. Add it as an OpenID Connect provider (or SAML if it only supports SAML). People keep one password, and the other system enforces its own password and second-step rules. See Add an OpenID Connect identity provider and Add a SAML identity provider.
- Your people live in Active Directory or another LDAP directory, and you want them to type their usual password on the SSOGEN page. Add a directory under Identity > Directories. SSOGEN checks the password against the directory each time. Use this when you do not have a cloud sign-in system in front of the directory.
- A partner organization’s people need to reach your applications. Add the partner’s system as a SAML or OpenID Connect provider, and give it its own sign-in domains so people at that partner are sent to the right place. See The sign-in page.
- Small groups, administrators, or people nobody else knows. Use local accounts. SSOGEN keeps a password for each person (it is stored so that nobody, including administrators, can read it back), and the person can add an authenticator app, a passkey or recovery codes. See Multi-factor authentication.
Federated and directory sign-in can be combined with SSOGEN’s own second step. The second step an application demands is set in an authentication policy; what happens after a sign-in at an external provider is set on the provider too (see Second factor after sign-in with a provider). See Policies.
The Identity providers page
Section titled “The Identity providers page”Open SSO policies > Identity providers in the Admin Console.
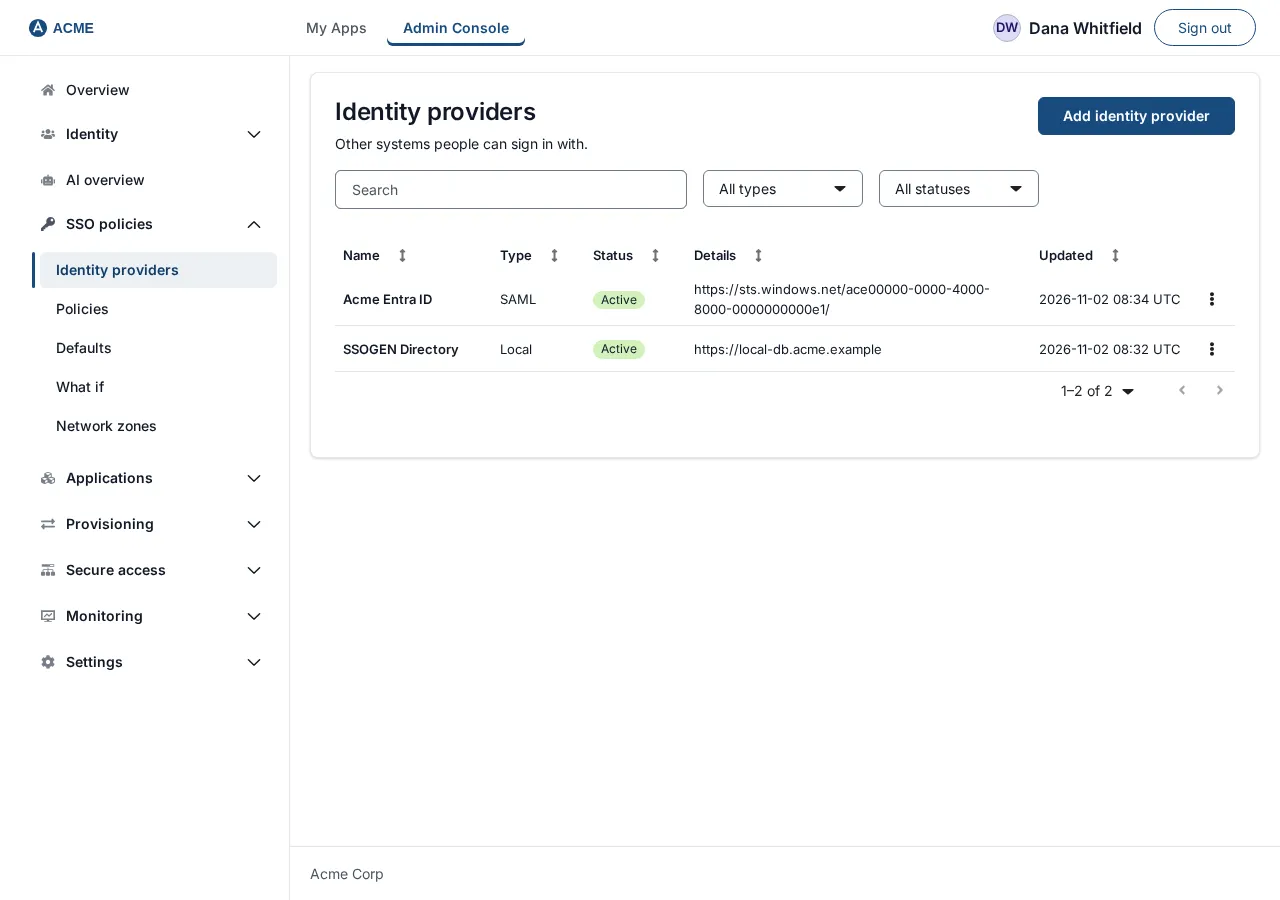
The heading is Identity providers and the description says: “Other systems people can sign in with.” A new connection is a draft and does not appear on the sign-in page until you activate it.
The list
Section titled “The list”| Part | What it does |
|---|---|
| Add identity provider | Opens a gallery titled Add identity provider with the text “Choose how people will sign in. Each option opens a guided setup.” and a search box. Cards are grouped under Enterprise identity providers (for example Microsoft Entra ID, Okta, Keycloak) and Social sign-in (for example Google, Microsoft, GitLab). A card with a template asks for any tenant details it needs and fills in the rest; a card without one opens the setup with only the name filled in, and a link to the vendor’s guide. A provider that offers both asks How should people sign in with name? first, with SAML or OpenID Connect. A card marked Not available (GitHub, Amazon, Facebook, X and Apple) cannot be chosen: SSOGEN does not sign in with that provider yet. Under Generic SAML / OpenID Connect / Directory (LDAP) four tiles start a setup with nothing filled in: SAML, OpenID Connect, Directory (LDAP) (which takes you to the Directories page) and Windows sign-in (Kerberos). Cancel (the same button) closes the gallery. |
| Search identity providers | Filters the rows by name. |
| Type and Status drop-downs | Narrow the list to one kind (for example OpenID Connect) or one status (for example Active). All types and All statuses clear the filter. |
| Columns | Name, Type, Status, Details (the provider’s issuer or metadata address) and Updated. A health badge (Healthy, Degraded or Unavailable with the time it started) appears beside the status of an active provider. |
| A row | Opens the provider. A row menu offers Open and the actions that fit its state. |
The built-in local provider is listed as Username and password (its identifier is local-db).
The lifecycle: draft, validated, tested, active
Section titled “The lifecycle: draft, validated, tested, active”A new SAML or OpenID Connect provider never changes anything for your people until you finish a short sequence. This protects you from a half-finished or wrong configuration locking people out.
| Status | Meaning | The next step |
|---|---|---|
| Draft | Saved, nothing checked. It does not appear on the sign-in page. | Validate |
| Validated | The settings are complete and well formed. | Test |
| Tested | SSOGEN reached the provider and the checks passed. A pass shown in amber says the client ID and secret could not be verified until a real sign-in. | Activate (after a pass in amber, first Try connection) |
| Active | Offered on the sign-in page, subject to policy. | Test again at any time; Disable to stop it |
| Disabled | Switched off. Nobody can sign in through it. Applications that allow only this provider refuse every sign-in meanwhile. | Test then Enable |
| Archived | Retired. It cannot be undone; its history stays readable. | None |
On a provider’s page the main button shows the next step for its status (Validate, Test, Activate, Enable). The Edit button opens the same setup steps again. Try connection is available once the configuration has passed Test. The ⋮ menu holds Archive and Delete permanently.
- Archive asks “Archive name?” and says: “Nobody can sign in through it, and it cannot be switched on again. Its revisions and the accounts linked through it stay readable. Delete it permanently to remove it.” A provider that applications still reach through their sign-in policies cannot be archived; the page names them: “Still used by applications, through their sign-in policies. Take it out of those policies (Authentication, Policies), or give those applications another policy, then try again.”
- Delete permanently is switched off until you turn on Allow permanent deletion under Settings > Security (see Security settings). The dialog asks you to type the provider’s name; the audit trail is kept.
- Disable asks “Disable name?” and warns: “People cannot sign in through name until it is enabled again. Applications that allow only this provider refuse every sign-in meanwhile.”
Editing an active provider safely
Section titled “Editing an active provider safely”Editing an active provider does not change what people use. Saving creates a new revision and the page says: “Saving creates a revision. The active one keeps serving sign-in until you activate it.” You validate, test and activate the revision; if it fails, the old configuration keeps working. The History tab lists every revision (Known good or Not known-good, validate and test results) and every change with who made it and from where.
The provider’s page
Section titled “The provider’s page”Opening a provider shows tabs:
| Tab | What it holds |
|---|---|
| Overview | Sign-in method, status, last update, activation time and Last try (“Not tried yet”, or who tried it, when, and whether it worked). |
| Configuration | The Sign-in page settings (order, sign-in domains, labels, sign-in restriction, account matching), New people from this provider (user type and group for people it creates), Second factor after sign-in with this provider, the connection’s addresses, the values to give the other system, Signing out settings and Attributes this provider may send on. |
| Mapping | For a directory, the attribute names it reads. For SAML and OpenID Connect, the rules that are set; change them with Edit, in the setup steps. |
| Assurance | The base sign-in method. It states: “Required assurance and step-up are set per application, not per connection.” |
| Applications | The applications that allow this connection, each with an Open auth policy button. |
| Diagnostics | The connection ID and raw status. |
| History | Changes and Revisions. |
What the Test result means
Section titled “What the Test result means”Test reaches the provider and shows one of three results:
| Result | What it means | What to do |
|---|---|---|
| Green: “The provider answered every check.” | SSOGEN read the provider’s published settings and signing keys, and the provider accepted the client ID and secret. | Activate. A real sign-in with Try connection is still worth doing once. |
| Amber | The published settings and keys are in order, but the provider cannot say whether the client ID and secret are right until a person really signs in. Microsoft Entra ID and the Microsoft personal-accounts card always give this result, and so does a public client with no secret. | Select Try connection and sign in as a test person before you activate. A wrong client ID or secret then shows as a red result. |
| Red | A check failed. The message names the cause, for example a different issuer, a certificate that does not verify, or a provider that refused the credentials. | Fix the setting the message names, then Test again. The causes are listed in the SAML and OpenID Connect guides. |
Try connection opens the provider in a new tab, shows what the provider sent and what SSOGEN would do (for example “Would sign in an existing account” or “Would be refused”) and creates nothing. If a claim your setup needs is missing, the result names it.
Sign-in restriction: who may sign in through a provider
Section titled “Sign-in restriction: who may sign in through a provider”An OpenID Connect or SAML provider can carry a sign-in restriction, also called its admission rule. SSOGEN checks it on every sign-in through that provider, before the person gets an account or a session. Someone who does not meet it is turned away with a general message that does not say why. The reason is recorded in the audit log.
The restriction has two parts:
- Who may sign in. Only people who already have an account here is the default: anyone SSOGEN does not already know is turned away, and no account is created. Create the accounts first (under Identity > Users, by import or by SCIM), or choose Anyone this provider vouches for (a new account is created) to let people in at their first sign-in. Pair that choice with a required claim (below) so only your own people qualify.
- Required claims. A claim is a fact the provider states about the person, such as a tenant id (
tid) or a Google Workspace domain (hd). Name a claim and list the values you allow. The person must have one of the listed values for every claim you name. You can name up to 8 claims, with up to 32 values each.
A directory (LDAP) and the built-in Username and password provider have no sign-in restriction, so the section is not shown for them.
Set a required claim
Section titled “Set a required claim”- Sign in to the Admin Console as a Super admin or Authentication admin.
- Open SSO policies > Identity providers and select the provider, for example Acme Entra ID.
- Open the Configuration tab. In Sign-in page, find Sign-in restriction.
- In Who may sign in, choose who is let in.
- In Claim name 1, type the claim, for example
tid. In Allowed values 1, type the values separated by commas, for example your tenant id. Select Add another claim for more. - Select Save sign-in restriction.
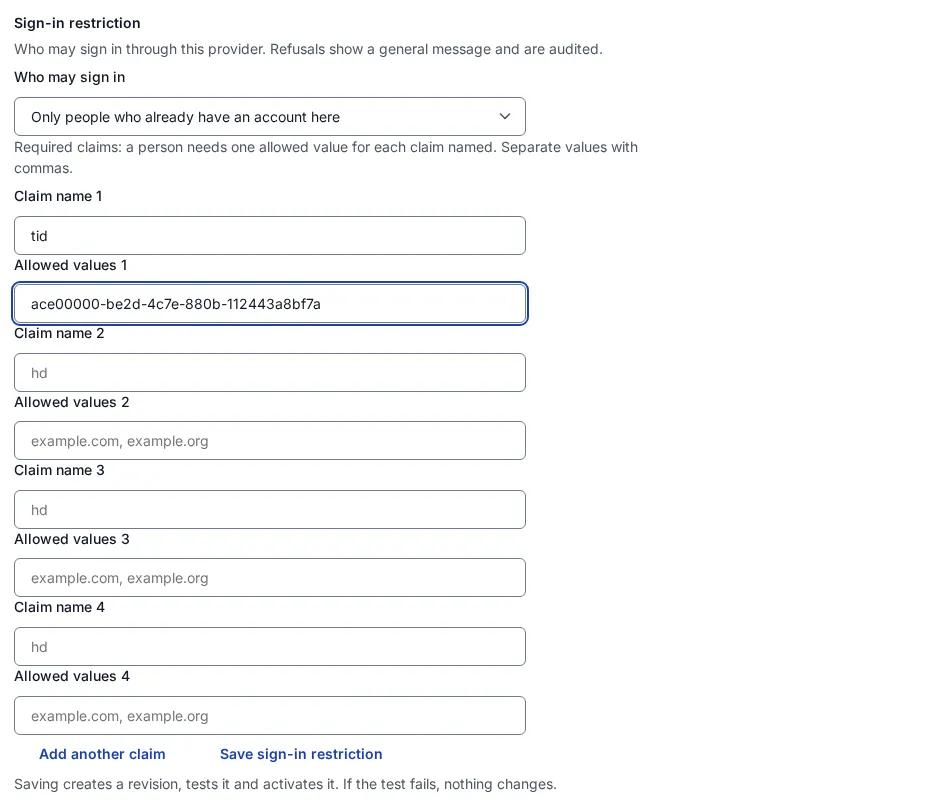
What saving does depends on the provider:
- A provider that has not been activated yet: the restriction becomes part of its configuration and applies when you activate it.
- A provider already in use: saving creates a new revision, validates it, tests it against the provider and activates it. If the test does not pass, the console says the restriction was saved as a revision that is not active yet and names the test result. Nothing changes for people signing in. Fix the cause, then finish the revision from the provider’s revisions.
- A provider with a saved edit waiting: the console asks you to activate that edit first, so that saving the restriction does not switch it on unreviewed.
The console refuses, before sending anything, a claim name that is not valid (it starts with a letter or underscore, then letters, digits and . _ : -), a claim with no values, a value with a space, the same claim twice, and removing the last required claim while account matching is on.
Account matching: joining a sign-in to an existing account
Section titled “Account matching: joining a sign-in to an existing account”By default, a person who signs in through a provider for the first time gets a new SSOGEN account, even if an account with the same email address already exists. One person who signs in through three providers then has three accounts. Account matching changes that for one provider: the sign-in joins the existing account that has the same email address.
Turn it on only when you trust the provider. A provider that lets people type any address, or that you do not control, could otherwise sign a stranger in to somebody else’s account.
The rules, in plain words
Section titled “The rules, in plain words”- It never joins an administrator’s account. If the account that has the address holds an administrator role, or is otherwise protected, SSOGEN does not join it. Link administrators explicitly instead.
- The provider must restrict who can sign in. An OpenID Connect or SAML provider needs a sign-in restriction first: an admission rule with a required claim, such as a tenant or a hosted domain. SSOGEN will not turn matching on without one. (A directory has no admission rule, so this applies to OpenID Connect and SAML providers.)
- It joins only on an address the provider verified. For an OpenID Connect or SAML provider, SSOGEN uses the email the provider marks as verified (
email_verified). A sign-in whose address is not marked verified is refused. - The addresses must be the same address. SSOGEN ignores spaces around an address, and for an address made only of plain ASCII characters it ignores capital letters, so
Maria.Lopez@acme.examplematchesmaria.lopez@acme.example. An address with any other character (an accented letter, for example) must match exactly, with no case folding. - Exactly one active account. If no account, more than one account, or only a disabled account has the address, matching does nothing and the provider’s own rule applies: a new account when the restriction is Anyone this provider vouches for, a refusal when it is Only people who already have an account here.
- Only a super administrator can turn it on. An authentication administrator can see the setting but cannot turn matching on. The same rule applies when an activated or rolled-back revision would turn it on.
- The person is told. When a sign-in is joined, SSOGEN emails the account’s owner, at the address the account already had, with a subject that begins “SSOGEN sign-in method linked”. The message says a sign-in through another provider was linked to their account because it used their email address, and to contact the help desk if it was not them. The email is sent only when outgoing email is set up.
Every change to account matching is recorded in the audit log.
Turn it on
Section titled “Turn it on”- Sign in to the Admin Console as a Super admin.
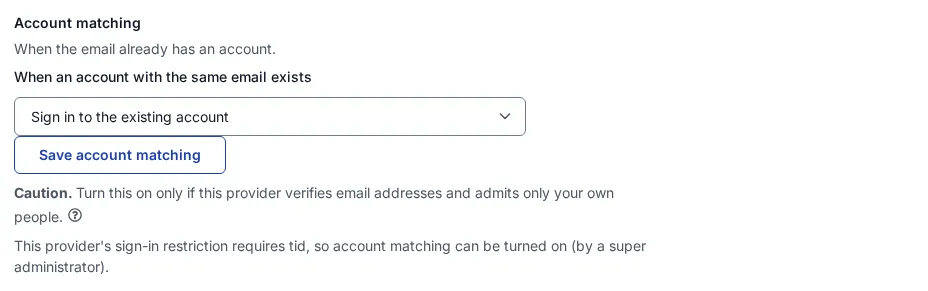
- Open SSO policies > Identity providers and select the provider, for example Acme Entra ID. Make sure it already has a required claim in its sign-in restriction. Under the Caution note, the console says whether it does: “Account matching needs a required claim in this provider’s sign-in restriction, and none is set yet.”, or “This provider’s sign-in restriction requires tid, so account matching can be turned on (by a super administrator).”
- Open the Configuration tab. In Sign-in page, find Account matching. It says: “When the email already has an account.”
- In When an account with the same email exists, choose Sign in to the existing account. The other choice, Create a separate account, is the default.
- Select Save account matching.
The section is not shown for the built-in Username and password provider, because that provider signs people in to their own accounts already. Under the setting, a Caution note repeats the rules above.
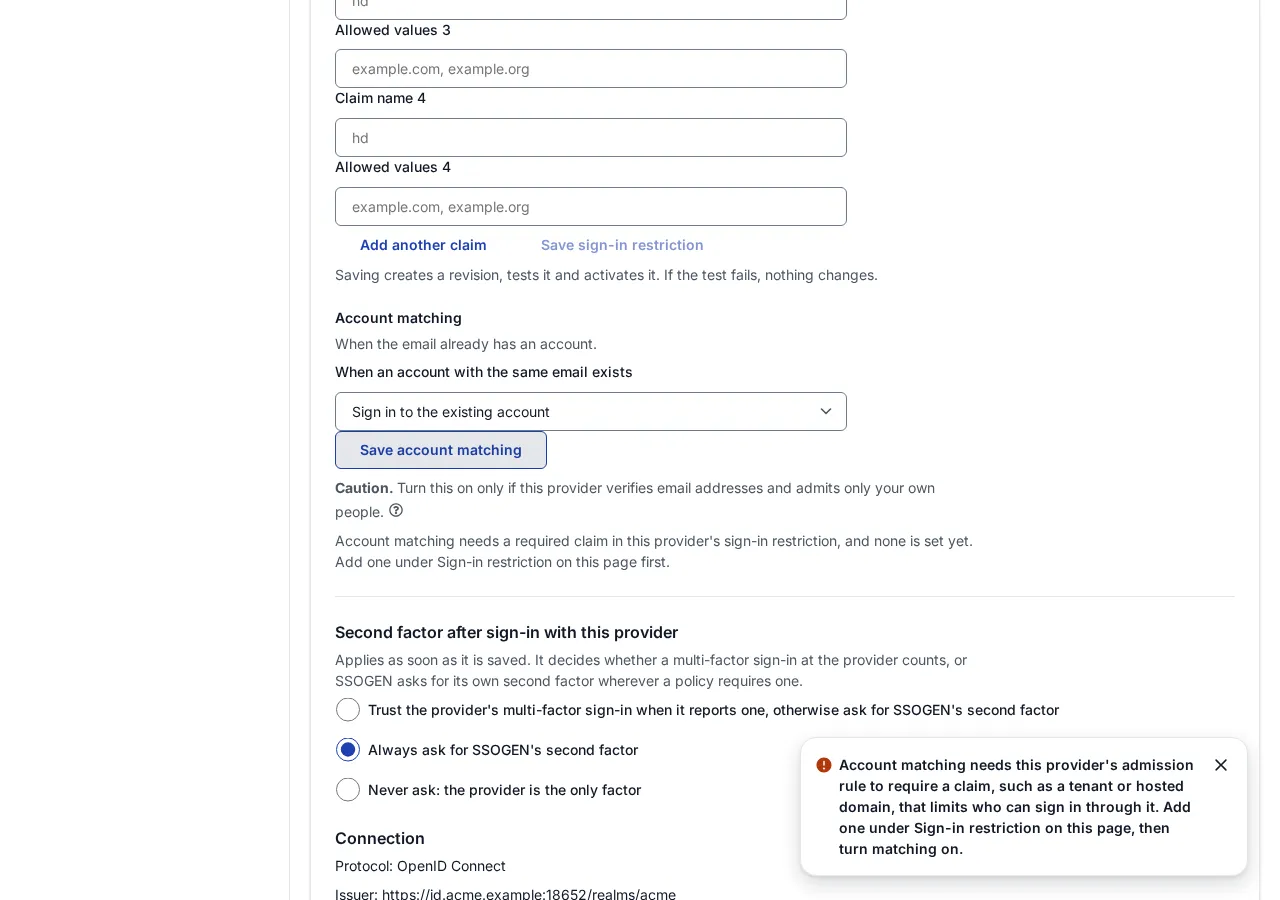
If SSOGEN refuses the change, the console says:
| Message | What to do |
|---|---|
| Only a super administrator can turn on account matching. | Ask a super administrator to make the change. |
| Account matching needs this provider’s admission rule to require a claim, such as a tenant or hosted domain, that limits who can sign in through it. Add one under Sign-in restriction on this page, then turn matching on. | Set a required claim under Sign-in restriction on the same tab (steps above), then turn matching on. |
| Could not change account matching. | Reload the page and try again. |
Second factor after sign-in with a provider
Section titled “Second factor after sign-in with a provider”An OpenID Connect, OAuth 2.0 or SAML provider has a card on the Configuration tab titled Second factor after sign-in with this provider. It applies as soon as you save it, and it decides whether a multi-factor sign-in at the provider counts, or SSOGEN asks for its own second factor wherever a policy requires one. The choices are:
| Choice | What happens |
|---|---|
| Trust the provider’s multi-factor sign-in when it reports one, otherwise ask for SSOGEN’s second factor | A sign-in the provider reports as multi-factor counts as the second factor. Otherwise SSOGEN asks. |
| Always ask for SSOGEN’s second factor | The provider counts as one factor. SSOGEN asks for its own second factor wherever the governing policy needs one. This is where a new provider starts. |
| Never ask: the provider is the only factor | Where a policy asks for a second factor, SSOGEN does not ask people who sign in with this provider for one: whatever the provider asks is all there is. A policy that requires a Passkey or security key still asks for a passkey. You must tick “I understand that this provider is the only factor for the people who sign in with it”. The Admin Console and administrator elevation still ask for SSOGEN’s second factor. |
When a policy needs a second factor and the provider’s setting does not accept the provider’s own, the sign-in is held for a few minutes after the provider answers, and the sign-in page asks the person for the second factor before a session is made. A person with no usable second factor is stopped there: “This sign-in needs a second step, and no method is set up for your account. Your administrator must set up your second factor. Contact your help desk.” Review each provider’s setting before you raise a policy. The Admin Console and administrator elevation always ask for SSOGEN’s own second factor, whatever the provider reports. Only a passkey at SSOGEN meets a policy that requires a Passkey or security key, whatever the provider claims.
If the provider does not report how the person signed in (OAuth 2.0), the first choice is unavailable: “This provider does not report how the person signed in.”
Which administrators can do this
Section titled “Which administrators can do this”The Super admin and Authentication admin roles can read and change identity providers. Only a Super admin can turn on account matching. A Read-only admin can see them. See the role table in A tour of the Admin Console.
Next steps
Section titled “Next steps”- Add a SAML identity provider, with every field and the steps in Microsoft Entra ID and Keycloak.
- Add an OpenID Connect identity provider, with the same for Entra ID, Keycloak and any generic provider.
- The sign-in page: how SSOGEN decides what a person sees when more than one provider is active.
- Multi-factor authentication and Forgot password and account recovery.