Add a SAML identity provider (Entra ID, Keycloak)
This guide connects a SAML identity provider, such as Microsoft Entra ID or Keycloak, to SSOGEN so your people can sign in with the account they already have there. It describes every screen and field of the Add SAML provider wizard, then the steps you take in Entra ID and in Keycloak, and finally how to test, activate and check it.
You need: an administrator who can read and change identity providers in SSOGEN (Super admin or Authentication admin), and an administrator of the other system.
How the pieces fit together
Section titled “How the pieces fit together”- You add the provider in SSOGEN and give SSOGEN a name and identifier. SSOGEN then shows the three values the other system needs: the SP entity ID, the ACS URL and the SP metadata URL.
- You create an application (a “client”) in the other system and paste those values in.
- The other system gives you its metadata (a file, text or web address).
- You give that metadata to SSOGEN, check how its attributes map to an SSOGEN account, then Validate, Test and Activate.
Because step 1 comes first, start the wizard, copy the values, and keep the browser tab open while you work in the other system.
SSOGEN always requires the assertion to be signed by the identity provider and checks the signature against the certificates in the provider’s metadata. This cannot be switched off. Everything else SSOGEN checks (who the assertion is for, where it was sent, that it has not expired or been used before) is also always on.
Part 1: Start the wizard in SSOGEN
Section titled “Part 1: Start the wizard in SSOGEN”- Sign in to the Admin Console and open SSO policies > Identity providers.
- Select Add identity provider, then your provider’s card in the gallery (a provider that offers SAML and OpenID Connect asks which; choose SAML), or the generic SAML tile under Generic SAML / OpenID Connect / Directory (LDAP). The page titled Add SAML provider opens with six steps along the top: General, Metadata source, Review metadata, Mapping, Test sign-in, Review and activate. You can go back to any step you have already reached by selecting its name.
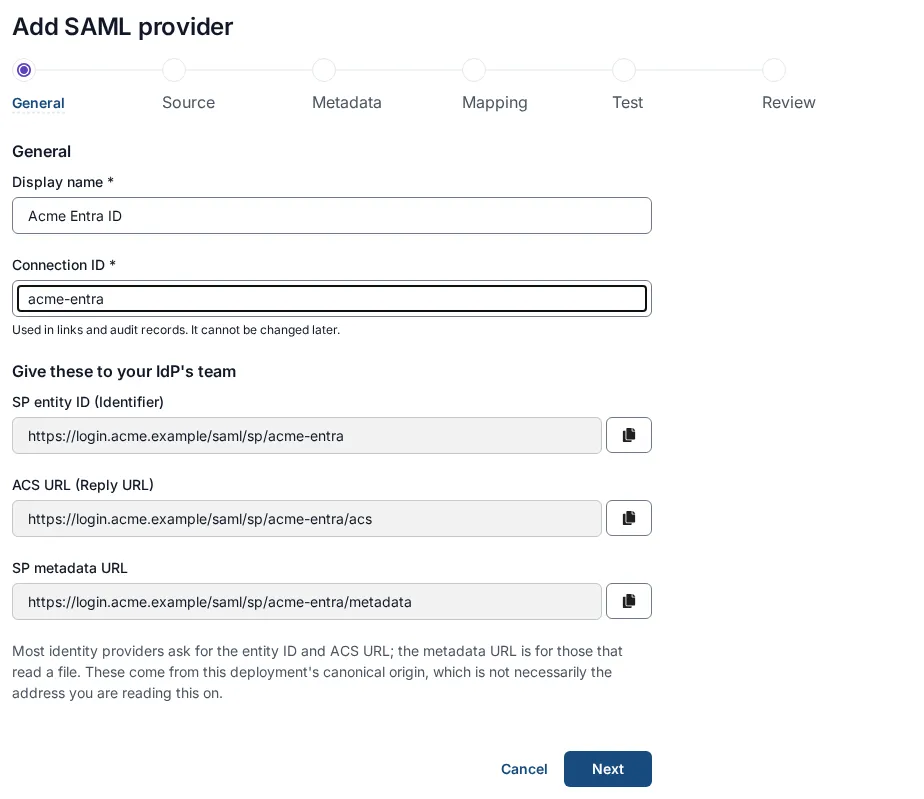
Step 1: General
Section titled “Step 1: General”| Field | What to enter | Example |
|---|---|---|
| Display name (required) | The name people and administrators see. Up to 256 characters. When your sign-in page offers a choice, this is the label, and the button reads “Continue to name”. | Acme Entra ID |
| Connection ID (required) | A short identifier used in links and audit records. It fills in from the display name as you type; you may change it. Lowercase letters, numbers and hyphens, up to 64 characters. “Used in links and audit records. It cannot be changed later.” | acme-entra |
Below these fields, a box titled Give these to your IdP’s team appears as soon as the Connection ID is valid. It shows three values, each with a copy button:
| Value | What it is | Example (yours will differ) |
|---|---|---|
| SP entity ID (Identifier) | SSOGEN’s name in this federation. | https://sso.acme.example/saml/sp/acme-entra |
| ACS URL (Reply URL) | Where the other system sends the signed-in person back to. | https://sso.acme.example/saml/sp/acme-entra/acs |
| SP metadata URL | SSOGEN’s own metadata, for systems that can read a file. | https://sso.acme.example/saml/sp/acme-entra/metadata |
The note under them says: “Most identity providers ask for the entity ID and ACS URL; the metadata URL is for those that read a file. These come from this deployment’s canonical origin, which is not necessarily the address you are reading this on.” The canonical origin is the one public address of your SSOGEN, set at install time; the values always use it.
If the Connection ID is not yet valid you see “The entity ID, ACS URL and metadata URL appear here once the connection has a valid identifier.”
Select Next. If a field is wrong you see a message under it: “Enter a name.”, “Enter an identifier.”, “Use lowercase letters, numbers and hyphens.” or “Use at most 64 characters.”
Step 2: Metadata source
Section titled “Step 2: Metadata source”The question is How will you provide IdP metadata? with four choices.
| Choice | What you do | When to use it |
|---|---|---|
| Metadata file upload | Choose the XML file under Metadata file. SSOGEN reads it in your browser. | You downloaded the file from the other system. |
| Paste metadata XML (the default) | Paste the XML into Metadata XML and select Parse metadata. | You copied it from the other system. |
| Metadata URL | Enter Metadata URL (https) and select Fetch metadata (it shows “Fetching…” meanwhile). | The other system publishes metadata at an address. This is best for the long term. |
| Manual configuration | Nothing here; you type the IdP entity ID on the next step. “Enter the IdP entity ID directly on the next step.” | You have no metadata. Not recommended: SSOGEN then has no certificates to check signatures with and activation will fail. |
When you choose Metadata URL, a note explains: “SSOGEN reads the document, not your browser. The URL is kept so you can fetch again after certificate rotation.” This means the SSOGEN server must be able to reach that address over the internet.
If the document cannot be used, an error appears under the choice. The messages and what to do:
| Message | What to do |
|---|---|
| Enter the metadata URL first. | Type the address. |
| The metadata URL must use https. / Only https metadata URLs can be fetched. | SAML metadata must be served over HTTPS. |
| That URL has no host. / That URL is not a valid https address. | Check the address. |
| That host is not one SSOGEN will fetch from. / That host resolves to an address SSOGEN will not fetch from. | The address points inside a private or reserved network. Upload the file instead. |
| That host is not on the metadata fetch allow-list. | Whoever runs your SSOGEN server has limited which hosts it may fetch metadata from. Upload the file or ask them to allow the host. |
| That host could not be resolved. | The name does not exist or DNS failed. Check for a typo. |
| The metadata URL could not be reached. / The metadata URL did not respond in time. / The metadata URL returned an error. | The other system is down, or a firewall blocks SSOGEN. Try again; otherwise upload the file. |
| That metadata document is too large to read. / That URL returned an empty document. | You pointed at the wrong address. |
| That metadata does not publish an entity ID. | The file is not SAML IdP metadata. |
| That metadata publishes no HTTP-Redirect sign-in endpoint. | SSOGEN needs an HTTP-Redirect single sign-on address in the metadata. Check the other system. |
| The sign-in endpoint in that metadata is not https. / … is not a valid address. | Fix it at the other system. |
| That metadata publishes no signing certificate, so assertions from it could not be verified. / The signing certificate in that metadata could not be read. | The metadata has no usable certificate. Download it again from the application, not from a generic page. |
| That document describes more than one entity. Ask the IdP for metadata for a single entity. / … more than one identity provider. | Use the metadata of your one application, not a federation-wide file. |
| That URL did not return usable SAML metadata. | The address does not serve SAML metadata. |
| SSOGEN could not process the metadata. Try again; if it keeps failing, check the SSOGEN log. | A problem inside SSOGEN. Retry; if it persists, ask whoever runs the server. |
For a pasted or uploaded file, Parse metadata reports a problem in the same place: “That file is not well-formed XML.” or “Could not read SAML IdP metadata from that document.”
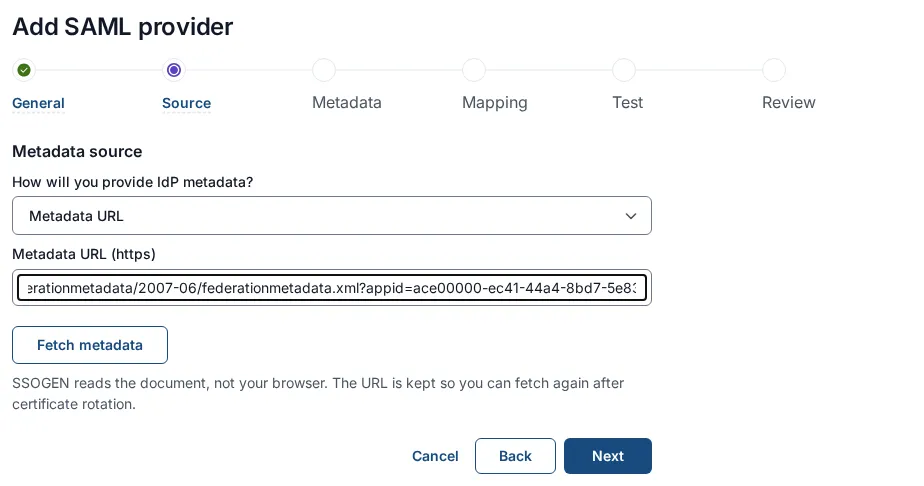
Select Next.
Step 3: Review metadata
Section titled “Step 3: Review metadata”| Field | What it means | Example |
|---|---|---|
| IdP entity ID | The other system’s name. Filled in from the metadata. Check it matches what the other system shows. | https://sts.windows.net/00000000-0000-0000-0000-000000000000/ |
| Metadata URL (https) | Optional. Kept so the metadata can be re-read later when certificates change. Must start with https://. |
https://login.microsoftonline.com/.../federationmetadata.xml?appid=... |
| NameID format | The NameID format SSOGEN publishes in its metadata and asks for on each request. A box with common values to choose from; you can type another. Leave it as urn:oasis:names:tc:SAML:1.1:nameid-format:unspecified unless the other system’s team asks for one. SSOGEN requires a subject but accepts any format. |
urn:oasis:names:tc:SAML:1.1:nameid-format:emailAddress |
| Sign the SAML requests SSOGEN sends (off by default) | Signs each sign-in request with SSOGEN’s signing key and says so in SSOGEN’s metadata. Turn on only after the other system holds the certificate from SSOGEN’s metadata, because a signature it cannot verify makes it reject the request. | off |
| Send requests by HTTP-POST instead of redirect (off by default) | Sends the sign-in request in a form the browser submits, rather than in the web address. Some providers accept nothing else. Set this together with request signing. | off |
| Force re-authentication at the identity provider (off by default) | Sets ForceAuthn on every request so the other system asks for credentials again even if the person already has a session there. It defeats single sign-on on purpose; use it only for something sensitive. |
off |
The step notes: “Optional now; required to activate.” (This is about the IdP entity ID and the metadata URL: a draft can be saved without them, but activation needs both.)
When you imported metadata, a Parsed from metadata box lists what was found: SSO redirect endpoint, SSO POST endpoint, Single logout endpoint, NameID formats and Signing certificates (shown abbreviated with their length). Check that the sign-in endpoint is the address you expect; the box notes “Shown for verification. Only the entity ID and metadata URL are stored.” When nothing was parsed you see “No parsed metadata. Entity ID can be entered manually.”
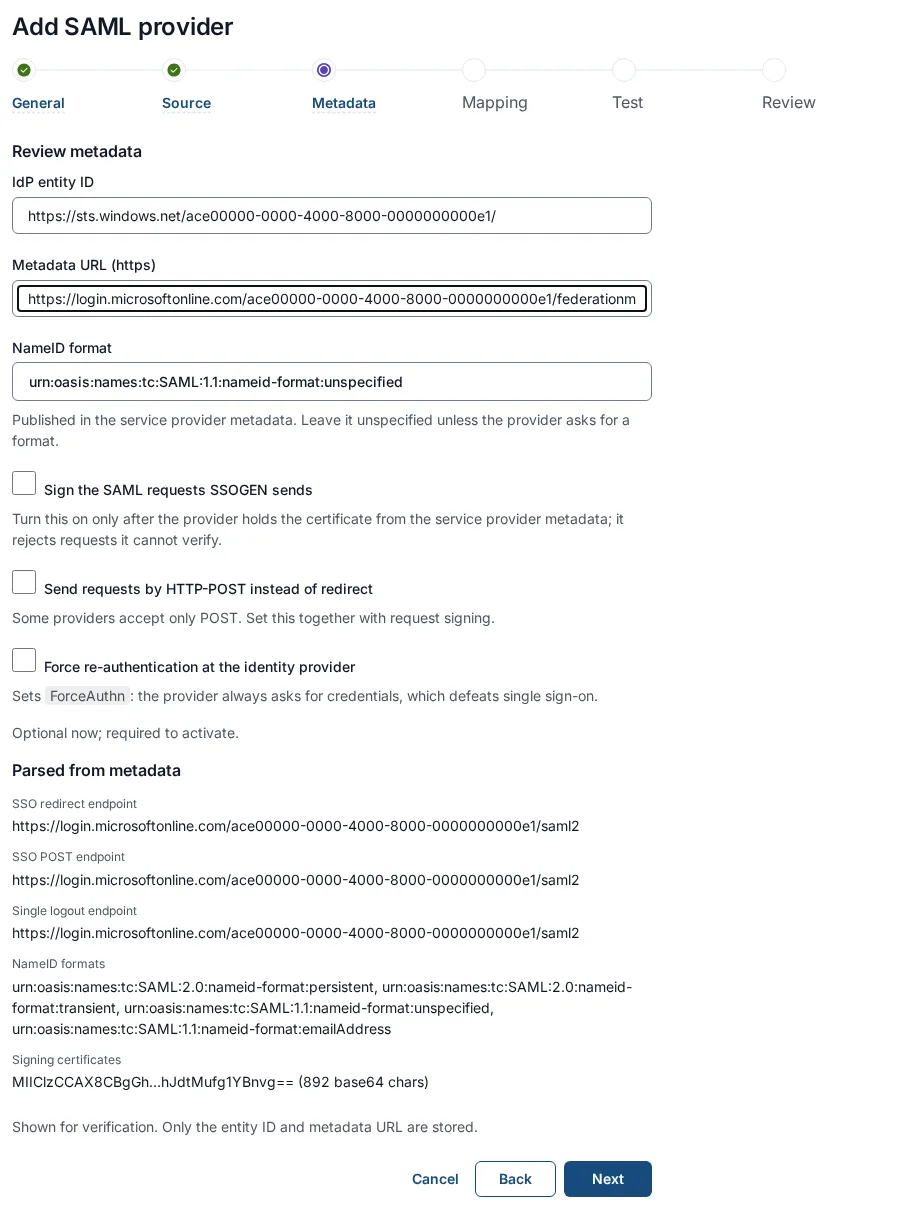
Step 4: Mapping
Section titled “Step 4: Mapping”On a new provider this step starts with a Who may sign in box, which sets the provider’s sign-in restriction from the start: Existing accounts only (on by default), Only people from these domains / this tenant (a Claim to check and its Allowed values), Join an existing account by email address (off by default) and Require a verified email address. You can change the restriction later under Sign-in restriction on the provider’s Configuration tab.
A SAML assertion carries attributes (facts about the person). The mapping says which assertion attribute holds which fact SSOGEN keeps on the person’s account.
| Field | Meaning | Default |
|---|---|---|
| Mail assertion attribute | The attribute that holds the person’s email address. | http://schemas.xmlsoap.org/ws/2005/05/identity/claims/emailaddress |
| Display name assertion attribute | The attribute that holds the person’s full name. | http://schemas.xmlsoap.org/ws/2005/05/identity/claims/name |
| Source assertion attribute / Keep it as (rows added with Add a mapping) | Keep another attribute: choose Mobile phone, or a Custom attribute you defined under Identity > Attributes (listed as “Name (custom)”). Up to 32 rows. Remove deletes a row. | none |
The defaults are the names Microsoft Entra ID and AD FS send. Other providers use their own names; type the exact attribute name your provider sends (Keycloak: the name you give the mapper, see below). Leave a field empty and SSOGEN still recognizes the usual standard names for it (for email, for example, mail and email, and the Microsoft and X.500 forms); if the provider sends none of them the account has no email or no display name rather than a wrong one. If you have not defined any custom attributes, the page says “To keep a value as a custom attribute, define it first under Attributes.”
Two things to know:
- The username is not mapped. It is always built from the assertion’s subject (NameID) and is what recognizes the same person next time. Choose a NameID in the other system that is stable and unique for each person, such as the user principal name or email address. If a person’s NameID changes, SSOGEN sees a new person.
- The same attribute cannot be used for both fields; if you enter the same name twice, only the mail field uses it.
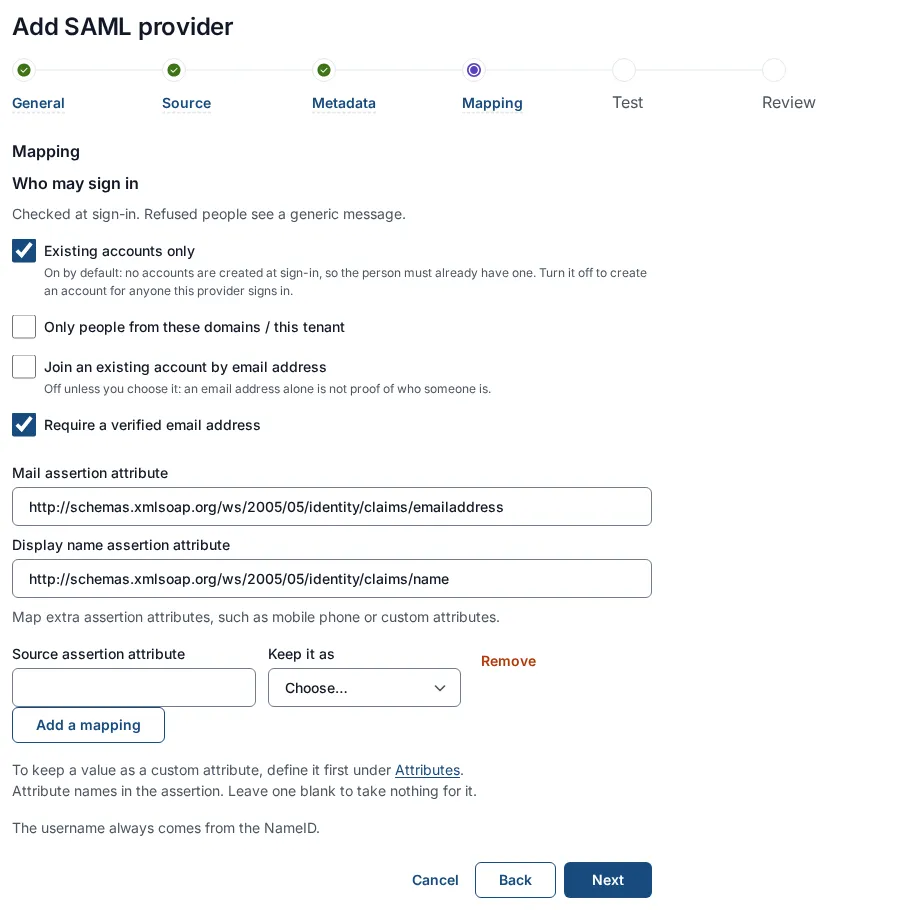
Select Next.
Step 5: Test sign-in
Section titled “Step 5: Test sign-in”This step only explains what saving does: “Saving creates a draft. It serves sign-in once activated.” (When editing an existing provider it says “Saving creates a revision. The active one keeps serving sign-in until you activate it.”)
Select Create provider (or Save revision when editing). If SSOGEN cannot save you see “Could not save the SAML provider. If you entered an entity ID or metadata URL, both must be https URLs.”
Step 6: Review and activate
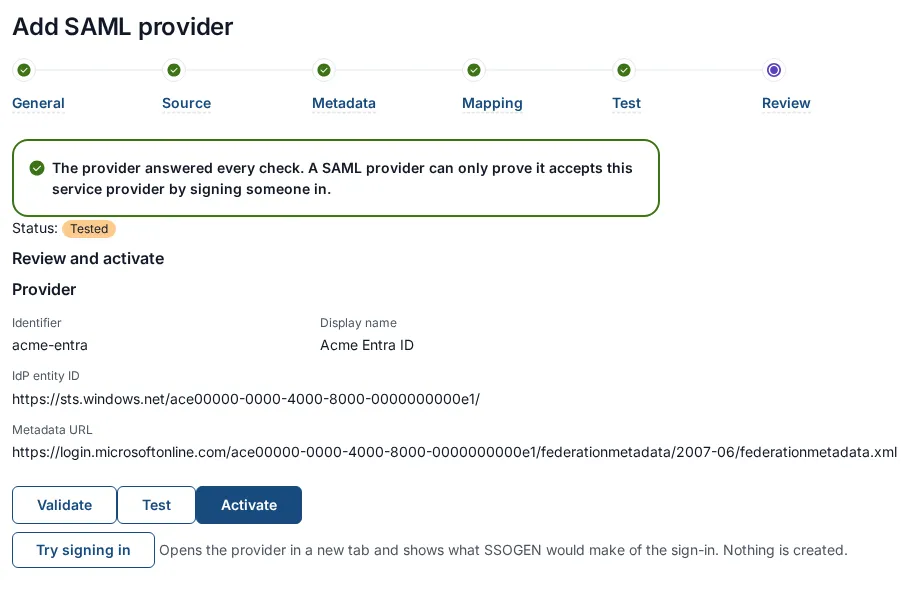
Section titled “Step 6: Review and activate”The page shows a summary (Identifier, Display name, IdP entity ID, Metadata URL) and a status line, Status: Draft. Three buttons run the lifecycle in order:
- Validate checks that the settings are complete. On success: “Validated. Select Test to check the connection, then Activate.” The status becomes Validated.
- Test checks the provider. See What Test checks below. On success the status becomes Tested, and a Try signing in button appears.
- Activate makes the provider available on the sign-in page, and takes you to the provider’s page.
Do not activate yet. First finish the other system’s side, below, because the checks need it.
Part 2: Configure the other system
Section titled “Part 2: Configure the other system”Pick the section for your identity provider.
Microsoft Entra ID (outside SSOGEN)
Section titled “Microsoft Entra ID (outside SSOGEN)”You need the Cloud Application Administrator or Application Administrator role in Entra.
- Sign in to the Microsoft Entra admin center (
entra.microsoft.com) and go to Identity > Applications > Enterprise applications. - Select New application, then Create your own application. Name it (for example
SSOGEN), choose Integrate any other application you don’t find in the gallery (Non-gallery) and select Create. - Open Single sign-on and choose SAML.
- In Basic SAML Configuration, select Edit and fill in:
- Identifier (Entity ID): select Add identifier and paste SSOGEN’s SP entity ID.
- Reply URL (Assertion Consumer Service URL): select Add reply URL and paste SSOGEN’s ACS URL.
- Leave Sign on URL, Relay State and Logout Url empty for now.
- Select Save.
- In Attributes & Claims, check the defaults. Entra sends
emailaddress(fromuser.mail) andname(fromuser.userprincipalname) with the exact names SSOGEN expects by default, so you do not need to change SSOGEN’s mapping. For Unique User Identifier (Name ID), the defaultuser.userprincipalnameis a good stable choice. If some people have no mail attribute in Entra,emailaddresswill be missing for them: choose a claim source that is filled in. - In SAML Certificates, check that Signing Option is Sign SAML assertion (the default) or Sign SAML response and assertion. SSOGEN needs the assertion signed. Copy the App Federation Metadata Url, or download Federation Metadata XML. The URL looks like
https://login.microsoftonline.com/<tenant-id>/federationmetadata/2007-06/federationmetadata.xml?appid=<application-id>. - Go to Users and groups and Add user/group to assign the people (or groups) who may sign in. By default Entra only issues assertions to assigned users; a person who is not assigned gets an Entra error page.
- Return to SSOGEN, on step 2 choose Metadata URL (paste the App Federation Metadata Url and Fetch metadata) or Metadata file upload (the downloaded XML).
The IdP entity ID Entra publishes looks like https://sts.windows.net/<tenant-id>/. SSOGEN fills it in from the metadata.
Keycloak (outside SSOGEN)
Section titled “Keycloak (outside SSOGEN)”These steps use the Keycloak admin console of recent versions. Names can differ slightly in older ones. You need to be an administrator of the Keycloak realm that holds your people.
- Open the Keycloak admin console, choose your realm, and go to Clients.
- Fastest route: select Import client, Browse to the SP metadata file you downloaded from SSOGEN (use Download SP metadata on the SSOGEN provider’s page, or open the SP metadata URL and save it), and select Save. Keycloak fills in the client ID, the redirect address and SSOGEN’s certificate. Keycloak may also switch Encrypt assertions on because SSOGEN’s metadata offers an encryption certificate; SSOGEN can decrypt encrypted assertions, so either setting works. Continue at step 5.
- Otherwise select Create client. Set Client type to SAML, Client ID to SSOGEN’s SP entity ID, and a Name such as
SSOGEN. Select Next. - Under Login settings set Valid redirect URIs to SSOGEN’s ACS URL, and select Save.
- On the client’s Settings tab, Signature and Encryption section:
- Turn Sign assertions On. Keycloak signs the whole document by default but not the assertion by default, and SSOGEN requires the assertion itself to be signed.
- Leave Sign documents On if you like; it does no harm.
- Still on Settings, under SAML capabilities, set Name ID format.
username(the default) oremailboth work; pick one and keep it, because it becomes the person’s SSOGEN username. Turn Force name ID format On. - On the Keys tab: if you did not turn on Sign the SAML requests SSOGEN sends in SSOGEN, turn Client signature required Off. Keycloak’s default expects signed requests and will refuse SSOGEN’s unsigned ones. If you did turn it on, leave it On and Import SSOGEN’s certificate there (or use the metadata import in step 2, which does it for you).
- Add the email attribute. On the client, open Client scopes, select the
...-dedicatedscope, then Configure a new mapper (or Add mapper > By configuration) and choose User Property:- Name:
email - Property:
email - SAML Attribute Name:
http://schemas.xmlsoap.org/ws/2005/05/identity/claims/emailaddress - SAML Attribute NameFormat:
URI Reference - Select Save.
Using that attribute name means SSOGEN’s default Mail assertion attribute works without any change. If you prefer a plain name such as
email, put the same name in SSOGEN’s Mail assertion attribute field.
- Name:
- For a display name, add another mapper the same way (for example User Property with Property
firstNameand SAML Attribute NamefirstName) and type that attribute name in SSOGEN’s Display name assertion attribute; or leave the SSOGEN field empty if you do not need a display name. Your Keycloak version may offer a single full-name mapper; check its documentation. - Get the realm’s SAML metadata: open
https://keycloak.acme.example/realms/<realm>/protocol/saml/descriptorin a browser (use your own Keycloak address and realm name). That address is what you give SSOGEN under Metadata URL, or save the page as an XML file for Metadata file upload. The IdP entity ID in it ishttps://keycloak.acme.example/realms/<realm>. - Make sure the person exists in Keycloak, is enabled, and has an email address.
Other SAML providers (Okta, AD FS, Shibboleth, PingFederate)
Section titled “Other SAML providers (Okta, AD FS, Shibboleth, PingFederate)”Create a SAML application and enter the three SSOGEN values (entity ID, ACS URL, and the HTTP-POST binding for the ACS). Make sure it signs the assertion and sends an email attribute and a NameID that is stable for each person. Give SSOGEN the application’s metadata. In SSOGEN’s Mapping step, type the exact attribute names the provider sends.
Part 3: Finish in SSOGEN
Section titled “Part 3: Finish in SSOGEN”- Back in the wizard, make sure steps 2 and 3 show the IdP entity ID and that Parsed from metadata lists a SSO redirect endpoint and at least one Signing certificate.
- Complete the Mapping step, then Create provider.
- On Review and activate, select Validate, then Test.
What Test checks
Section titled “What Test checks”Test asks the provider for its metadata and checks it, so it proves SSOGEN can read the provider and has the right certificates. It cannot prove the sign-in itself works: “A SAML provider can only prove it accepts this service provider by signing someone in.” When Test passes you read: “The provider answered every check.” followed by that sentence. The status becomes Tested.
If a check fails you see one sentence per failed check:
| Message | Fix |
|---|---|
| The provider’s metadata could not be fetched from the metadata URL. Check the address. | Fix the Metadata URL, or check a firewall. |
| The metadata names a different entity ID than the one entered. | Make IdP entity ID equal the one in the metadata. |
| A signing certificate in the provider’s metadata has expired. | Renew it in the other system and import the metadata again. |
| The signing certificate in the metadata does not match the one configured. | The provider rolled its certificate. Re-read the metadata (see “When certificates change” below). |
| The provider’s metadata does not list a single sign-on endpoint. | The metadata is incomplete; download it from the application. |
| The provider answered, but the connection changed while it was being tested. Run Test again. | You edited it during the test. |
| SSOGEN failed to run the test. Try again; if it keeps failing, check the SSOGEN log. | A problem inside SSOGEN. |
Try signing in
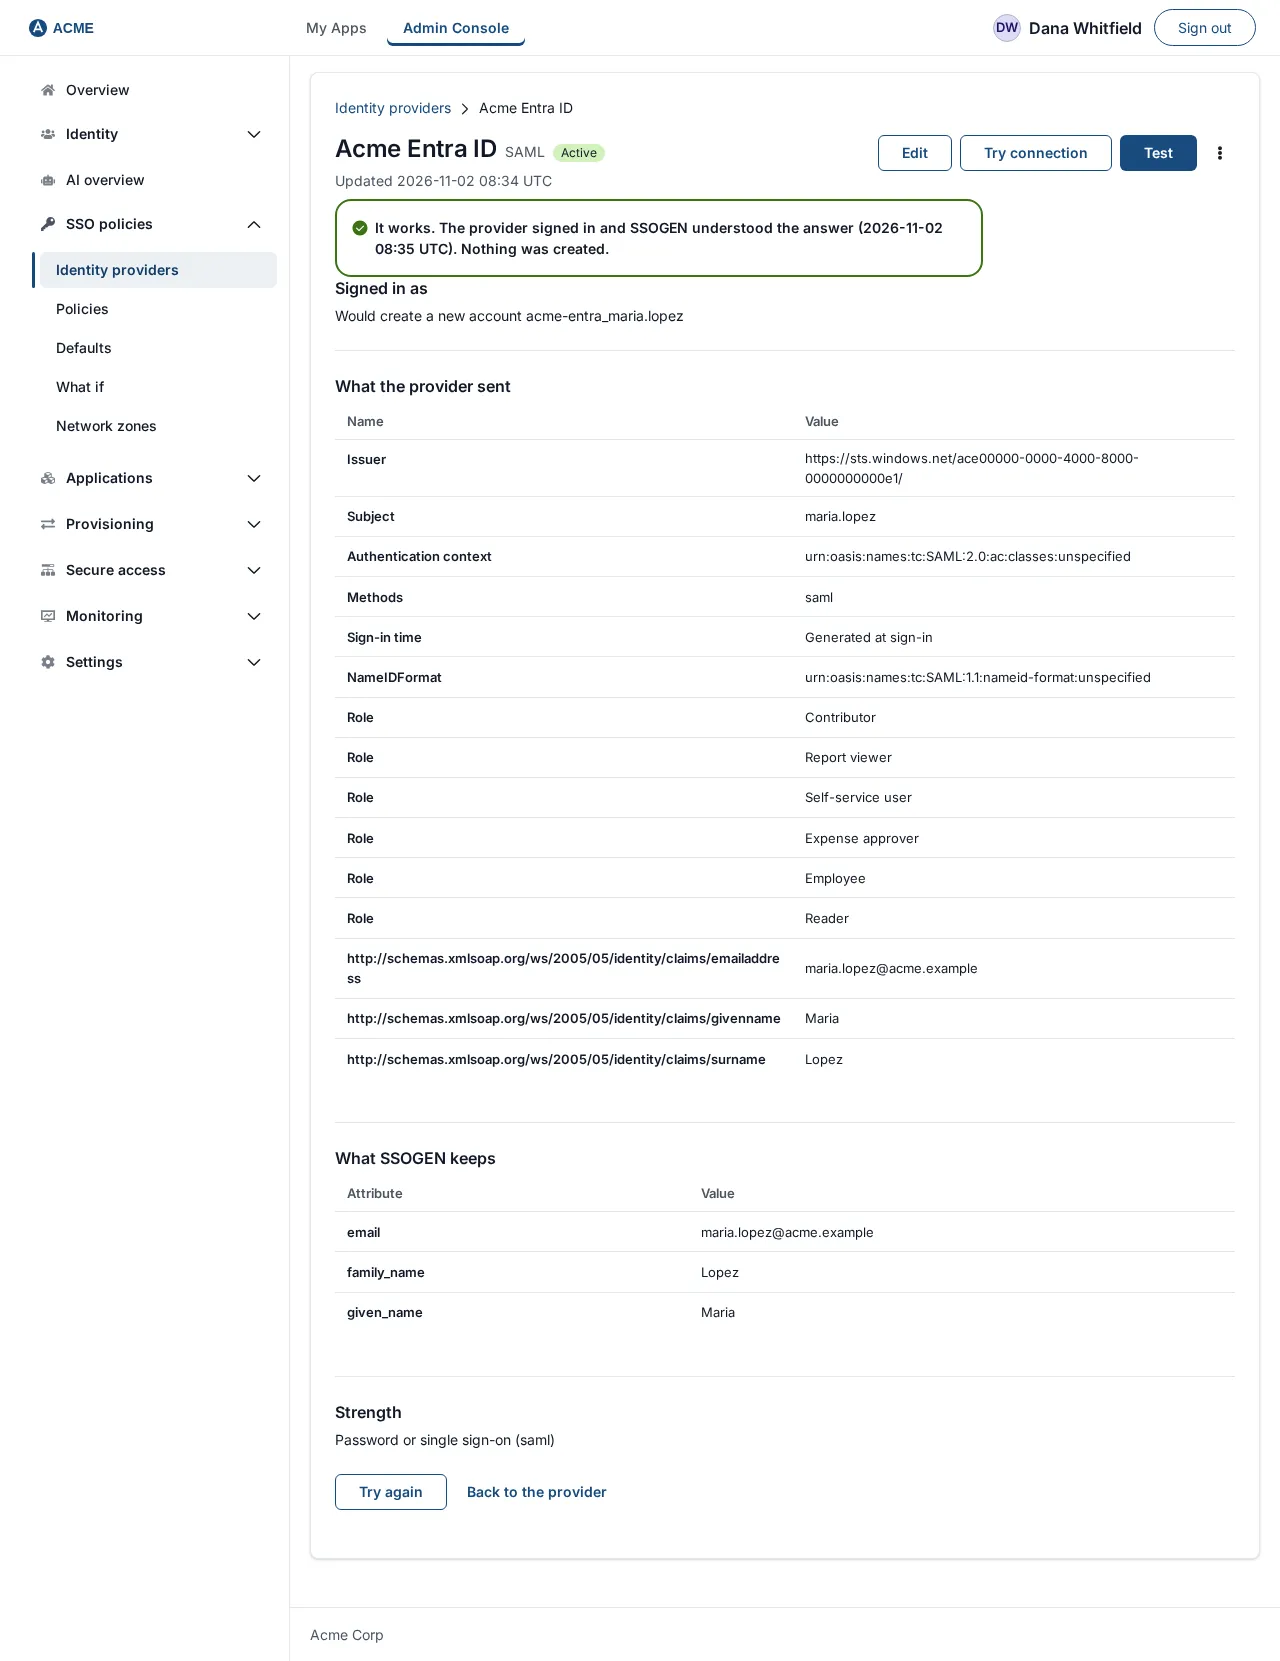
Section titled “Try signing in”Once the status is Tested, select Try signing in (on the wizard, or Try connection on the provider’s page). It opens the provider in a new tab. Sign in as a real test person in the same browser. SSOGEN then shows a result page that creates nothing:
- A green message: “It works. The provider signed in and SSOGEN understood the answer (time). Nothing was created.”
- Signed in as: which account this person would be, for example “Would sign in as Maria Lopez (maria.lopez@acme.example), an existing account” or “Would create a new account maria.lopez@acme.example”.
- What the provider sent: the subject (NameID) and attributes received.
- What SSOGEN keeps: the mapped attributes, and a warning if a required one is missing.
- Strength: how strong the sign-in was (for example Password or single sign-on, Plus a second factor or Passkey or security key).
- Try again and Back to the provider buttons.
A test sign-in lasts five minutes and can only be read by the console session that started it. If it fails, the red message names the reason. The ones you are most likely to meet:
| Message | Fix |
|---|---|
| The assertion was addressed to a different service provider. Its audience must be this provider’s entity ID. | In the other system, set the Identifier (Entity ID) to SSOGEN’s SP entity ID exactly. |
| The response was addressed to a different address than this provider’s ACS URL. / The response came back to a different ACS URL than the one this provider registered. | Set the Reply URL to SSOGEN’s ACS URL exactly. |
| The assertion’s signature did not verify. Check the signing certificate. | The certificate in SSOGEN is out of date. Import the metadata again. |
| The assertion is outside its validity window. Check that both clocks are correct. / The response’s time is too far from this server’s clock. | Fix the clock on the SSOGEN server or the other system. SSOGEN allows a few minutes of difference. |
| This assertion had already been used. Try again for a fresh one. | Start the test again; do not use the browser’s Back button. |
| The assertion carried no subject (NameID). | Add a NameID in the other system. |
| The provider did not send an attribute this connection requires. | Add the attribute at the other system or fix the Mapping. |
| Sign-in finished in a different browser; the test was discarded. Start again in this browser. | Run it again in one browser. |
| The provider reused an existing session, so the result may describe someone else. Sign out at the provider or use a private window, then try again. | Sign out at the provider or use a private window, then try again. |
Activate
Section titled “Activate”Select Activate. The provider now appears on the sign-in page (subject to policy; see The sign-in page). Its status is Active. It does not change what people use until the next two steps are done, so continue.
Part 4: Sign-in domains and other settings on the provider’s page
Section titled “Part 4: Sign-in domains and other settings on the provider’s page”After activating, the provider’s page opens. Select the Configuration tab.
Sign-in page
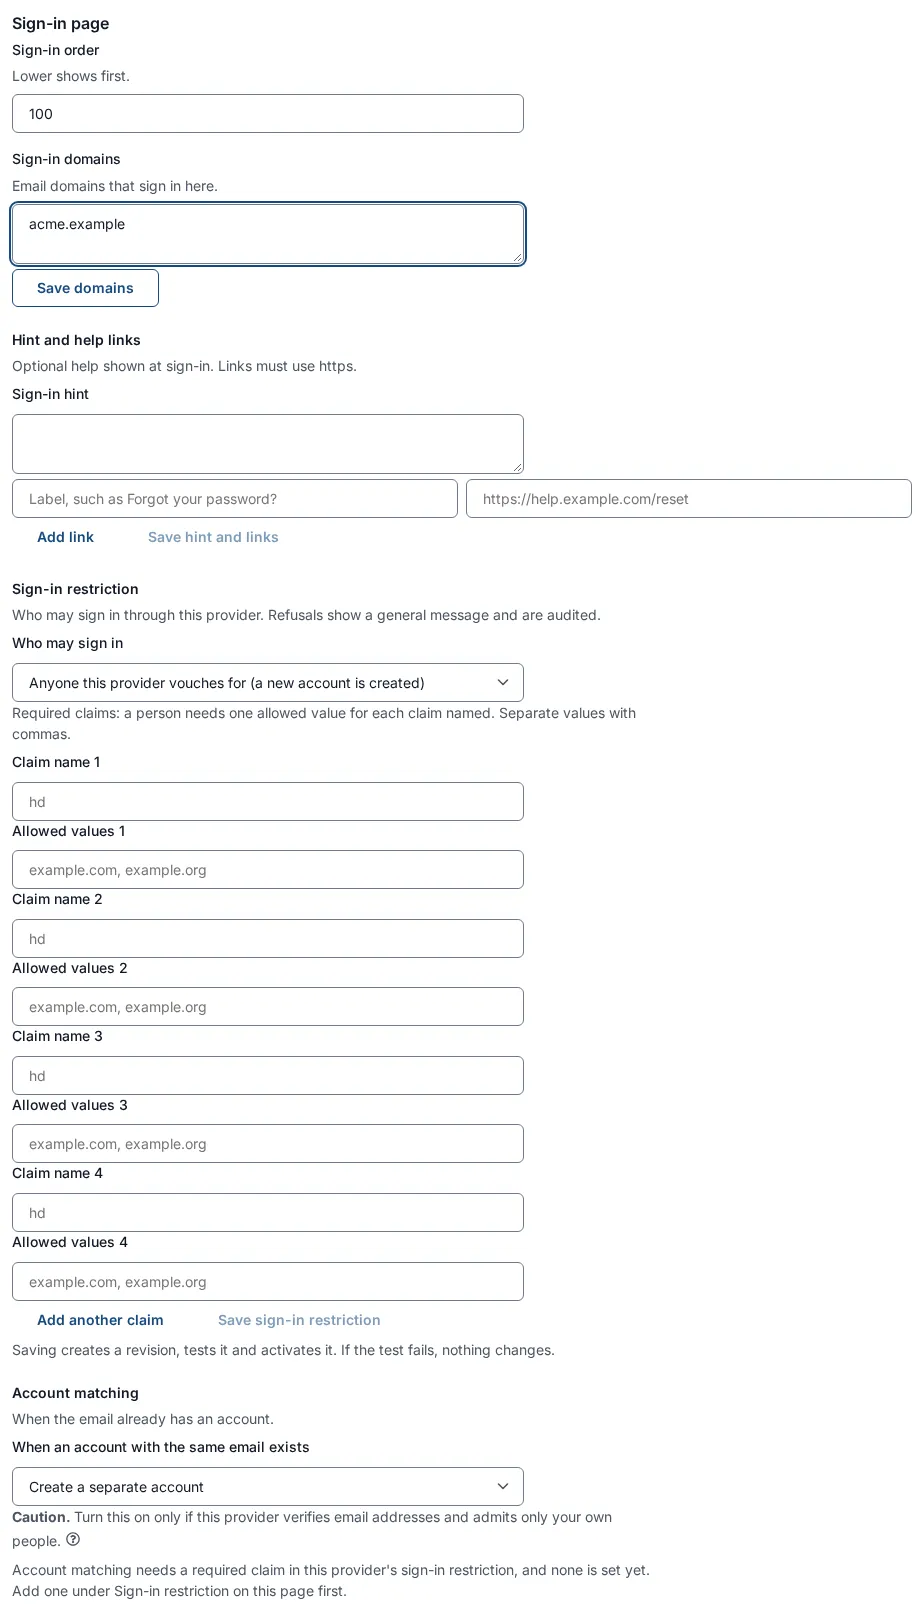
Section titled “Sign-in page”- Sign-in order: a whole number from 0 to 10,000. “Lower shows first.” Select Save order.
- Sign-in domains: “Email domains that sign in here.” Separate several with commas or new lines. When someone enters an address at one of these domains, the sign-in page sends them to this provider; each domain can belong to one provider. Example:
acme.example, corp.acme.example. Up to 20 domains. Select Save domains. Errors:"x" is not a valid sign-in domain. Use names such as example.com, separated by commas or new lines.and “Another provider already uses domain.” - Account matching: whether a sign-in joins an existing account with the same email address. Off by default, only a super administrator can turn it on, and a SAML provider needs a sign-in restriction first. See Identity providers: account matching.
Two more cards sit below it on the same tab. New people from this provider sets the User type for new people and the group new people are added to (Add new people to group); it applies to people created from now on, not to people who already exist. Second factor after sign-in with this provider decides whether SSOGEN trusts the provider’s own multi-factor sign-in or asks for its own second factor; a new provider starts at Always ask for SSOGEN’s second factor. See Identity providers.
Sign-in domains matter when you have more than one provider; the page The sign-in page explains how.
Service provider values
Section titled “Service provider values”Under Service provider you can copy the SP entity ID, ACS URL and SP metadata URL again, and Download SP metadata as sp-metadata.xml. Protocol settings lists what you chose: Sign authentication requests, Require signed assertions (always true), Force re-authentication, Request binding, NameID format, Clock skew allowed (5 minutes by default), IdP sign-in URL and Signing certificates (how many are held).
Attributes this provider may send on
Section titled “Attributes this provider may send on”Everything the provider asserts is recorded at each sign-in. This setting, Release, decides what reaches an application when no rule names an attribute (“Decides what reaches an application when no rule names an attribute.”):
- Only attributes a rule names (the default): “Only attributes named by a rule on the application are sent.”
- Everything this provider asserts: “All provider attributes are sent to every application, including third-party service providers. Rules override names.”
Select Save; it shows “Saved.”
Signing out
Section titled “Signing out”- Post-logout URL: where a person lands after signing out. Empty means a page on SSOGEN that says they have been signed out. It must be a full
https://address; otherwise: “That has to be a full https:// address. A path on this server would send people to the sign-in page, which signs them straight back in.” - Also sign out of this provider: turn on so that signing out of SSOGEN also ends the session at the identity provider (and everything else federated to it). Choose IdP SLO URL (taken from the provider’s metadata) or Custom provider SLO URL. For Entra, the sign-out address looks like
https://login.microsoftonline.com/<tenant-id>/saml2. Why it matters: “Signing out here does not end the provider session, so people may be signed straight back in. Turn this on to end it too, which also signs them out of everything else federated to it.” Select Save.
Check that it works
Section titled “Check that it works”Before the first sign-in decide who may arrive. A new provider is set to Only people who already have an account here: Maria is turned away, with a general message and a reference code, unless her account exists. Either create it under Identity > Users first, or open the provider’s Configuration tab, set Sign-in restriction to Anyone this provider vouches for (a new account is created), add a required claim so only your people qualify, and select Save sign-in restriction. Try connection says “Would be refused” until one of these is done.
- Open a private browser window and go to your SSOGEN address (for example
https://sso.acme.example/). - You should see the sign-in page. If this provider is the only active one you are sent straight to it; otherwise choose it, or type an email in a sign-in domain.
- Sign in at the other system as Maria Lopez. You land in My Apps as Maria Lopez.
- In the Admin Console open Identity > Users: Maria’s user is there. With Anyone this provider vouches for it is new, created at her first sign-in, with the provider as her source; otherwise it is the account you made first. Her Last try on the provider’s Overview tab shows the earlier test.
If Maria sees “Sign-in was not completed. Nothing was changed. Try again.”, the other system refused or she canceled. A short reference code may be shown; give it to your administrator. On the provider’s page, History > Changes shows what happened.
When certificates change
Section titled “When certificates change”An identity provider replaces its signing certificate from time to time. If you gave SSOGEN a Metadata URL, select Edit on the provider, choose Metadata URL on step 2, select Fetch metadata again, and Save revision; then Validate, Test and Activate the revision. People keep signing in on the old configuration until you activate the new one. If you only gave a file, upload the new file the same way.
Troubleshooting
Section titled “Troubleshooting”| What you see | Likely cause |
|---|---|
| The provider is missing from the sign-in page | It is not Active, or the policy for that application or for My Apps does not allow it. See Policies. |
| “An IdP entity ID is required. Import the provider’s metadata, or enter it on the Review metadata step.” | You did not supply metadata. Edit and add it. |
| “A metadata URL is required before activation. Enter it on the Review metadata step.” | Add the Metadata URL (https). |
| “This provider has not passed Validate and Test yet. Select Validate, then Test, then Activate.” | Run the steps in order. |
| “This revision has not passed Validate and Test yet…” | The same, for a saved edit. |
| “This provider has been deleted and cannot be activated.” | It is archived. Create a new one. |
| A person signs in and gets no email or name | The Mapping names do not match what the provider sends. Use Try connection and read What the provider sent. |
| A person signs in as a second, different account | The NameID changed. Use a stable NameID and see Signed in as in the Try result. |