Create an authentication policy and assign it
An authentication policy (the console also just says policy) is a named set of sign-in requirements that many applications share. To create an authentication policy, use the Add policy wizard, then assign it to an application, as this guide shows. Read How sign-in decisions work first if the words provider, first factor or step-up are new to you.
The example: Acme Corp wants finance staff to give a second factor when they open “Acme Payroll”. We create a policy called Finance with second factor.
Before you start, you need:
- At least one active identity provider. Here it is a directory called Corporate LDAP (add it under SSO policies > Identity providers). If a provider is still a draft, activate it first: only active providers can be chosen.
- An administrator account that may edit authentication settings.
1. Open the Policies page
Section titled “1. Open the Policies page”- In the Admin Console menu, open SSO policies > Policies. The page is titled Policies.
- You see a list of policies (empty on a new installation), with a search box Search sign-in policies.
- Each row shows the policy name, how many applications use it in the Used by column (a dash when none, otherwise 1 app, 3 apps), a Status (Default (My Apps), Admin Console, Default and Admin Console, In use or Not in use), and in small print its first factor, its second factor, its providers and any role it holds (Default policy, Used by the Admin Console).
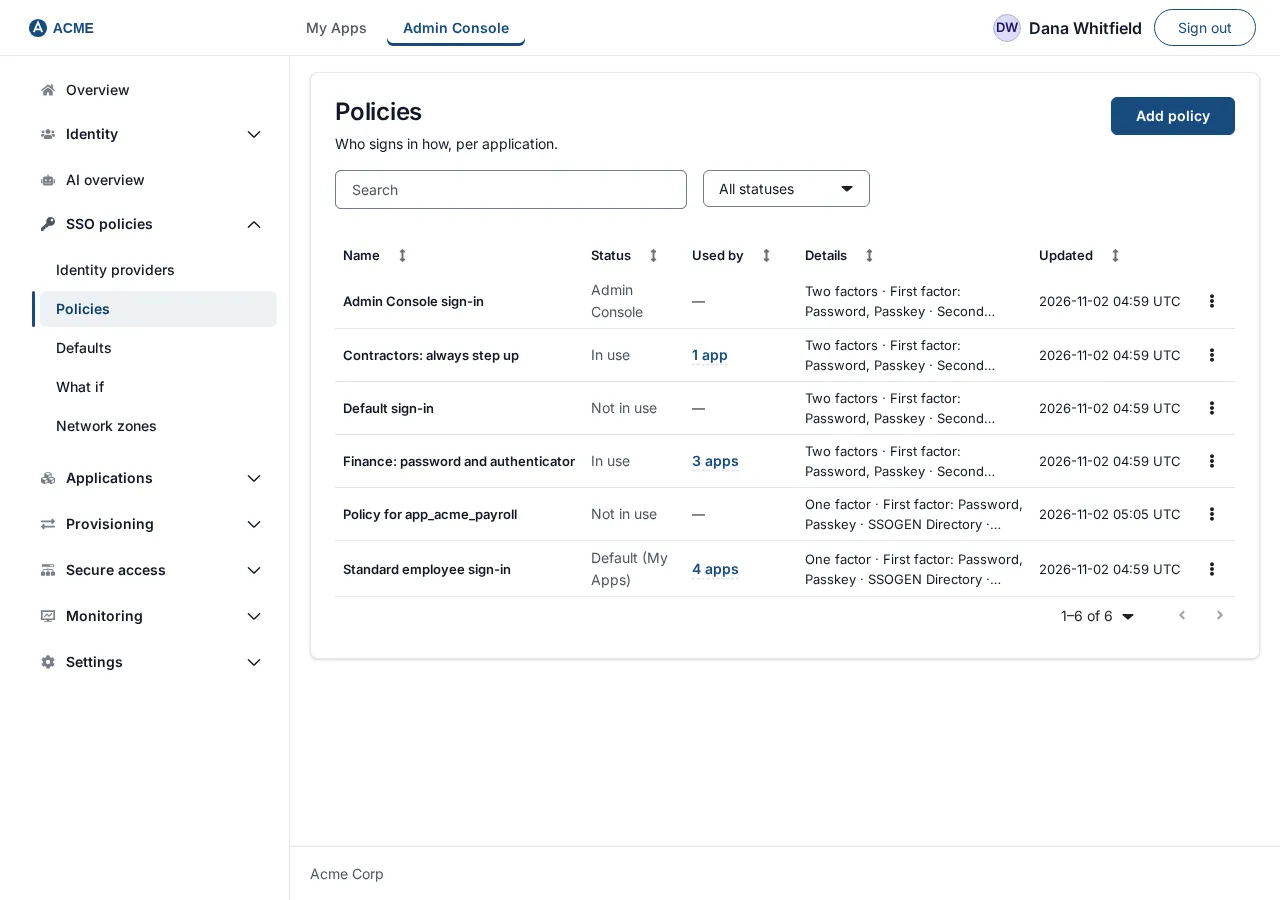
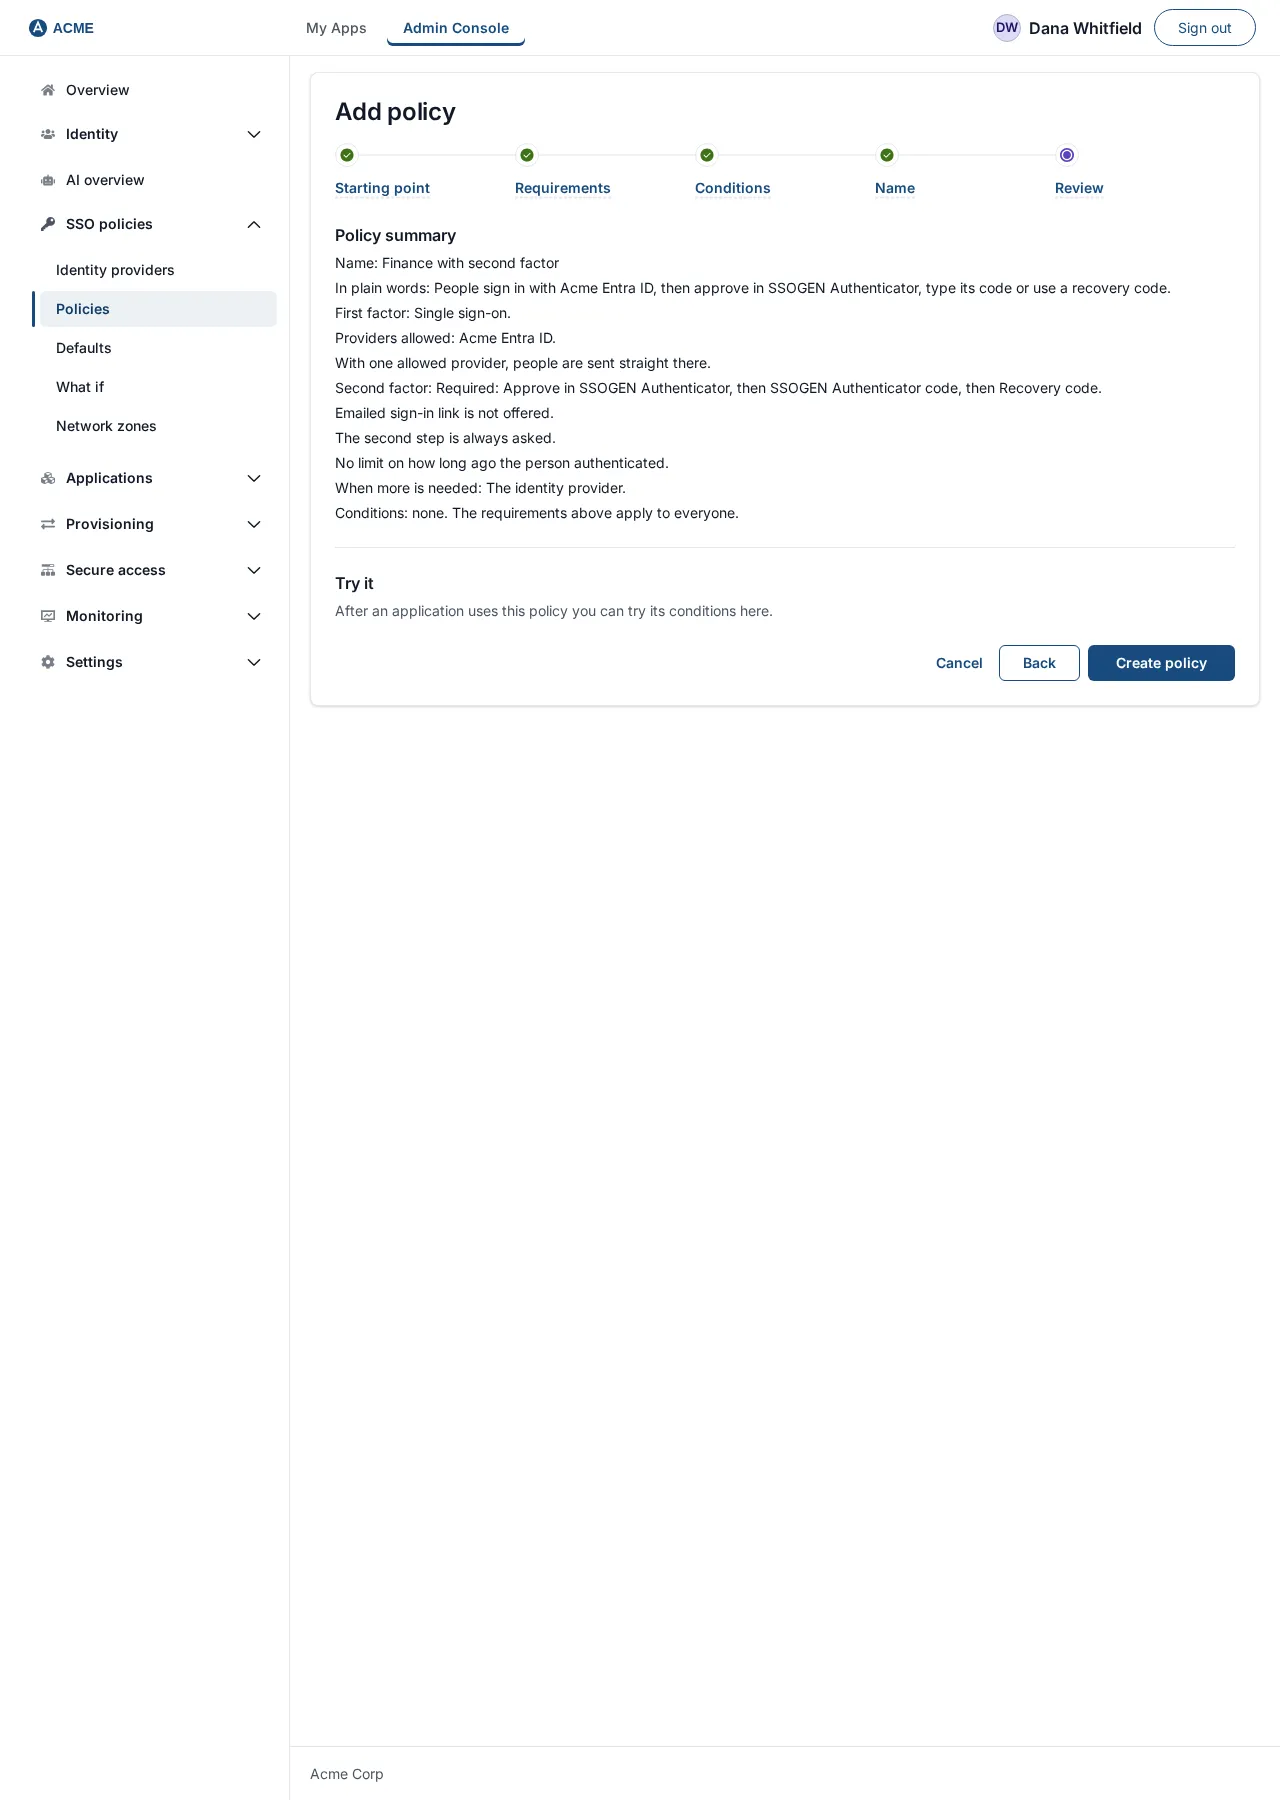
Select Add policy. The wizard opens with the heading Add policy and a step bar: Starting point, Requirements, Conditions, Name, Review. Nothing is saved until the last step, and Cancel (bottom left) throws the draft away.
2. Starting point
Section titled “2. Starting point”Under Start from, choose one. Each one only fills in the next steps for you; you can change everything afterwards.
| Choice | What it fills in |
|---|---|
| Corporate LDAP | “People sign in with their directory username and password. Nothing more is asked.” Strength Password or single sign-on. |
| LDAP + authenticator code | “Directory sign-in, then a code from the SSOGEN Authenticator or another authenticator app.” Strength Plus a second factor, asked by SSOGEN. |
| Passkey only | “Only a passkey or security key is accepted. No password or provider is used.” |
| Corporate SSO | “People sign in at the company’s SAML or OpenID Connect provider. Any more that is needed is asked there.” |
| Windows desktop sign-in | “People on managed Windows computers are signed in by their Windows account. Anywhere else, or if that fails, they sign in with their directory password.” |
| Blank | “Start empty and choose everything yourself.” |
For Acme choose LDAP + authenticator code, then select Next.
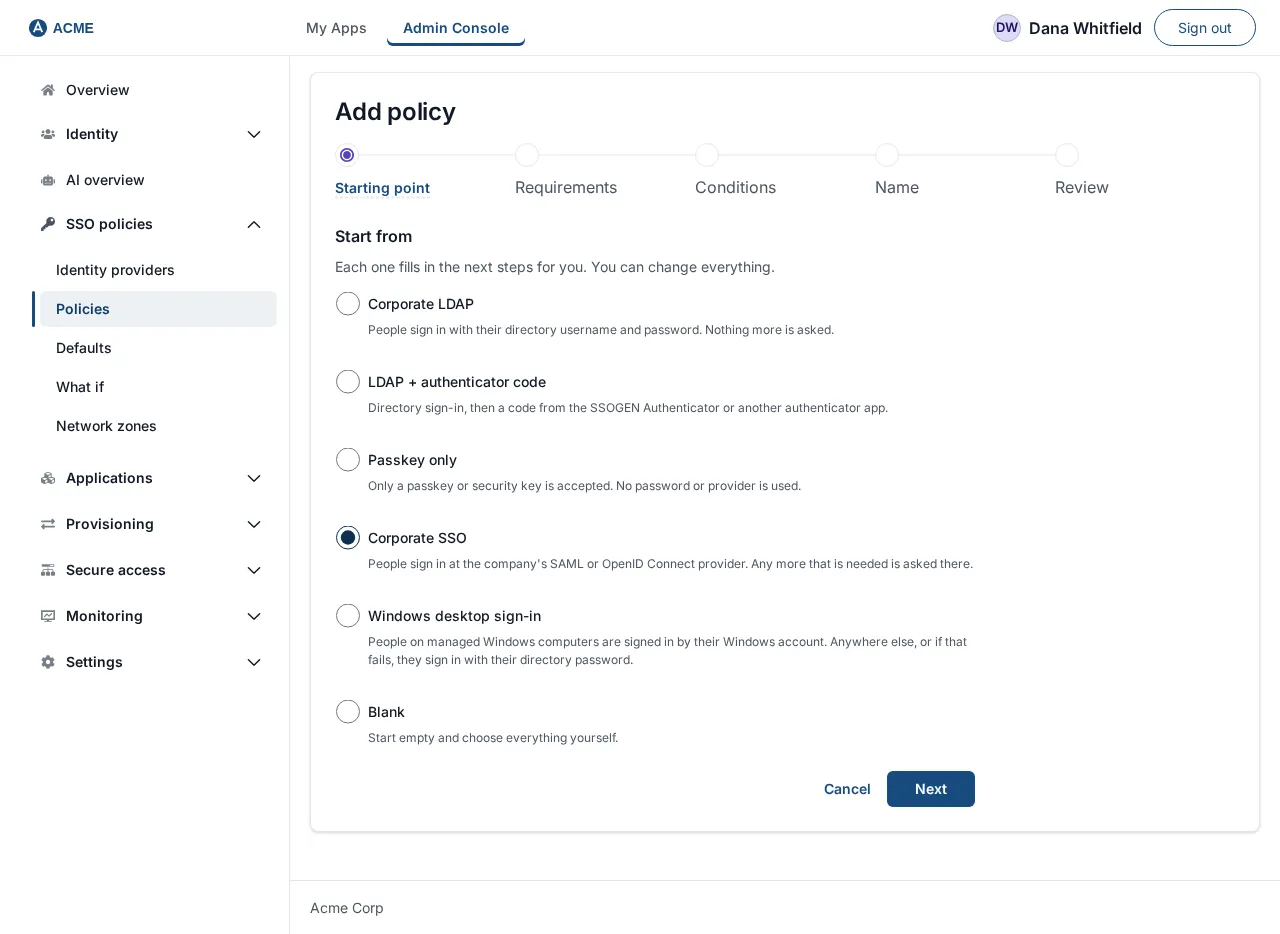
If you select Next without choosing, you see “Choose a starting point.”
3. Requirements
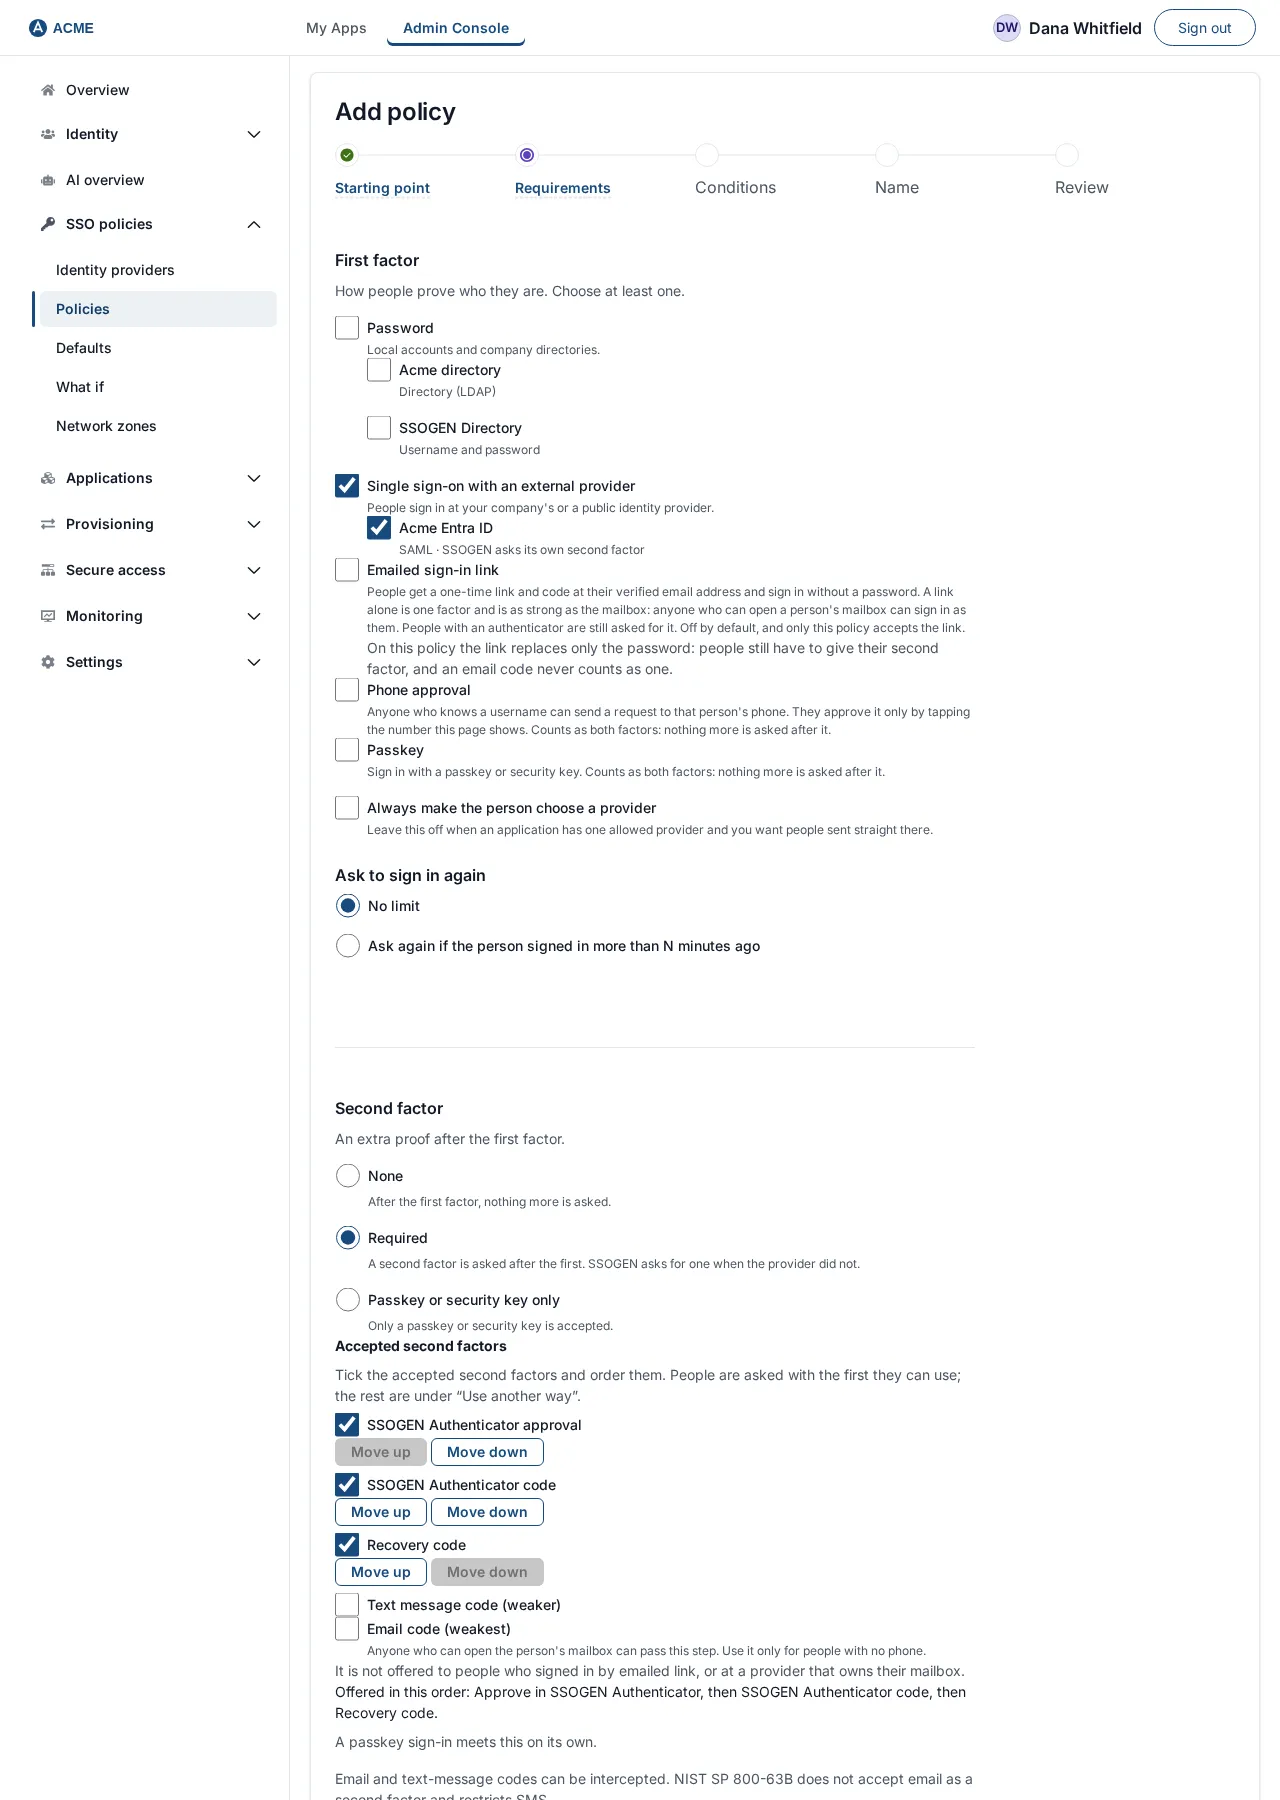
Section titled “3. Requirements”The step is a set of blocks. A line under the blocks sums up what the policy asks, in a sentence, and warns about settings that do not fit together.
First factor. How people prove who they are: “Choose at least one.” Each way is a checkbox:
| Checkbox | Notes |
|---|---|
| Password | “Local accounts and company directories.” Its identity providers are listed under it; tick the ones this policy allows. |
| Single sign-on with an external provider | “People sign in at your company’s or a public identity provider.” Its providers are listed under it. |
| Emailed sign-in link | Off by default. People get a one-time link and code at their verified email address. |
| Phone approval | Off by default. People approve the sign-in on their phone. |
| Passkey | Passkey or security key. “Counts as both factors: nothing more is asked after it.” |
Only active providers can be chosen. If there are none of a kind you see “No local accounts or directories yet. Add one under Identity providers.” or “No single sign-on providers yet. Add one under Identity providers.” Tick Always make the person choose a provider only if you want people to see a choice even when one provider is allowed; leave it off to send them straight to the provider. With nothing ticked, Next says “Choose at least one first factor.”
Ask to sign in again. Choose No limit, or Ask again if the person signed in more than N minutes ago and type whole minutes in Minutes (N) (for example 480 for a working day). The limit must be between 1 minute and 24 hours.
Second factor. “An extra proof after the first factor.” Choose one:
| Choice | Meaning |
|---|---|
| None | “After the first factor, nothing more is asked.” People who set up an authenticator or paired a phone are still asked for it after a password. |
| Required | “A second factor is asked after the first. SSOGEN asks for one when the provider did not.” |
| Passkey or security key only | “Only a passkey or security key is accepted.” Saving turns the other first factors off. |
Under Required, tick the Accepted second factors and put them in the order people are offered them with Move up and Move down. People are asked with the first one they can use; the rest are under “Use another way”. SSOGEN Authenticator approval, SSOGEN Authenticator code and Recovery code are on by default; Text message code (weaker) and Email code (weakest) are off. “Email and text-message codes can be intercepted. NIST SP 800-63B does not accept email as a second factor and restricts SMS.”
Remembered browsers. Choose Always ask for the second step (the default), Don’t ask on a remembered browser from a known network, or Don’t ask on a remembered browser from a known network inside a network zone (then pick the zone; see Network zones). A browser is remembered for 30 days after the person ticks “Don’t ask again on this browser for 30 days”. It never applies to the Admin Console, to administrator elevation, to password reset or to security changes, and phone approval always asks. Skipping needs the second factor Required (it cannot combine with Passkey or security key only).
If the person has no second factor. Shown when the policy can ask for a second factor. Choose Offer to set one up during sign-in (the default: “Anyone who never had a second factor, and anyone whose second factors an administrator reset.”), After a reset only, or Send them to the help desk. Under Before setting one up, the person proves, choose a code to their email address (a text message when they have no email address; the default), a code to their email address, a code by text message, or Nothing more than their sign-in. Under A person with no email address or phone number on file, choose May still set one up or Is told to contact the help desk. The block also lists what Always applies, whatever you choose: set-up comes only after the first factor of this sign-in, only for a person who holds no second factor at all, never for a high-risk sign-in or through an emailed link, and the person is emailed when a second factor is added. On the Admin Console’s policy a code is always asked first and a person with no email address or phone number on file is always sent to the help desk; anyone who can open the Admin Console is set up only by that rule, wherever they sign in. Only a Super admin can make a policy ask less here.
When more is needed. Where the person is sent when what they signed in with is not strong enough:
| Choice | Meaning |
|---|---|
| SSOGEN second factor | SSOGEN asks for an authenticator code or a passkey after the provider. |
| The identity provider | The person is sent back to their provider to prove more. |
| Either | SSOGEN offers its own second factor or the provider’s, whichever the person can do. |
Alternatives, in order (optional). If the first way is not available to the person, the next is offered. Use the add control to add SSOGEN second factor or one of the policy’s providers, and Move up, Move down and Remove to arrange them. With none, the line reads “None. The mode above decides.”
For Acme, tick Password and Corporate LDAP, choose Required, keep the three default second factors, and choose SSOGEN second factor under When more is needed. Select Next.
4. Conditions
Section titled “4. Conditions”Optional. These are rules that tighten the requirements for some people or situations, for example “from outside the office, refuse”. With none, “the requirements apply to everyone.” Acme adds none now. How to build rules, with examples, is in Rules and conditions. Select Next.
5. Name
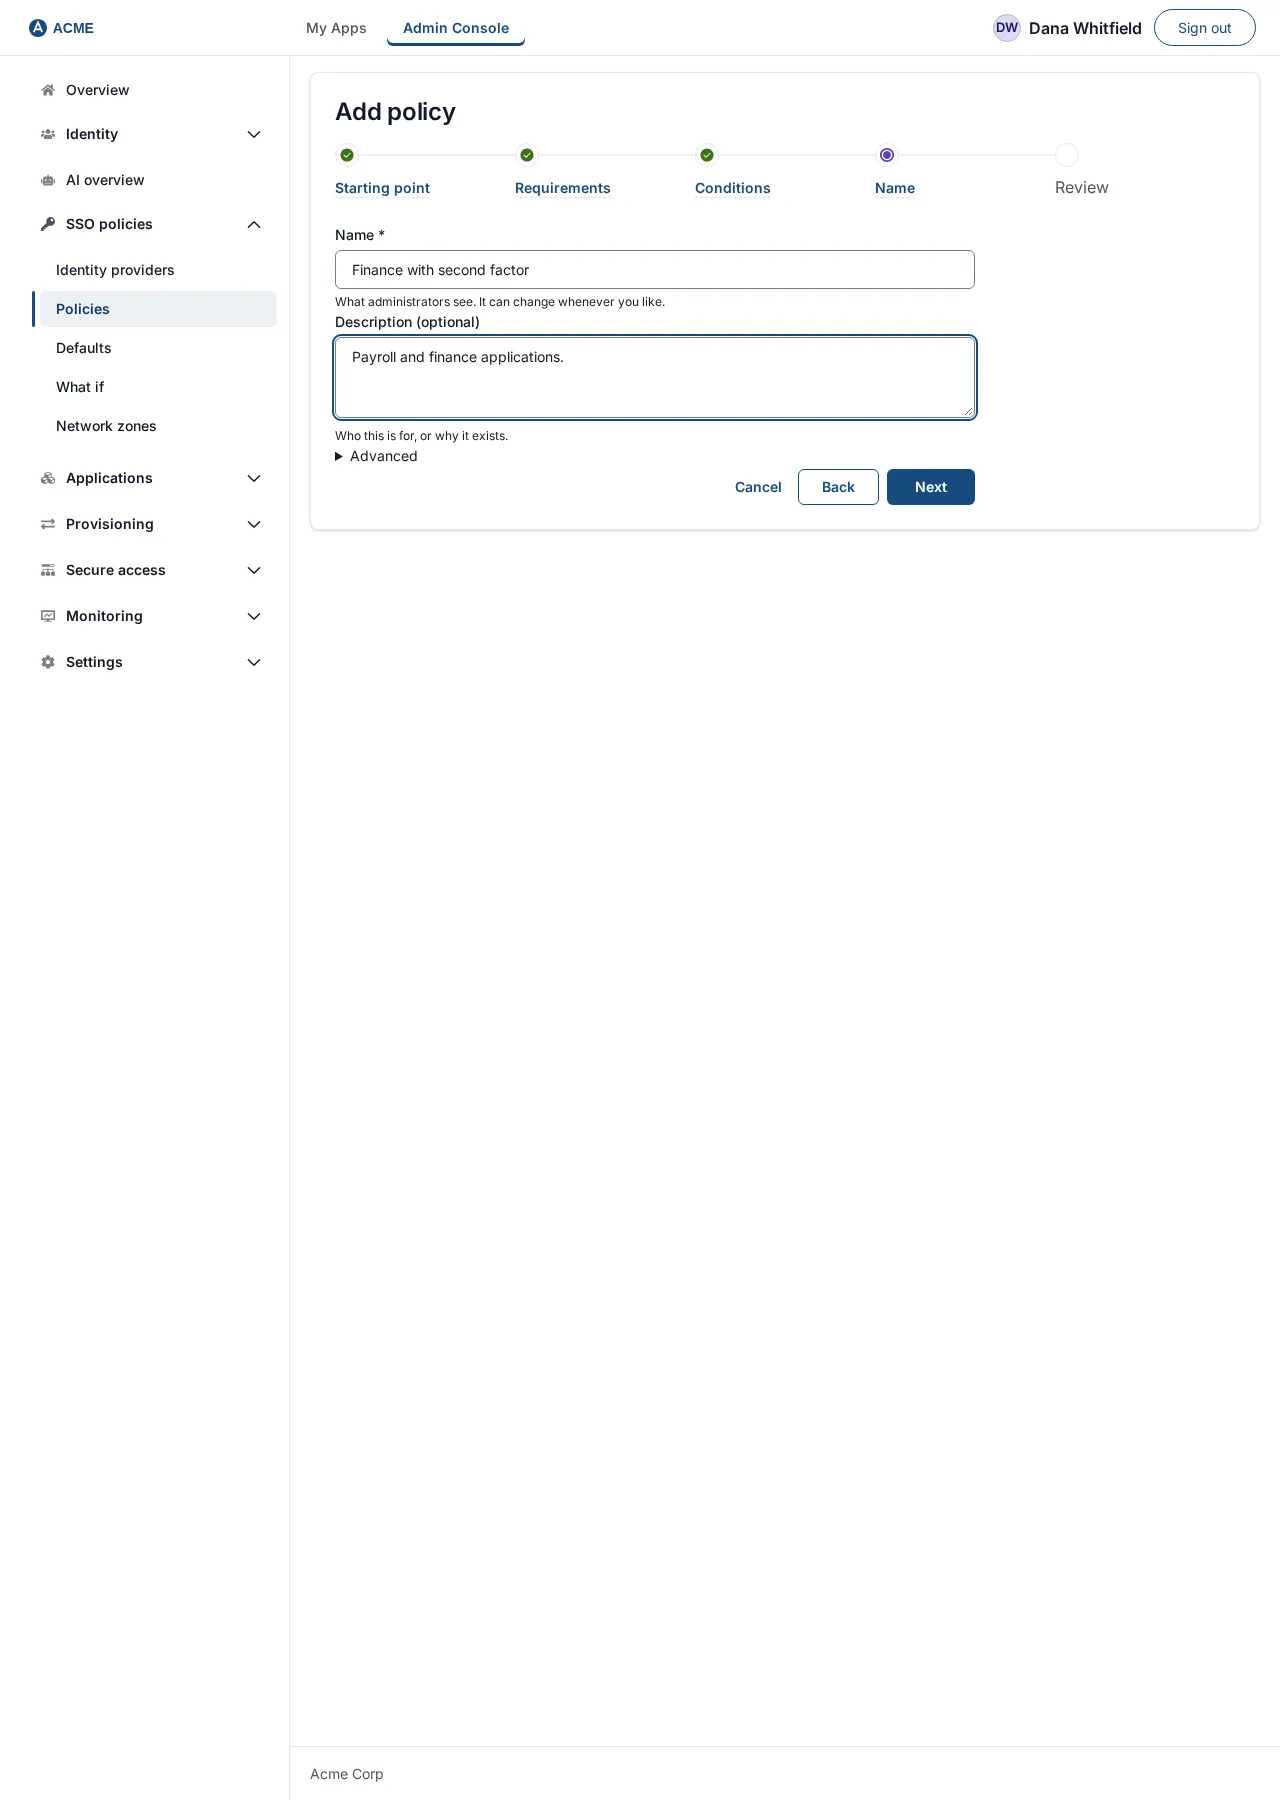
Section titled “5. Name”- Name (required): “What administrators see. It can change whenever you like.” Type
Finance with second factor. Without a name you see “Enter a name.” - Description (optional): “Who this is for, or why it exists.” Up to 1,024 characters, for example
Payroll and finance applications. Second factor required. - Open Advanced to see Policy ID (optional). Leave it empty and the ID is made from the name (here
finance-with-second-factor). If you type one, use lowercase letters, numbers and hyphens, at most 64 characters, for examplefinance-mfa. Applications point at this ID, never at the name, so nothing loses track of the policy when the name changes. The help says “It cannot be changed later.” The ID cannot be changed after the policy is created.
Select Next.
6. Review and create
Section titled “6. Review and create”The step shows Policy summary, one plain sentence per decision: the name, the first factors and providers allowed, the second factor, the sign-in age limit, what happens when more is needed, and the conditions.
Below it a Try it section says, for a new policy, “After an application uses this policy you can try its conditions here.” (You can try an existing policy; see What if and Test.)
Select Create policy. You see “Policy created. Assign it to applications from their Access rules tab.” and the policy’s own page opens.
7. Review the policy page
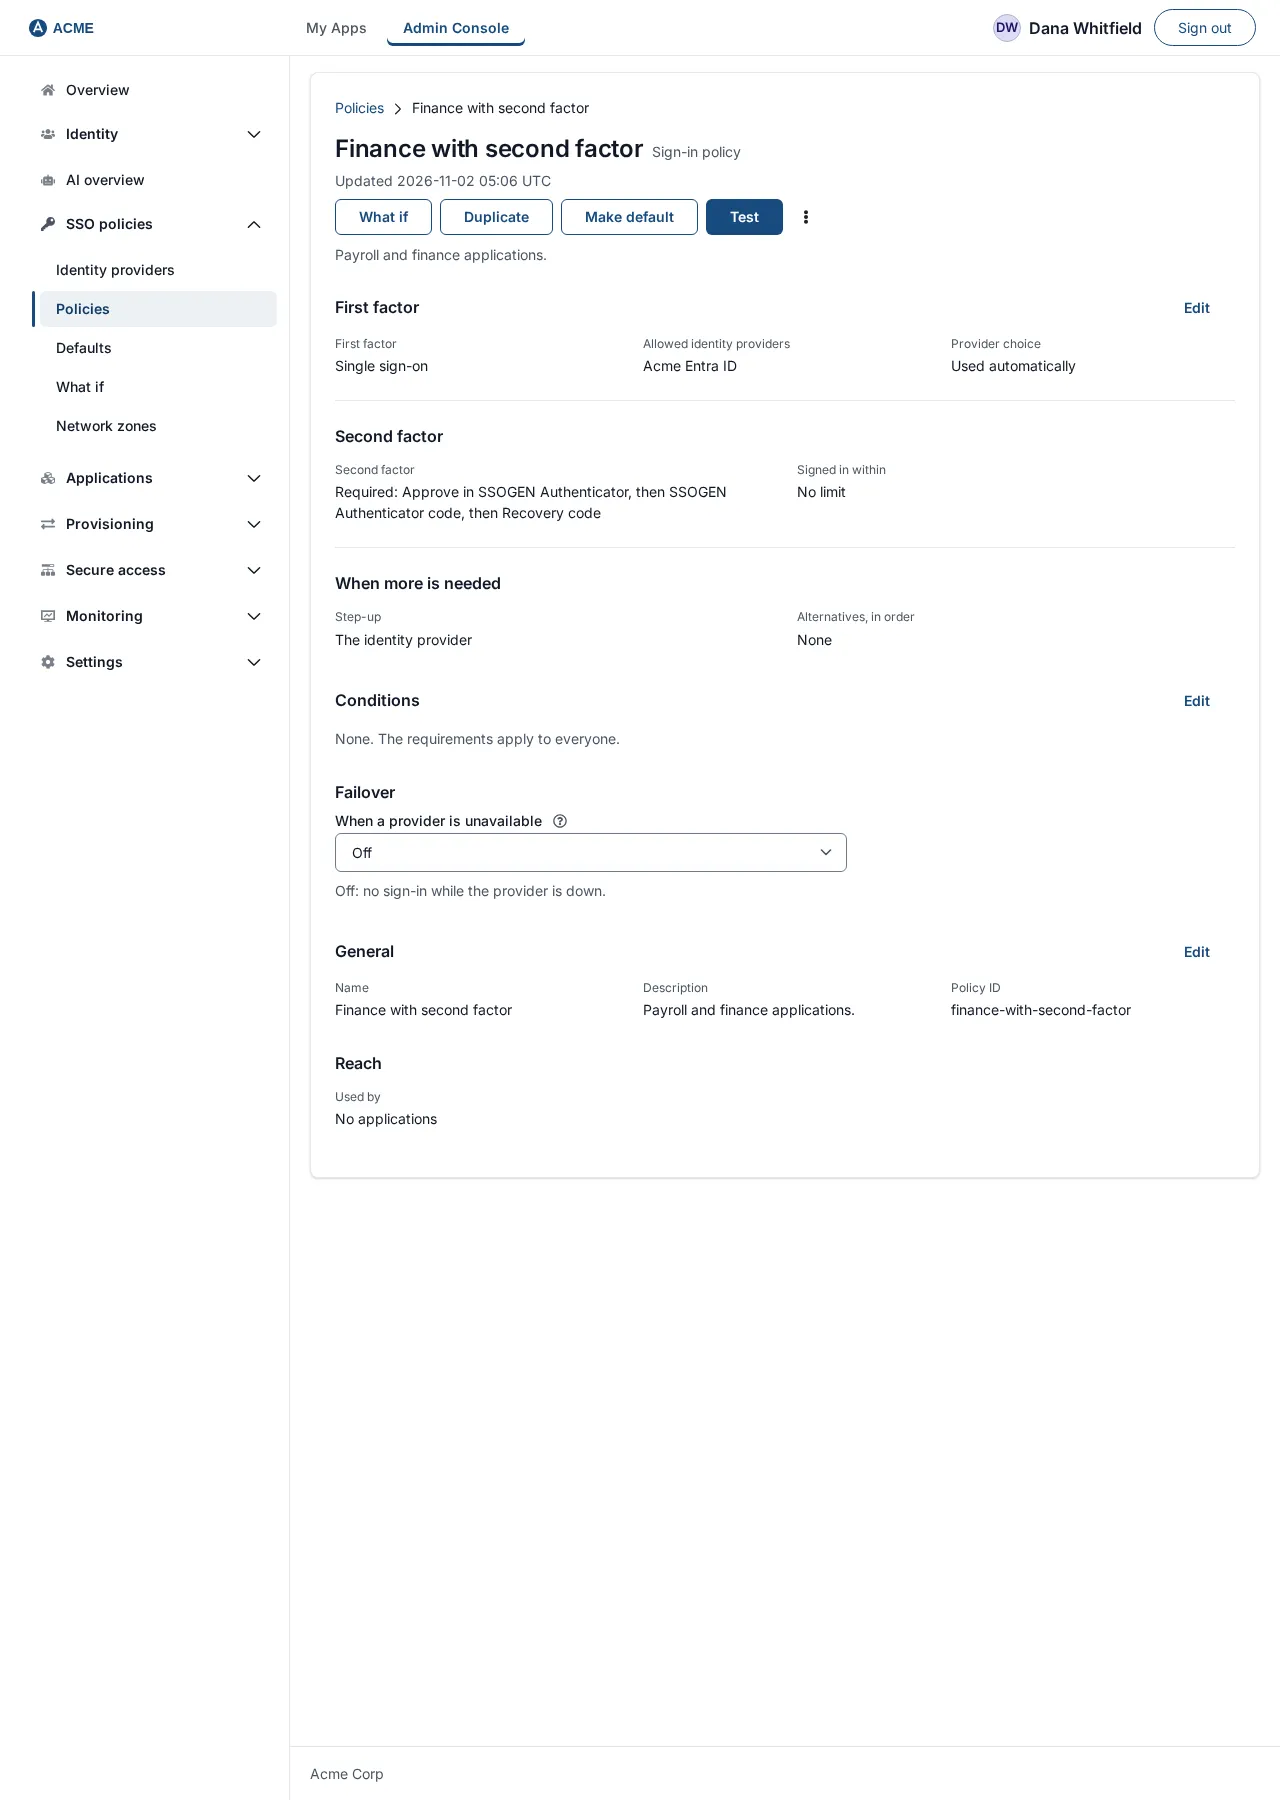
Section titled “7. Review the policy page”The page shows the policy’s name as its title and its description. Buttons at the top: Test, What if and Duplicate (and Make default when the policy is not the default), and a ⋮ menu with Delete permanently. Back to policies returns to the list.
The details are in sections, each with its own Edit button that reopens the wizard on that step (an edit has no Starting point step):
- First factor: First factor, Allowed identity providers, Provider choice.
- Second factor and When more is needed: Second factor, Signed in within, Step-up, Alternatives, in order.
- Conditions: the rules, read-only. See Rules and conditions.
- When a provider is unavailable: see Failover.
- General: Name, Description, Policy ID.
- Reach: Used by, the applications using it, or “No applications”.
When you edit a policy that applications use, the wizard warns “This change reaches 3 applications.” and saving says “Saved. This change reaches 3 applications.” Editing a policy changes every application on it at once.
8. Assign the policy to an application
Section titled “8. Assign the policy to an application”There are two places.
While registering a new application
Section titled “While registering a new application”In the application wizard (Applications, then Register), the step Sign-in policy shows Policy. Its first entry is Use the default policy (with the default policy’s name in brackets); the policies follow, and the default one is marked “(default)”. Choosing a policy shows a line such as “Allows Corporate LDAP. Sign-in strength: Plus a second factor.” If no default exists, Use the default policy (none is set) is disabled and a note tells you to choose a policy or set a default under Defaults.
On an existing application
Section titled “On an existing application”- Open Applications and select “Acme Payroll”.
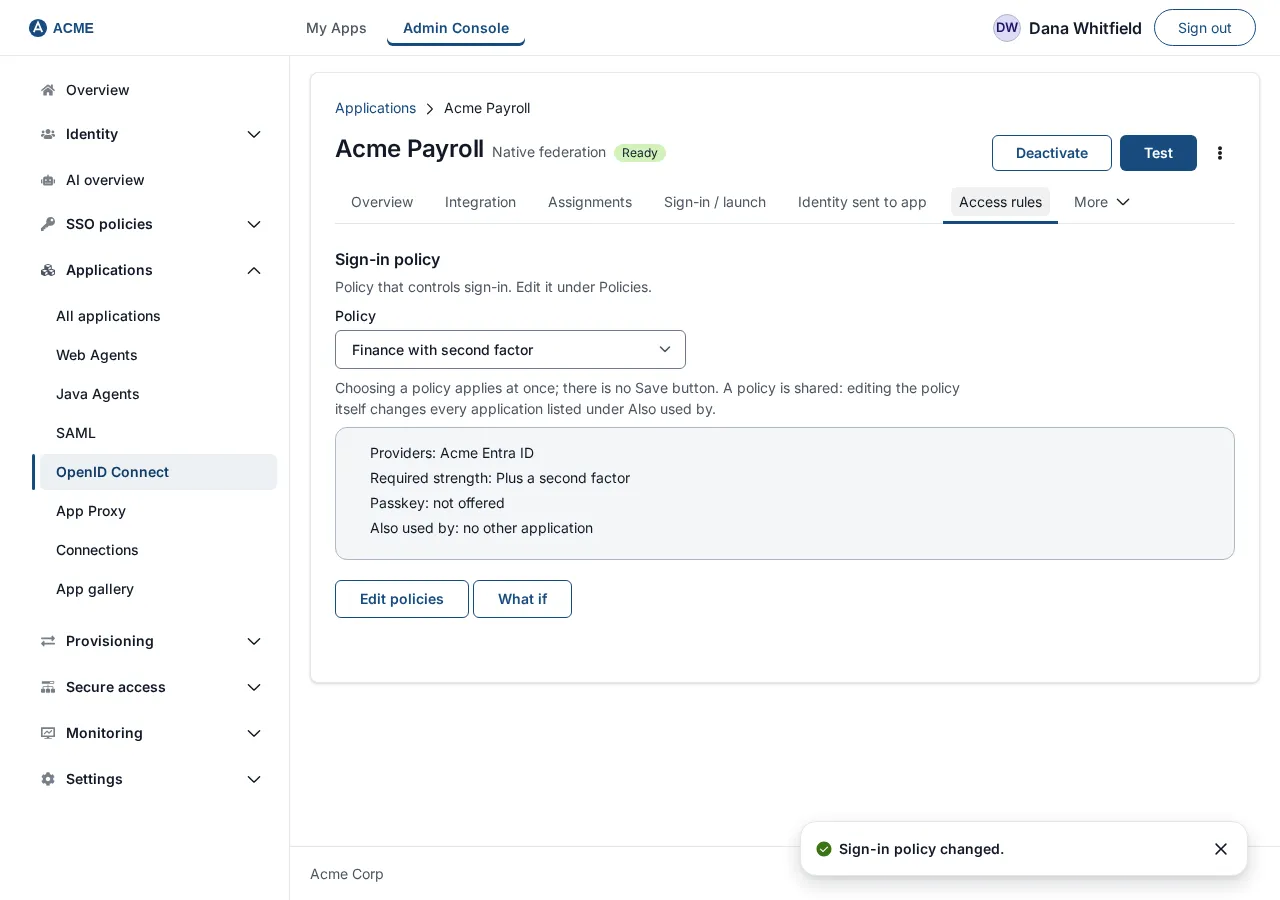
- Open the Access rules tab. It is headed Sign-in policy.
- In Policy, choose Finance with second factor. The change is saved at once, there is no Save button, and you see “Sign-in policy changed.”
- A summary of the chosen policy appears under the list, with Also used by naming the other applications that share it.
- Edit policies takes you to SSO policies; What if opens the What if page for this application.
If the change is refused you see “Could not change the sign-in policy.” An application behind the Gateway may also be refused with a longer message about a Gateway hostname letting people sign in more weakly from outside your network zones; keep a rule that denies sign-in from outside your zones in that hostname’s policy, or change the hostname’s policy on the Gateway screen first (see Network zones).
Check that it worked
Section titled “Check that it worked”- Back on SSO policies > Policies, the row for Finance with second factor now reads 1 application.
- Open the policy page: Used by lists “Acme Payroll”.
- Open What if, choose Maria Lopez and “Acme Payroll”, and select Ask. Leave Sign-in strength at Assume what the provider gives, or choose Password or single sign-on to see the policy ask for more. The headline should start with “Would be asked for a second factor”. See What if and Test.
- Sign in as Maria and open the application: after her password she is asked for an authenticator code (she needs an authenticator app enrolled in My Account first).
Duplicate, edit and delete
Section titled “Duplicate, edit and delete”- Duplicate (on a row or on the policy page) opens the wizard on Requirements with everything filled in and the name “Finance with second factor (copy)”. The ID is left empty so a new one is made. A policy whose rules cannot be shown cannot be copied: “The conditions of the policy being copied cannot be shown, so a copy would not carry them. Copy a policy whose conditions can be shown.”
- Edit opens the wizard on the section you chose.
- Delete permanently asks you to type the policy’s name to confirm. You see “Policy deleted.” If applications still use it: “Still in use by Acme Payroll. Move those applications to another policy first.” The default policy cannot be deleted, or cleared, while an application follows it, and the Admin Console’s policy cannot be deleted while it is assigned: “This is the Admin Console’s sign-in policy. Give the console another policy first, then delete this one.” If permanent deletion is off, the menu item is disabled with “Switched off for this deployment. Turn on “Allow permanent deletion” in Security.”
Fix a refused save
Section titled “Fix a refused save”| Message | What to do |
|---|---|
| Choose at least one first factor. A policy that offers none would refuse every sign-in. | Tick a first factor on Requirements. |
| One of the chosen providers is archived or no longer exists. Choose an active provider. | Replace it. |
| Choose an accepted second factor or offer passkeys; otherwise nobody can meet this policy. | Tick an accepted second factor under Second factor, or tick Passkey. |
| A policy that accepts only a passkey has to offer passkey sign-in. Turn passkeys on, or choose another second factor. | Tick Passkey or choose another second factor. |
| The age limit has to be between 1 minute and 24 hours. | Change Minutes (N). |
| An alternative is not one of the policy’s providers. Remove it or add the provider. | Fix Alternatives, in order. |
| A policy with that ID already exists. Choose another ID. | Change Policy ID under Advanced. |
| No administrator could sign in to the console. Nothing was saved. (also: No administrator could meet the required strength. Nothing was saved. / This change would lock you out of the console. Nothing was saved.) | The policy is the one the console uses; keep a second administrator able to meet it. |
| Only a Super Admin can change or delete the Admin Console’s sign-in policy. Nothing was changed. | Ask a Super Admin. See Defaults. |
| The console policy needs approval in SSOGEN Authenticator, the SSOGEN Authenticator code, a recovery code, or passkeys. Email codes and text message codes never open the console. | Tick one of the accepted ones on the console policy. |
| The Admin Console always asks for a second factor. Choose Second factor: Required, or use another policy. Nothing was saved. | Set Second factor to Required on the console policy, or give the console another policy. |
| Only a Super Admin can ask less of people who set up a second factor at sign-in. Nothing was changed. | Ask a Super admin to make the change, or keep the stricter choice under If the person has no second factor. |
| Phone approval needs SSOGEN Authenticator approval as an accepted second factor, and a second factor no stricter than Required. | Tick SSOGEN Authenticator approval, or turn off Phone approval. |
| Skipping needs a second factor. Choose Second factor: Required, or turn skipping off. | Set Second factor to Required or choose Always ask for the second step. |
| Someone else saved this policy. It was reloaded; review and repeat your change. | Redo your change. |
| The policy was saved, but its conditions were not. | The policy saved; fix the conditions and save again. |