Add an OpenID Connect identity provider (Entra ID, Keycloak OIDC)
This guide connects an OpenID Connect (OIDC) identity provider, such as Microsoft Entra ID, Keycloak, Okta or Google Workspace, to SSOGEN so your people can sign in with the account they already have there. It describes every screen and field of the Add OpenID Connect provider wizard, then the steps you take in Entra ID and Keycloak and in any other provider.
You need: an administrator who can read and change identity providers in SSOGEN (Super admin or Authentication admin), and an administrator of the other system. If you have not read it yet, Identity providers explains the terms and the draft-to-active lifecycle used below.
How the pieces fit together
Section titled “How the pieces fit together”- You start the wizard in SSOGEN and give the provider a name and identifier. SSOGEN works out the redirect URI from them.
- You register SSOGEN as a client at the provider using that redirect URI, and the provider gives you a client ID and client secret.
- You give SSOGEN the issuer, client ID and client secret, choose the scopes, and check the claim mapping.
- You Validate, Test and Activate.
SSOGEN signs people in with the standard authorization-code flow. It checks every ID token it receives: the issuer, the audience (that the token was meant for SSOGEN’s client), the signature against the provider’s published keys, the expiry and a one-time value tied to the sign-in. These checks cannot be switched off.
Part 1: Start the wizard in SSOGEN
Section titled “Part 1: Start the wizard in SSOGEN”- Sign in to the Admin Console and open SSO policies > Identity providers.
- Select Add identity provider. The gallery opens with three groups: Enterprise identity providers, Social sign-in and Generic SAML / OpenID Connect / Directory (LDAP). Choose your provider’s card (for example Keycloak, Microsoft Entra ID or Google), or the generic OpenID Connect tile for a provider that has no card. A card with a template asks for any tenant details it needs (Entra asks for the Directory (tenant) ID) and fills in the issuer and scopes; a card without one fills in only the name. A provider that offers both SAML and OpenID Connect first asks which to use. A card marked Not available (GitHub, Amazon, Facebook, X, Apple) cannot be chosen: SSOGEN does not sign in with that provider yet. The page titled Add OpenID Connect provider opens with seven steps: General, Issuer and discovery, Client credentials, Scopes and claims, Mapping, Test sign-in, Review and activate.
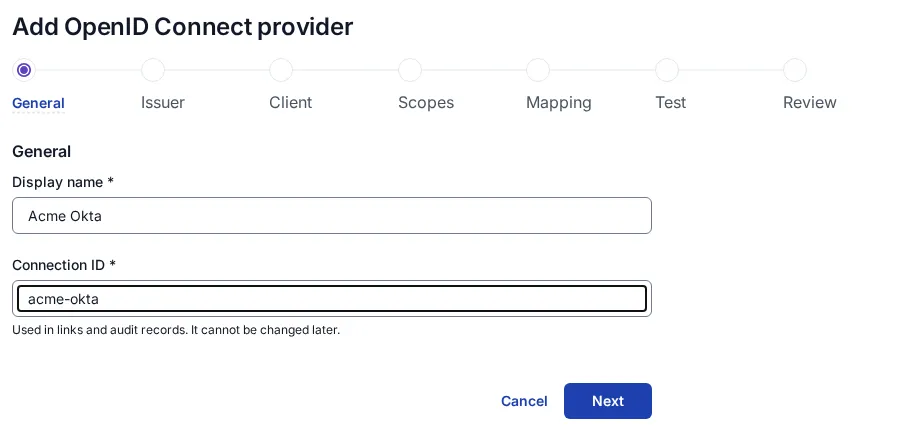
Step 1: General
Section titled “Step 1: General”| Field | What to enter | Example |
|---|---|---|
| Display name (required) | The name people and administrators see. Up to 256 characters. The sign-in button reads “Continue to name”. | Acme Keycloak |
| Connection ID (required) | A short identifier used in links and audit records. It fills in from the display name; you may change it. Lowercase letters, numbers and hyphens, up to 64 characters. It cannot be changed later. | acme-keycloak |
Messages: “Enter a name.”, “Enter an identifier.”, “Use lowercase letters, numbers and hyphens.”, “Use at most 64 characters.”
Step 2: Issuer and discovery
Section titled “Step 2: Issuer and discovery”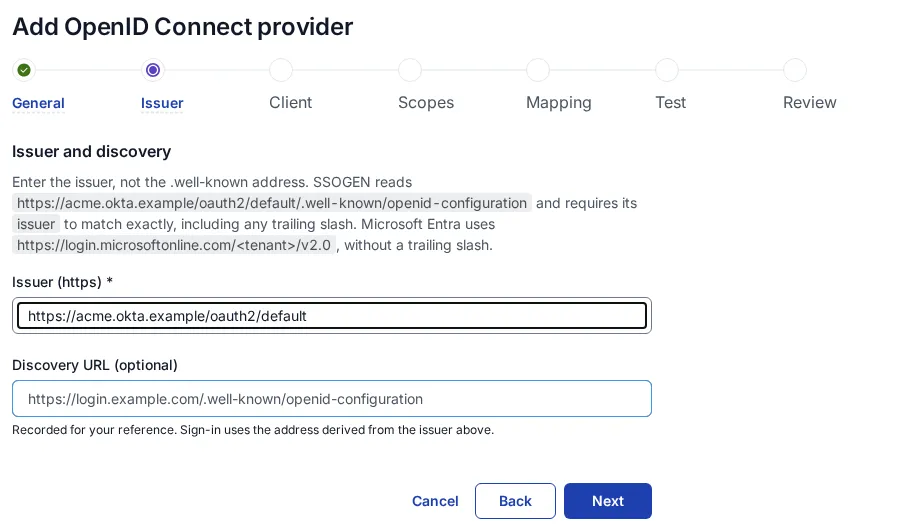
The page explains: “Enter the issuer, not the .well-known address. SSOGEN reads issuer/.well-known/openid-configuration and requires its issuer to match exactly, including any trailing slash. Microsoft Entra uses https://login.microsoftonline.com/
| Field | What to enter | Example |
|---|---|---|
| Issuer (https) (required) | The provider’s issuer, exactly as the provider publishes it. Must start with https://. |
Entra: https://login.microsoftonline.com/00000000-0000-0000-0000-000000000000/v2.0 Keycloak: https://keycloak.acme.example/realms/acme |
| Discovery URL (optional) | Kept for your reference. “Recorded for your reference. Sign-in uses the address derived from the issuer above.” Must start with https:// if given. |
https://keycloak.acme.example/realms/acme/.well-known/openid-configuration |
Entra publishes its issuer with /v2.0 at the end and no trailing slash. The tenant address without /v2.0 is a different document whose issuer is on a different host, so it will not match.
Messages: “Enter the issuer.”, “The issuer must be an https:// address.”, “Enter the issuer itself, not the discovery address. Leave off /.well-known/openid-configuration.”, “The discovery URL must be an https:// address.”
Step 3: Client credentials
Section titled “Step 3: Client credentials”| Field | What to enter | Example |
|---|---|---|
| Client ID (required) | The client ID exactly as the provider shows it. It is an identifier, not a secret, so you type it here. When editing: “Leave blank to keep the current one.” | 0oa1b2c3d4e5f6g7h8i9 |
| Client secret (required) | The provider’s client secret. See below. |
The client secret. The Client secret field takes the secret in one of two ways, and a link under it switches between them:
- Type the secret (the default): “Encrypted when saved, never shown again.” It is stored as this provider’s own secret.
- Use a reference instead lets you enter
secret://env/NAMEorsecret://stored/<id>. Type a client secret instead switches back.
When you edit a provider that already has a secret, the field shows when it was last changed, and a Replace client secret button; leave it alone to keep the current secret. If you change the issuer, a stored secret is only sent to the address it was typed for, so SSOGEN asks you to type it again: “The address changed, and stored secrets are sent only to the address they were typed for. Nothing was saved. Type the secrets again to save.”
Messages: “Enter the client ID.”, “Enter the client secret, or a reference to it.” Other messages you may meet when saving or activating:
| Message | Meaning |
|---|---|
| That environment variable is not allowed as a secret reference. Store the secret under Secrets and use its secret://stored/ reference, or ask an operator to list the variable… | A secret://env/ name that the server does not allow. Use a stored secret. |
| No secret encryption key is configured, so nothing was saved. Use a secret://env/ reference, or ask an operator to configure the key. | The server was installed without its secret-encryption key. |
| That secret belongs to another object and cannot be used here. Type the value instead. | You pointed at a secret owned by another provider. |
| Give the secret once, either as a value or as a reference. | You filled both. |
A box titled Give these to your IdP’s team shows the Redirect URI with a copy button, for example https://sso.acme.example/oidc/rp/acme-keycloak/callback. “Register this at the provider as the redirect or reply URL. These come from this deployment’s canonical origin, which is not necessarily the address you are reading this on.”
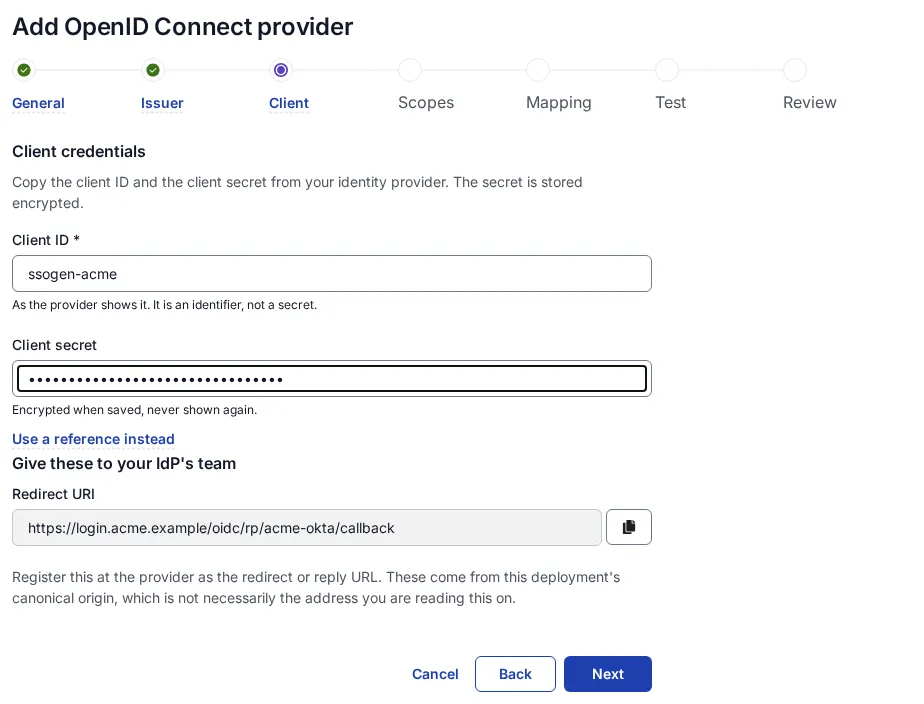
At this point, go and register the client at the provider (Part 2), then come back with the client ID and secret.
Step 4: Scopes and claims
Section titled “Step 4: Scopes and claims”The step says: “openid is required; add other scopes only as needed.”
A two-list picker shows Available and Requested scopes, with buttons to add or remove selected scopes or all of them. Requested starts as openid profile email.
| Scope | What it asks for |
|---|---|
openid |
Required. Asks for an identity rather than API access. It cannot be removed. |
profile |
Name, given name, family name, preferred username. |
email |
Email address, and whether the provider has verified it. |
offline_access |
A refresh token. SSOGEN does not use one. |
groups |
Group membership, where the provider offers it. |
address |
Postal address. |
phone |
Phone number. |
Under A scope this provider defines you can type a scope of your own (for example api://resource/.default) and select Add, or press Enter. A line below shows what will be sent: “Sent to the provider exactly as it reads here, in this order: openid profile email”.
Ask only for what you need. Each extra scope makes the person’s consent screen at the provider longer.
Step 5: Mapping
Section titled “Step 5: Mapping”The step says: “Claims are read automatically; override only if the provider differs.” Name a claim only to override one, for a provider that puts the value somewhere else.
On a new provider this step also holds a Who may sign in box, which sets the provider’s sign-in restriction from the start: Existing accounts only (on by default), Only people from these domains / this tenant (a Claim to check and its Allowed values), Join an existing account by email address (off by default) and Require a verified email address. You can change the restriction later under Sign-in restriction on the provider’s Configuration tab.
| Field | Standard claim used when blank | Use it when |
|---|---|---|
| Sign-in name claim | preferred_username |
The provider keeps the person’s sign-in name in another claim. |
| Mail claim | email |
The email address is in another claim. |
| Display name claim | name |
|
| First name claim | given_name |
|
| Last name claim | family_name |
Below them, Add a mapping adds rows to keep other claims: Source claim and Keep it as (Mobile phone or a Custom attribute you defined under Identity > Attributes; up to 32 rows).
Microsoft Entra note: its preferred_username is the person’s user principal name, which is a good sign-in name, but Entra only sends email if the account has a mailbox or you add the email optional claim (see Part 2).
Step 6: Test sign-in
Section titled “Step 6: Test sign-in”“Saving creates a draft. It serves sign-in once activated.” (When editing: “Saving creates a revision. The active one keeps serving sign-in until you activate it.”) Select Create provider (or Save revision). If saving fails: “Could not save the OpenID Connect provider. Check the issuer, the client ID and the client secret.”
Step 7: Review and activate
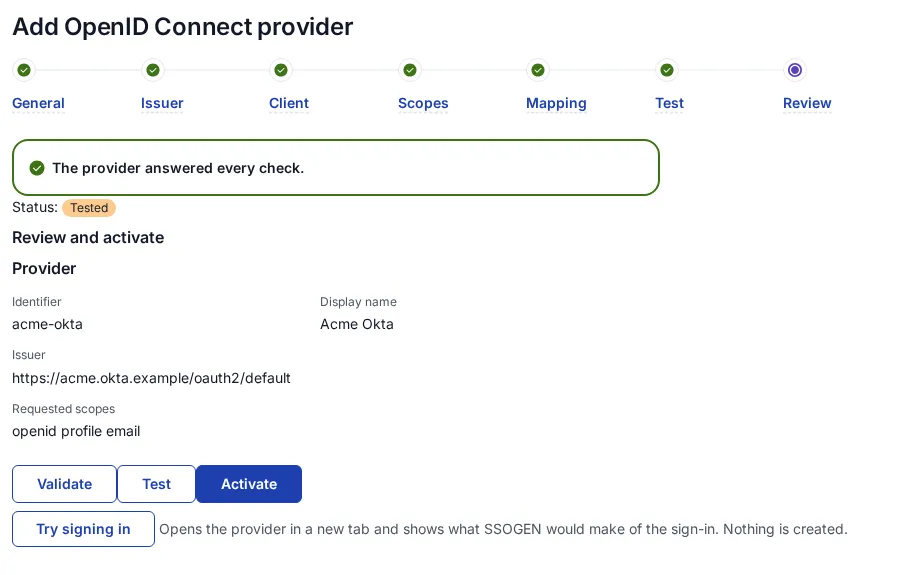
Section titled “Step 7: Review and activate”The page shows a summary (Identifier, Display name, Issuer, Requested scopes) and Status: Draft, with the buttons Validate, Test and Activate, used in that order, as in the SAML guide. After a successful Test the status is Tested and a Try signing in button appears.
Part 2: Register SSOGEN at the other system
Section titled “Part 2: Register SSOGEN at the other system”Microsoft Entra ID (outside SSOGEN)
Section titled “Microsoft Entra ID (outside SSOGEN)”You need the Application Administrator (or higher) role in Entra.
- In the Microsoft Entra admin center (
entra.microsoft.com) go to Identity > Applications > App registrations and select New registration. - Name:
SSOGEN. Supported account types: usually Accounts in this organizational directory only (single tenant). - Redirect URI: choose platform Web and paste SSOGEN’s Redirect URI. Select Register.
- On the Overview page copy the Application (client) ID and the Directory (tenant) ID.
- Go to Certificates & secrets > Client secrets > New client secret. Give it a description and an expiry (note the date: SSOGEN cannot renew it for you, and sign-in stops when it expires). Copy the secret’s Value at once; it is shown only once. Do not copy the Secret ID.
- Optional but recommended: Token configuration > Add optional claim > ID > email, then Add. Accept the prompt to add the Microsoft Graph
emailpermission if asked. This makes Entra send an email address for every person who has one set. - Enterprise applications: find the application in Identity > Applications > Enterprise applications, open Users and groups and assign who may sign in if Assignment required is on (under Properties).
- In SSOGEN:
- Issuer (https):
https://login.microsoftonline.com/<tenant-id>/v2.0. - Paste the Application (client) ID as the Client ID.
- Paste the secret Value into Client secret.
- Issuer (https):
Keycloak (outside SSOGEN)
Section titled “Keycloak (outside SSOGEN)”These steps use the Keycloak admin console of recent versions.
- Open the Keycloak admin console, choose your realm, and go to Clients > Create client.
- Client type:
OpenID Connect. Client ID:ssogen-acme. Name:SSOGEN. Select Next. - Capability config: turn Client authentication On (this makes the client confidential and gives it a secret). Leave Authorization off. Under Authentication flow, keep Standard flow ticked. Select Next.
- Login settings: set Valid redirect URIs to SSOGEN’s Redirect URI exactly. Select Save.
- Open the Credentials tab. Make sure Client Authenticator is Client Id and Secret and copy the Client secret.
- Check that the client’s Client scopes include
emailandprofileas defaults (they are by default). The person needs an email address on their Keycloak account to have one in SSOGEN. - In SSOGEN:
- Issuer (https):
https://keycloak.acme.example/realms/<realm>(your Keycloak address and realm name, with no trailing slash). - Enter the Client ID (
ssogen-acme) as the Client ID. - Paste the client secret into Client secret.
- Issuer (https):
Any other OpenID Connect provider (Okta, Google, Auth0, Ping)
Section titled “Any other OpenID Connect provider (Okta, Google, Auth0, Ping)”- Create a web application (a confidential client) that uses the authorization code flow.
- Set its redirect or reply URL to SSOGEN’s Redirect URI, and allow the scopes
openid,profileandemail. - Note the client ID and client secret.
- Find the issuer: open
<issuer>/.well-known/openid-configurationin a browser and read theissuervalue in it. Give SSOGEN exactly that value.
Part 3: Finish in SSOGEN
Section titled “Part 3: Finish in SSOGEN”- Enter the client ID and client secret on step 3, check the scopes and mapping, and select Create provider.
- On Review and activate select Validate. You see “Validated. Select Test to check the connection, then Activate.”
- Select Test.
What Test checks
Section titled “What Test checks”Test reads the provider’s discovery document and signing keys, then asks the provider’s token endpoint whether it accepts the client ID and secret. A full pass, shown in green, reads “The provider answered every check.”
Some providers only say whether they accept a client ID and secret when a real person signs in. The Microsoft identity platform (Microsoft Entra ID and the Microsoft personal-accounts card) is one: it answers a made-up client ID the same way as a correct one. A public client with no secret is another case. Then Test passes but is shown as a warning, in amber: “The provider’s discovery document and signing keys are in order. The client ID and secret could not be verified until a real sign-in. Try a sign-in to confirm them before people use this provider.” Select Try signing in before you activate: a wrong client ID or secret then shows as a red result.
SSOGEN contacts only the issuer’s own host for the provider’s sign-in, token and key addresses. Google publishes its token and key addresses on its own googleapis.com hosts, and SSOGEN accepts exactly those for the issuer https://accounts.google.com. This exception is built in and cannot be changed.
| Message | Fix |
|---|---|
| The discovery document could not be read. Check the issuer URL. | Typo, or SSOGEN’s server cannot reach the provider. Open <issuer>/.well-known/openid-configuration from the SSOGEN server’s network. |
| The provider reports a different issuer. Enter it exactly as the provider publishes it. | Copy the issuer value from the discovery document, including any /v2.0 or trailing slash. |
| The provider’s discovery document names a sign-in, token or key endpoint SSOGEN may not contact: on another host than the issuer’s, not HTTPS, or a private address. Check with the provider that the issuer is the one they publish. | The document was read, but one of its addresses is somewhere SSOGEN does not send sign-ins or secrets. Check that the issuer is the provider’s published one. |
| The provider’s signing keys could not be read or are not usable. | The provider’s key address is not reachable or returns no keys. |
| The provider refused the client id or secret. | Check the client ID you entered and the secret’s value; check the secret has not expired. |
| The client id or secret could not be read from its reference. Check the stored secret or variable. | The reference is wrong or was deleted. |
Try signing in
Section titled “Try signing in”Select Try signing in (on the wizard) or Try connection (on the provider’s page). A new tab opens at the provider. Sign in as a test person in the same browser. SSOGEN shows a result page and creates nothing: “It works. The provider signed in and SSOGEN understood the answer (time). Nothing was created.” with Signed in as, What the provider sent, What SSOGEN keeps and Strength sections, as in the SAML guide.
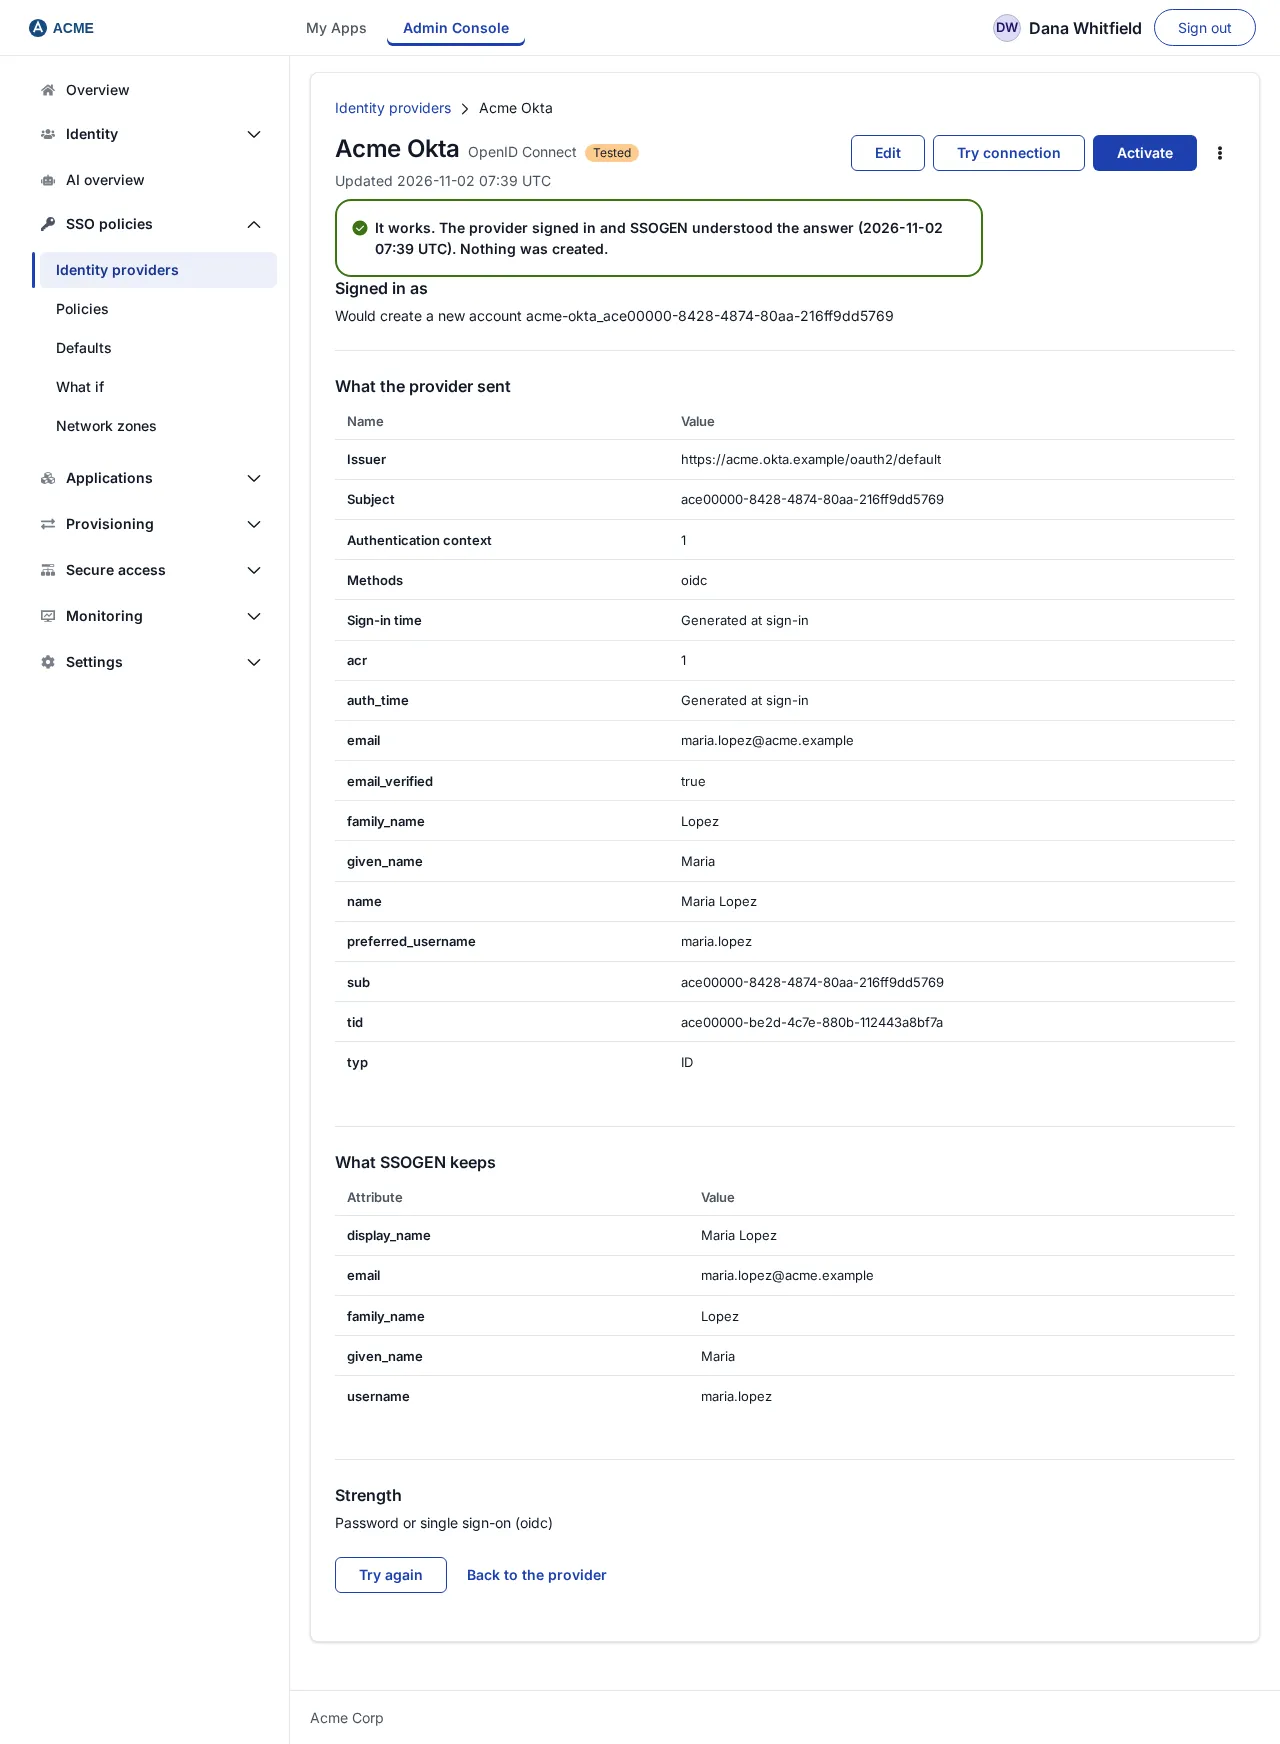
If the result is red, the message names the cause:
| Message | Fix |
|---|---|
| The provider named a different issuer. It must match exactly, including any trailing slash. | Correct the Issuer. |
| The ID token was issued for a different client. Check the client ID. | The client ID entered is not the one for this application at the provider. |
| The provider refused the authorization code. Check the client secret and that the redirect URI is registered. | Wrong or expired secret, or the redirect URI is missing at the provider. |
| The provider rejected the redirect URI. Register the one shown on this provider. | Add exactly the Redirect URI under the provider’s allowed redirects. |
| The provider rejected the client credentials. Check the client ID and secret. | |
| The ID token’s signature did not verify against the provider’s keys. Check the provider’s key set. | |
| The ID token had already expired. Check that this server’s clock is correct. | Fix the server clock. |
| The provider sent no subject, so SSOGEN cannot tell who signed in. | The provider is not returning a standard ID token. |
| The provider did not send an attribute this connection requires. See What SSOGEN keeps below. | Add the scope or claim at the provider, or correct the Mapping. |
| The provider did not send the “tid” claim with a value this provider’s sign-in restriction allows (it may be missing). Make the provider send it, or admit this account by changing the allowed values under Configuration, Sign-in restriction on this provider. | A required claim of the sign-in restriction is missing or has another value. The Microsoft Entra ID card requires tid, your tenant ID: sign in with an account of that tenant. |
| This provider’s sign-in restriction does not admit this person, who has no account here yet. … | Create the account first, or change Who may sign in under Configuration, Sign-in restriction. |
| Sign-in finished in a different browser; the test was discarded. Start again in this browser. | Run it again in one browser. |
| The provider reused an existing session, so the result may describe someone else. Sign out at the provider or use a private window, then try again. | Sign out at the provider or use a private window. |
| Too many test sign-ins in a minute. Wait n seconds and try again. |
Activate
Section titled “Activate”Select Activate. The provider appears on the sign-in page (subject to policy) and its status is Active. Activation and policy are covered in Identity providers and Policies.
Part 4: The provider’s page
Section titled “Part 4: The provider’s page”After activation the provider’s page opens. Its Configuration tab has the same sections as a SAML provider: Sign-in page (Sign-in order, Sign-in domains; see Add a SAML identity provider, Part 4 and The sign-in page), Signing out, and Attributes this provider may send on. In addition, under Connection you find the Issuer, Client ID, and a section Register at the provider with the Redirect URI to copy again and Reads metadata from: “Derived from the issuer, not configured separately. The issuer that document publishes must equal the issuer above exactly, or sign-in is refused.”
The same Sign-in page section holds Account matching, which joins a sign-in to an existing account with the same email address. It is off by default, needs a super administrator and a sign-in restriction on the provider, and is explained in Identity providers: account matching.
Two more cards sit below it on the same tab. New people from this provider sets the User type for new people and the group new people are added to (Add new people to group); it applies to people created from now on, not to people who already exist. Second factor after sign-in with this provider decides whether SSOGEN trusts the provider’s own multi-factor sign-in or asks for its own second factor; a new provider starts at Always ask for SSOGEN’s second factor. See Identity providers.
For Signing out, Post-logout URL and Also sign out of this provider work as for SAML. For OpenID Connect the provider’s sign-out address is its end_session_endpoint, taken from its discovery document (the IdP SLO URL option), or you can choose Custom provider SLO URL (for Entra, https://login.microsoftonline.com/<tenant-id>/oauth2/v2.0/logout). If you turn it on without an address: “Signing out of the provider needs the address where it accepts a sign-out. The provider publishes it as end_session_endpoint.” When SSOGEN signs a person out of the provider, it asks the provider to send the browser back to SSOGEN’s own /logout/complete address, and SSOGEN then forwards the person to your Post-logout URL. If the provider only returns people to addresses registered for the client, register your SSOGEN address followed by /logout/complete as an allowed post-logout redirect at the provider. Your Post-logout URL itself is not registered there.
Check that it works
Section titled “Check that it works”Before the first sign-in decide who may arrive. A new provider is set to Only people who already have an account here: Maria is turned away, with a general message and a reference code, unless her account exists. Either create it under Identity > Users first, or open the provider’s Configuration tab, set Sign-in restriction to Anyone this provider vouches for (a new account is created), add a required claim so only your people qualify, and select Save sign-in restriction.
- Open a private window and go to
https://sso.acme.example/. - Choose the provider (or enter a sign-in-domain email, see The sign-in page). The button reads “Continue to Acme Keycloak”.
- Sign in at the provider as Maria Lopez. You arrive in My Apps as Maria Lopez.
- In the Admin Console open Identity > Users: Maria’s account is there. It was created at her first sign-in if you chose Anyone this provider vouches for; otherwise it is the account you made first.
When the client secret expires
Section titled “When the client secret expires”Provider secrets expire. Before the date, create a new secret at the provider. In SSOGEN select Edit on the provider, go to Client credentials, select Replace client secret, paste the new value, run through to Save revision, then Validate, Test and Activate the revision. People keep signing in on the old secret until you activate the revision, so create the new secret before the old one expires and activate before then.
If activating a revision says “A secret this revision needs was removed by a later revision. Type it again below to activate.”, a box titled “Type again to activate revision n” appears. Type the secret there.
Troubleshooting
Section titled “Troubleshooting”| What you see | Likely cause |
|---|---|
| “A client ID is required before activation.” | The client ID is empty. Edit the provider and add it. |
| “This provider has not passed Validate and Test yet. Select Validate, then Test, then Activate.” | Run the steps in order. |
| After sign-in the person lands at the sign-in page with “Sign-in was not completed” | The provider returned an error or the person canceled. The page may show a reference; give it to your administrator. |
| People are created without an email address | The provider did not send email. Add the email scope and the claim at the provider, or map the right claim under Mapping. |